


Tag: Mac
Check out our Mac tutorial section where you'll find many articles on how to set up email on many version of Macs.
How to Access Your Windows Server Using Remote Desktop
In this article, we explain how to use Remote Desktop software to access your Windows server’s desktop from anywhere in the world. On a normal Windows computer, you have a keyboard, monitor, and mouse that allow you to interact with the machine. For Windows VPS servers hosted on the Internet, things are a bit different because your server could physically be thousands of miles away. To access the desktop of an Internet-hosted server, Microsoft has created a feature known as Remote Desktop.
How To Set Up Email in Outlook 2016 for Mac
Pre-Flight Check
- These instructions are intended specifically for setting up a new email account in Microsoft Outlook 2016 for Mac OS X 10.11.3.
- If you have not already created an email address on your server, visit our New User Tutorial: Creating E-Mail Addresses in cPanel.
- If you need to configure your email address in Outlook 2016 for Microsoft Windows, see How To Set Up Email in Outlook 2016. For other mail clients, check out our tutorial on setting up other email clients.
How To Modify an Existing Email Account in Thunderbird
Pre-Flight Check
- These instructions are intended specifically for setting up an email account in Mozilla Thunderbird 38.3.0 on Mac OS X 10.11.1.
- While the steps should be similar across platforms and operating systems, they may not necessarily apply to older versions of Thunderbird.
- For help with general email account settings, see How to Set up Any Email Client.
You can edit an email account that already has been configured in Thunderbird, for example should you decide to switch between non-SSL and SSL settings or change the server’s connection port. You change the connection type between standard (non-SSL) and secure (SSL) by changing the hostname and port for the incoming and outgoing servers.
Pre-Flight Check
- These instructions are intended specifically for setting up a new email account on Mac Mail under OS X 10.11.1 (El Capitan).
- Need instructions for an older version? Try How To Set up Email in OS X 10.5.
- For help with general email account settings, see How To Set up Any Email Client.
Step #1: Create the Account
- Launch Mail by clicking on its icon in the dock. Under the Mail menu, select Add Account.
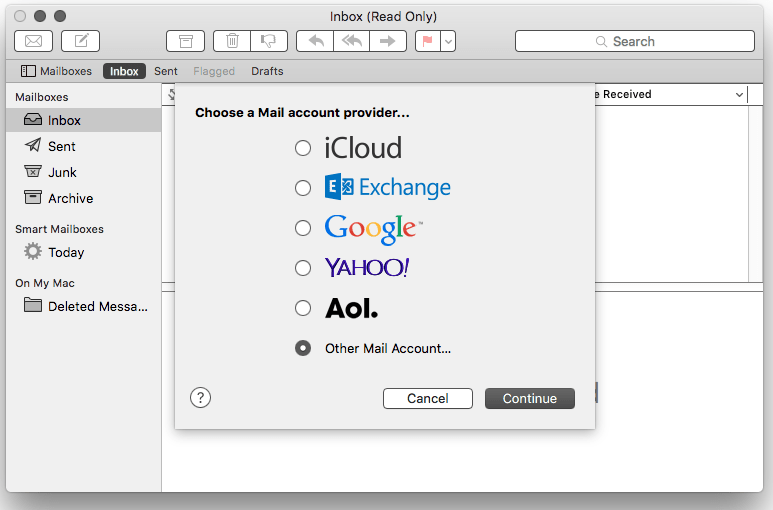
- On the “Choose a Mail account provider” screen, select the radio button next to Other Mail Account and click the Continue button.
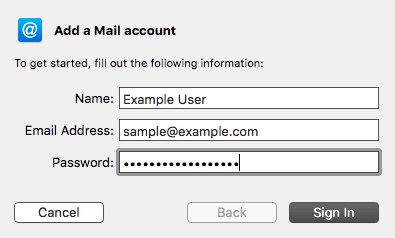
- On the Add a Mail Account screen, enter your name, the email address and the email account’s password.
Step #2: Account Settings
- At this point, you should see an additional popup window with a place for you to add additional settings.
- You will need to ensure that all the fields are completed:
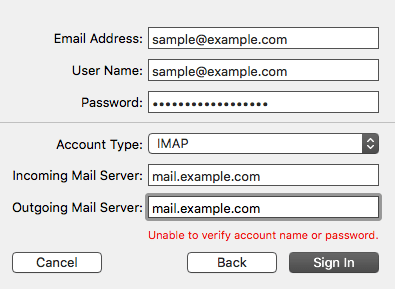
- Email Address is the full email address you’re setting up.
- Username also is the full email address.
- Password is the email account’s password.
- Account Type will be IMAP or POP, depending on your preference. For its ability to keep email in sync across multiple devices (desktop, laptop, phones and tablets), IMAP generally is recommended.
- Incoming and Outgoing Mail Server
- If you are using non-SSL settings, both the Incoming Mail Server and Outgoing Mail Server will be your domain name: mail.yourdomainname.com (or simply yourdomainname.com).
- If you are using SSL settings, both the Incoming Mail Server and Outgoing Mail Server will need to be set to the server’s hostname (e.g., host.yourdomainname.com).
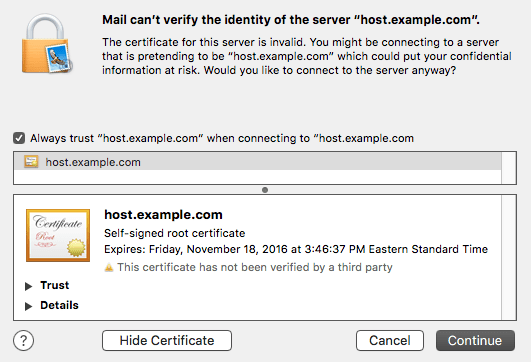
Step #3: Security Settings
- If you set up the email account with standard connection settings (mail.yourdomainname.com), or you set up the account with secure SSL settings and have an SSL certificate installed on your mail server, you can skip this section and proceed to Step 4. However, if you’re using SSL settings (host.yourdomainname.com) and your server has a self-signed (free) SSL certificate installed on the mail server, you should see a popup notification about the server certificate:
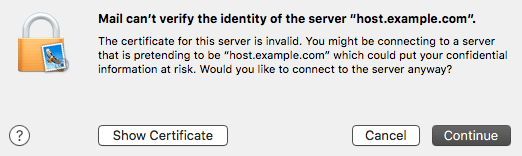
- If you receive this notification, you will need to click either the Continue button to accept the certificate and proceed, or the Show Certificate button to inspect it. Should you wish to permanently store the certificate and add it to the Keychain, you can check the Always trust box before selecting Continue. Depending on your security settings, choosing to permanently store the certificate could require you to enter your password to add it to the Keychain.
-
Note: A self-signed certificate uses the same level of encryption as a verified certificate, except that it is you who are verifying your server’s identity, rather than a third party. However, if you would prefer to use a third party verified SSL certificate to cover core services (cPanel/WHM, POP3, IMAP, SMTP and FTP) on your server, you can find instructions for ordering and installing an SSL certificate at install an SSL certificate on a Domain using cPanel, and you’ll find a guide to installing your certificate on email and other core server services at Installing Service SSLs in cPanel. Should you find that you need any assistance, please feel free to contact a Heroic Support® technician who can assist with obtaining and installing an SSL from the vendor of your choice.
Step #4: Finishing Up
- Ensure that the box next to mail is checked and then click on Done to complete the setup.
- You’re now ready to begin using your email account with mail.
Pre-Flight Check
- These instructions are intended specifically for modifying an existing email account in Mac Mail on OS X 10.11.1 (El Capitan).
- Need instructions for an older version? Try How To Set up Email in OS X 10.5.
- For help with general email account settings, see How To Set up Any Email Client.
You can edit an email account that already has been configured in Mail, for example should you decide to switch between non-SSL and SSL settings or update the password.
How To Set up Any Email Client
Setting up an email client for the first time can seem a little complicated, but once you know a few key pieces of information, you can get almost any client up and running quickly.
Starting with Mac OS X 10.6, it is now possible to connect to a Cisco IPSec VPN without having to download any extra software.
Full email message headers provide invaluable information when trying to track down a problem. Just a few of the items included in the headers are:
The Whois command is used to collect information about a domain including who owns the domain, basic contact information for the domain owner, and the nameservers that the domain is using.
If you contact support regarding an e-mail problem one of the questions we will ask you is how you are accessing your e-mail. If you are using a client such as Outlook, Outlook Express, Thunderbird, Mac OS X Mail, or any other modern e-mail application we will ask if you are using POP3 or IMAP for your incoming e-mail.
Our Sales and Support teams are available 24 hours by phone or e-mail to assist.