How to Install Jenkins on CentOS 8
What is Jenkins?
Jenkins is an open-source software written in Java and Scala. This software allows users the ability to automate almost any task and, it saves significant time that can be better utilized addressing other issues. When automating tasks with Jenkins, users can optimize their workflow by quickly automating the jobs that servers cannot do themselves. In this tutorial, we will learn how to install Jenkins on CentOS 8. We will also explore what its purpose is and share several benefits that Jenkins offers. We will then configure it to run on our CentOS 8 server.
Why Use Jenkins?
If you have studied DevOps roles in the past, you have come across the term CI/CD. The first acronym CI stands for Continuous Integration and refers to the automatic assembly and testing of code (i.e., When we write the code, we collect all the settings, additional libraries, frameworks, and the code itself into a ready-to-run application). Continuous Deployment or CD refers to continuous deployment of applications on a server to run them.
There is also another aspect that is used in conjunction with Continuous Delivery. This term implies the continuous application delivery to the server. The most significant difference between the two is Continuous Deployment denotes an automated process, while Continuous Delivery indicates a manual process. These processes are often repeated to automate them to the greatest extent possible, thereby simplifying the workload, reducing the number of errors, and, more importantly, speeding up the deployment process.
Jenkins is the tool that can accomplish these processes and functions. Moreover, it not only easily achieves this level of competence but also excels in these tasks. The most significant benefits Jenkins offers are as follows:
- Jenkins is a free and open-source application.
- Its ease of configuration is extended to encompass multiple environments.
- It has an outstanding track record of stability and longevity.
- Jenkins is platform-independent, so it works in almost every environment.
- Jenkins supports cloud-native environments.
- It offers a substantial number of tools and plugins, which increases its functionality.
- Jenkins can use a dual mode of operation within two or more different environments.
- It has a significant community base, which increases the availability of support options and documentation.
Install Jenkins on CentOS 8
Prerequisites
In this tutorial, we require the following preferences to complete this process.
- 2 GB RAM and a dual-core server.
- The CentOS 8 Operating System
First, we will update our system and installed applications by running the following command:
[root@host]# dnf update -y
 Last metadata expiration check: 0:00:06 ago on Sun 27 Dec 2020 03:25:00 PM EST.
 Dependencies resolved.
 Nothing todo.
 Complete!
 [root@host]#
Install JDK
For Jenkins to work effectively, we need to install the Java Development Kit (The JDK is a Java application development kit that includes a Java compiler (javac), the standard Java class libraries, and the accompanying JRE documentation). Newer versions of Jenkins use JDK 11, but some plugins that were written earlier may not be compatible with Java 11, so in some cases, it is better to use Java 8. If the server already has JDK installed, the next steps can be skipped. In this step, we install JDK 8 using the following command.
 [root@host]# dnf install java-1.8.0-openjdk-devel -y
 Last metadata expiration check: 0:01:24 ago on Sun 27 Dec 2020 03:32:26 PM EST.
 Dependencies resolved.
 =====================================================
  Package Arch Version Repo Size
 =====================================================
 Installing:
  java-1.8.0-openjdk-devel x86_64 1:1.8.0.272.b10-3.el8_3 appstream 9.8 M
 Installing dependencies:
  copy-jdk-configs noarch 3.7-4.el8 appstream 27 k
  java-1.8.0-openjdk x86_64 1:1.8.0.272.b10-3.el8_3 appstream 329 k
  java-1.8.0-openjdk-headless x86_64 1:1.8.0.272.b10-3.el8_3 appstream 34 M
  javapackages-filesystem noarch 5.3.0-1.module_el8.0.0+11+5b8c10bd
  appstream 30 k
  lksctp-tools x86_64 1.0.18-3.el8 baseos 100 k
  ttmkfdir x86_64 3.0.9-54.el8 appstream 62 k
  tzdata-java noarch 2020d-1.el8 appstream 190 k
  xorg-x11-fonts-Type1 noarch 7.5-19.el8 appstream 522 k
 Enabling module streams:
  javapackages-runtime 201801
 Transaction Summary
 =====================================================
 Install 9 Packages
 Total download size: 45 M
 Installed size: 160 M
 Downloading Packages:
 (1/9): copy-jdk-configs-3.7-4.el8.noarch.rpm 2.0 MB/s | 27 kB 00:00
 (2/9): java-1.8.0-openjdk-1.8.0.272.b10-3.el8_3 3.9 MB/s | 329 kB 00:00
 (3/9): javapackages-filesystem-5.3.0-1.module_e 2.9 MB/s | 30 kB 00:00
 (4/9): ttmkfdir-3.0.9-54.el8.x86_64.rpm 1.5 MB/s | 62 kB 00:00
 (5/9): tzdata-java-2020d-1.el8.noarch.rpm 2.6 MB/s | 190 kB 00:00
 (6/9): xorg-x11-fonts-Type1-7.5-19.el8.noarch.r 2.7 MB/s | 522 kB 00:00
 (7/9): lksctp-tools-1.0.18-3.el8.x86_64.rpm 1.3 MB/s | 100 kB 00:00
 (8/9): java-1.8.0-openjdk-devel-1.8.0.272.b10-3 4.7 MB/s | 9.8 MB 00:02
 (9/9): java-1.8.0-openjdk-headless-1.8.0.272.b1 7.1 MB/s | 34 MB 00:04
 --------------------------------------------------------------------
 Total 8.3 MB/s | 45 MB 00:05
 Running transaction check
 Transaction check succeeded.
 Running transaction test
 Transaction test succeeded.
 Running transaction
 …
 Installed:
   copy-jdk-configs-3.7-4.el8.noarch
   java-1.8.0-openjdk-1:1.8.0.272.b10-3.el8_3.x86_64
   java-1.8.0-openjdk-devel-1:1.8.0.272.b10-3.el8_3.x86_64
   java-1.8.0-openjdk-headless-1:1.8.0.272.b10-3.el8_3.x86_64
   javapackages-filesystem-5.3.0-1.module_el8.0.0+11+5b8c10bd.noarch
   lksctp-tools-1.0.18-3.el8.x86_64
   ttmkfdir-3.0.9-54.el8.x86_64
   tzdata-java-2020d-1.el8.noarch
   xorg-x11-fonts-Type1-7.5-19.el8.noarch
 Complete!
[root@host]#
Verify JDK Installation
To verify that the software installed correctly, run this command.
 [root@host]# java -version
 openjdk version "1.8.0_272"
 OpenJDK Runtime Environment (build 1.8.0_272-b10)
 OpenJDK 64-Bit Server VM (build 25.272-b10, mixed mode)
 [root@host]#
Add the Jenkins Repository
Next, we will add the official repository for Jenkins to our system.
 [root@host]# wget -O /etc/yum.repos.d/jenkins.repo http://pkg.jenkins-ci.org/redhat-stable/jenkins.repo
 --2020-12-27 15:36:56-- http://pkg.jenkins-ci.org/redhat-stable/jenkins.repo
 Resolving pkg.jenkins-ci.org (pkg.jenkins-ci.org)... 52.202.51.185
 Connecting to pkg.jenkins-ci.org (pkg.jenkins-ci.org)|52.202.51.185|:80... connected.
 HTTP request sent, awaiting response... 200 OK
 Length: 85
 Saving to: '/etc/yum.repos.d/jenkins.repo'
 /etc/yum.repos.d/je 100%[===================>] 85 --.-KB/s    in 0s
 2020-12-27 15:36:56 (24.7 MB/s) - '/etc/yum.repos.d/jenkins.repo' saved [85/85]
 [root@host]#
Verify Security Key
Next, we will add a key to verify repository security.
 [root@host]# rpm --import https://pkg.jenkins.io/redhat-stable/jenkins.io.key
 [root@host]#
Update packages
Now we will rerun our update so the new repository is recognized and available.
 [root@host]# yum update
 Jenkins-stable 58 kB/s | 19 kB 00:00
 Dependencies resolved.
 Nothingtodo.
 Complete!
 [root@host]#
Install Jenkins
Now that all of our initial conditions have been met, we can install Jenkins.
 [root@host]# yum install jenkins -y
 Last metadata expiration check: 0:01:43 ago on Sun 27 Dec 2020 03:38:25 PM EST.
 Dependencies resolved.=================================================== Package Architecture Version Repository Size===================================================
 Installing:
  jenkins noarch 2.263.1-1.1 jenkins 64 M
 Transaction Summary===================================================
 Install 1 Package
 Total download size: 64 M
 Installed size: 64 M
 Downloading Packages:
 jenkins-2.263.1-1.1.noarch.rpm 7.4 MB/s | 64 MB 00:08    --------------------------------------------------------------------------
 Total 7.4 MB/s | 64 MB 00:08
 Running transaction check
 Transaction check succeeded.
 Running transaction test
 Transaction test succeeded.
 Running transaction
   Preparing : 1/1
   Running scriptlet: jenkins-2.263.1-1.1.noarch 1/1
   Installing : jenkins-2.263.1-1.1.noarch 1/1
   Running scriptlet: jenkins-2.263.1-1.1.noarch 1/1
   Verifying : jenkins-2.263.1-1.1.noarch 1/1
 Installed products updated.
 Installed:
   jenkins-2.263.1-1.1.noarch
 Complete!
 [root@host]#
Configure the Jenkins Service
Jenkins has been installed. Let’s start the service and configure it to run automatically when the system is rebooted.
Restart the Service
 [root@host]# systemctl daemon-reload
 [root@host]#
Start the Jenkins Service
 [root@host]# systemctl start jenkins
 [root@host]#
 Now, we can check the service status of Jenkins.
 [root@host]# systemctl status jenkins
  jenkins.service - LSB: Jenkins Automation Server
    Loaded: loaded (/etc/rc.d/init.d/jenkins; generated)
    Active: active (running) since Sun 2020-12-27 15:53:57 EST; 22s ago
      Docs: man:systemd-sysv-generator(8)
   Process: 4942 ExecStart=/etc/rc.d/init.d/jenkins start (code=exited, status=0>
     Tasks: 45 (limit: 49357)
    Memory: 992.9M
    CGroup: /system.slice/jenkins.service
            └─4968 /etc/alternatives/java -Dcom.sun.akuma.Daemon=daemonized -Dja>
 Dec 27 15:53:57 localhost.localdomain systemd[1]: Starting LSB: Jenkins Automat>
 Dec 27 15:53:57 localhost.localdomain runuser[4949]: pam_unix(runuser:session):>
 Dec 27 15:53:57 localhost.localdomain runuser[4949]: pam_unix(runuser:session):>
 Dec 27 15:53:57 localhost.localdomain jenkins[4942]: Starting Jenkins [ OK ]
 Dec 27 15:53:57 localhost.localdomain systemd[1]: Started LSB: Jenkins Automati>
 lines 1-15/15 (END)
 The specific lines noted below are important factors we should be aware of from the command’s output.
 jenkins.service - LSB: Jenkins Automation Server
    Loaded: loaded (/etc/rc.d/init.d/jenkins; generated)
    Active: active (running) since Sun 2020-12-27 15:53:57 EST; 22s ago
Configure and Reload the Firewall
Next, we need to configure the firewall so Jenkins can communicate with the servers. The software uses port 8080, so we will open that port in the firewall.
 [root@host]# firewall-cmd --permanent --zone=public --add-port=8080/tcp
 success
 [root@host]#
Now, we can reload the firewall, so our changes take effect.
 [root@host]# firewall-cmd --reload
 success
 [root@host]#
Configure Jenkins
Now we move on to editing the Jenkins configuration to define how it will run.
First, we need to retrieve our server’s IP address. Enter the following command to find this information.
 [root@host]# ifconfig
 enp0s3: flags=4163<UP,BROADCAST,RUNNING,MULTICAST> mtu 1500
         inet 192.168.50.189 netmask 255.255.255.0 broadcast 192.168.50.255
         inet6 fe80::93ba:cfae:bd1f:6ad7 prefixlen 64 scopeid 0x20<link>
         ether 08:00:27:07:29:a0 txqueuelen 1000 (Ethernet)
         RX packets 89276 bytes 133684641 (127.4 MiB)
         RX errors 0 dropped 0 overruns 0 frame 0
         TX packets 43642 bytes 2850349 (2.7 MiB)
         TX errors 0 dropped 0 overruns 0 carrier 0 collisions 0
 [root@host]#
Pay close attention to the inet line as we will need the IP shortly.
inet 192.168.50.189
Next, we open a browser and enter the following address using the IP obtained from the inet line.
http://YOUR_IP:8080
In our case, it looks like this.
http://192.168.50.189:8080
You will need to use the IP provided when you run the ifconfig command. Do not use the 192.168.50.189 IP.
Locate Administrative Password
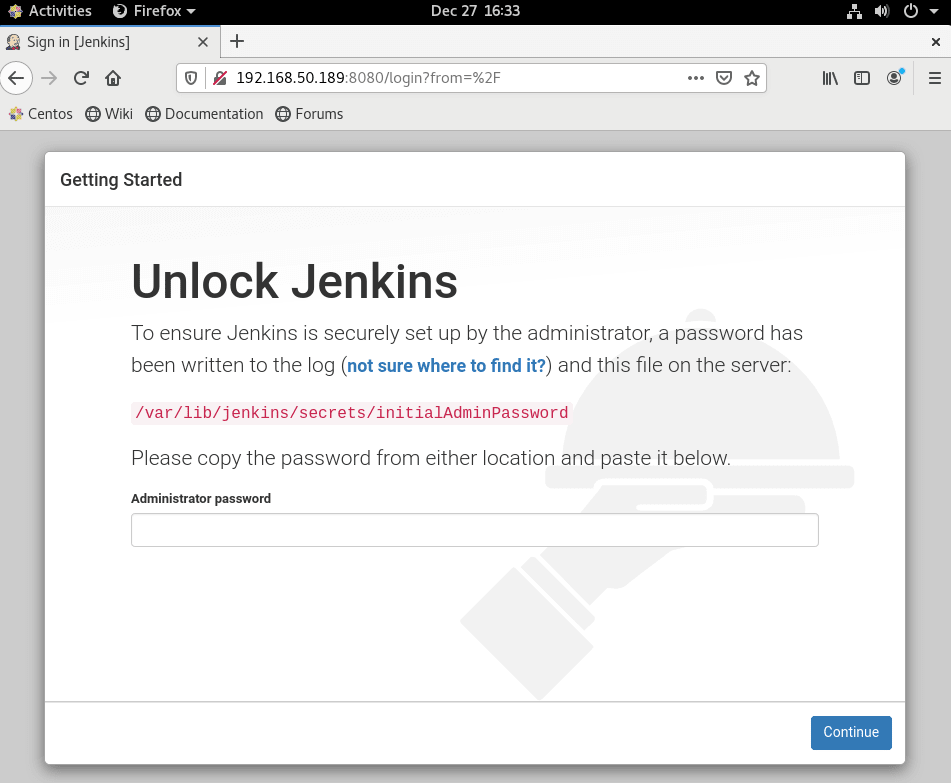
After we enter the info in our address bar, the following screen will appear.

Here we enter the administrator password. The password is self-generated, and we can obtain it using the following command.
 [root@host]# cat /var/lib/jenkins/secrets/initialAdminPassword
 ee31e4195008434691d24d451bef2e2b
 [root@host]#
Copy the long password output from the command and paste it into the password field.

Next, click Continue.
Load Plugins
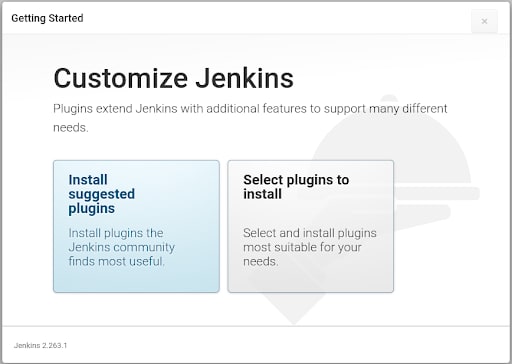
Now, we need to load our plugins. On the next screen, select “Install suggested plugins” and wait until that process completes.

Once the installation completes, we will see a pop-up window that helps create the administrator user.
Fill in the requested information to complete this step.

Click “Save and Continue.” We need to indicate which URL we will use to go to the settings interface on the next screen. In our setup, we use the address http://192.168.50.189:8080 from our earlier data.

Click Save and Finish.
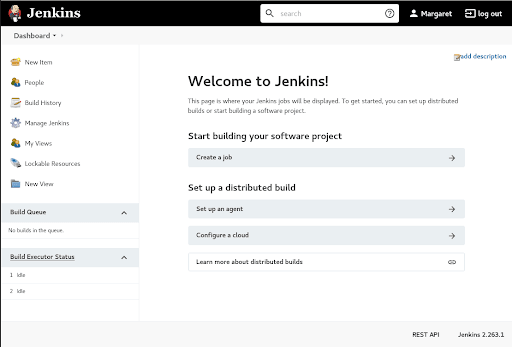
Next, click on the Start using Jenkins button. Then, click on Start, and the Jenkins dashboard opens.

The Jenkins installation and configuration is now complete.

Conclusion
To recap, Jenkins is an open-source, free automation tool used to help automate many parts of the software development process related to building, testing, and deployment of software. It allows us to facilitate and improve upon the CI/CD (Continuous Integration and Continuous Delivery) procedures via a stable methodology system. We learned what Jenkins is used for and why it is a beneficial software to employ in multiple situations. We installed the JDK package to work with Jenkins and then we configured the official repository for the download and installed the Jenkins software. Furthermore, we configured the Jenkins service, launched it, created a user, and set it up for further use. Lastly, we demonstrated how to manage it from within a browser.
Our Support Teams are full of talented Linux professionals who have intimate knowledge of multiple web hosting technologies, including those discussed in this article. If you are a Fully Managed VPS server, Cloud Dedicated, VMWare Private Cloud, Private Parent server or a Dedicated server owner, and you are uncomfortable with performing any of the steps outlined, we can be reached via phone @800.580.4985, a chat or support ticket to assisting you with this process.
Related Articles:

About the Author: Margaret Fitzgerald
Margaret Fitzgerald previously wrote for Liquid Web.
Our Sales and Support teams are available 24 hours by phone or e-mail to assist.
Latest Articles
In-place CentOS 7 upgrades
Read ArticleHow to use kill commands in Linux
Read ArticleChange cPanel password from WebHost Manager (WHM)
Read ArticleChange cPanel password from WebHost Manager (WHM)
Read ArticleChange the root password in WebHost Manager (WHM)
Read Article


