Installing Jenkins on Ubuntu 16.04
What Is Jenkins?
Jenkins is an open source automation server software developed in Java. It allows developers to integrate CI/CD (Continuous Integration/Continuous Delivery) pipelines within their organization that ease and automate workflows. It has an extensive help community, supports over 1000 plugins, allows users the ability to automate almost any task and, it saves significant time that can be better utilized addressing other issues.
When automating tasks with Jenkins, users can optimize their workflow by quickly automating the jobs that servers are not able to do themselves. Jenkins has a wide array of features including building projects, executing unit tests for bug detection, analyzing static code, and deploying applications. For this article, we will learn how to install Jenkins on a Ubuntu 16.04 server using APT (Advanced Package Tool). When using APT, we can retrieve and install all of the needed dependencies as well.
Pre-Flight Checks:
- Ubuntu 16.04 server with a sudo user setup
- Java 8 installed on the server
Hardware Requirements
Minimum:
- 256 MB of RAM
- 1 GB of available disk space (10 GB is recommended for containers)
Recommended:
- 1 GB of RAM
- 50 GB+ disk space
Step 1 – Install the Jenkins Ubuntu Package
First, let’s add the GPG key to our package manager so that it can verify the authenticity of the files.
admin@host:~$ wget -q -O - https://pkg.jenkins.io/debian/jenkins-ci.org.key | sudo apt-key add –
If done correctly, the terminal will return the message “OK”.
admin@host:~$ wget -q -O - https://pkg.jenkins.io/debian/jenkins-ci.org.key | sudo apt-key add –

OK
Next, add the Debian package repository for Jenkins to the system’s APT source list.
admin@host:~$ sudo sh -c 'echo deb http://pkg.jenkins.io/debian-stable binary/ > /etc/apt/sources.list.d/jenkins.list'
Once we add that repository, let’s resynchronize the package list so that we can retrieve the Jenkins Ubuntu package using the newly added repository.
admin@host:~$ sudo apt-get update
Note: If you receive a “jenkins : Depends: daemon but it is not installable”, error, execute the following command:
admin@host:~$ sudo add-apt-repository universe
Finally, install Jenkins and all its dependencies using the APT package manager.
admin@host:~$ sudo apt-get install jenkins
Step 2 – Starting the Jenkins Service
To start the Jenkins system service, run the following command:
admin@host:~$ sudo service jenkins start
Note: The Jenkins default port is 8080. If you have services using this port already, you will want to adjust this setting to an unused port in the configuration file and restart the service. This config is located here:
admin@host:~$ /etc/default/jenkins folder
Setting to change:
HTTP_PORT=8080
Next, verify that Jenkins is running by executing the following command:
admin@host:~$ sudo service jenkins status
Expected Output:

Step 3 – Opening the firewall port for Jenkins
Note: If a different port was previously chosen in step 2, you would need to adjust the following command to that Jenkins port chosen earlier.
If your server is using UFW as the firewall frontend, run the following command:
admin@host:~$ sudo ufw allow 8080
If you are simply using IPTables as the firewall, run the following command:
admin@host:~$ sudo iptables -A INPUT -i eth0 -p tcp --dport 8080 -j ACCEPT
Step 4 – Accessing Jenkins
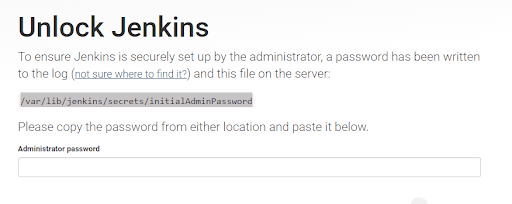
Jenkins is accessible by default at <Server-IP>:8080. When Jenkins is initially set up, it must be unlocked to access its use.

You can retrieve the randomly generated administrator password by running the following command:
admin@host:~$ cat /var/lib/jenkins/secrets/initialAdminPassword
Example Output:
![]()
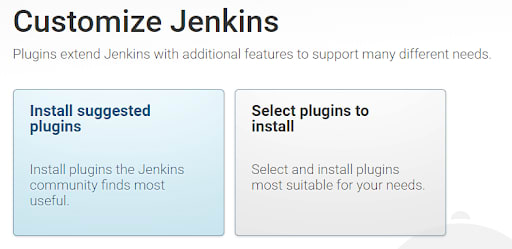
Once Jenkins is unlocked, you will be given the option to install the suggested plugins or, to manually select the plugins. For this tutorial, the suggested plugins will be chosen and installed.

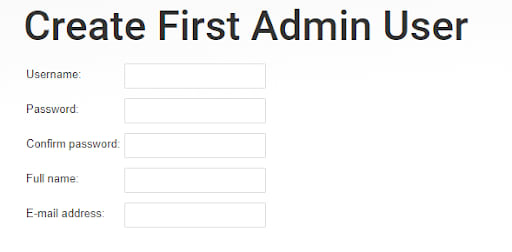
Once all the plugins have finished installing, Jenkins will prompt you to create the first admin user.

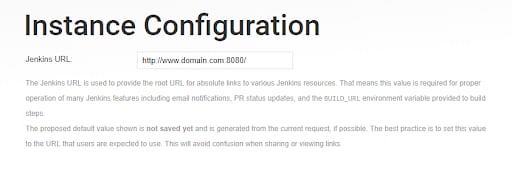
Once the user is created, Jenkins will prompt to confirm the URL, and it will automatically load in the current host URL that is used to connect. If this is incorrect, it can be adjusted now to the preferred URL.

After the URL has been verified, click “Save and Finish”. Jenkins will return a confirmation page which reads that the setup was successful.
To use Jenkins click “Start using Jenkins” to be redirected to the Jenkins dashboard homepage.

Congratulations! Jenkins has been successfully installed on Ubuntu and can be used to automate tasks. Feel free to explore the wide variety of features it has to offer. During this tutorial, you learned how to install Jenkins on Ubuntu using APT, exposed Jenkins port in the firewall, and created an administrator user. You can now begin creating your very first Jenkins project to perform tasks that should be automated.
Still have questions about Jenkins and how it can be utilized in your new or existing infrastructure?
Reach out to us today and contact us by creating a support ticket at support@liquidweb.com, opening a chat with us or, by giving us a call at 1-800-580-4985. Our dedicated Support and Solutions teams are standing by to assist you with this question or any others you may have. Ask us today!
Related Articles:

About the Author: Erwin Evans
Our Sales and Support teams are available 24 hours by phone or e-mail to assist.
Latest Articles
How to use kill commands in Linux
Read ArticleChange cPanel password from WebHost Manager (WHM)
Read ArticleChange cPanel password from WebHost Manager (WHM)
Read ArticleChange cPanel password from WebHost Manager (WHM)
Read ArticleChange the root password in WebHost Manager (WHM)
Read Article


