
 Alex Gorzen
 Using PhpMyAdmin to export a database or table is a great way to make a backup you can save locally, or it can help you with transferring that information to another server quickly, whether you’re working with a dedicated server, a VPS, or a cloud environment. A few simple steps can be a powerful tool to help you and your business. We will go over exporting all databases at once, a single database, and exporting a single table. This guide assumes that you have already logged in to PhpMyAdmin.
Exporting Databases
First we can go over exporting all databases at once. From the main PhpMyAdmin page, click on the Export tab.

This tab says “Exporting databases from the current server”, so this will include ALL databases that the user we are logged in to has access to. This would be helpful if we quickly need a backup of all databases done or if all databases need to be transferred to another server.
Under the Custom options we can choose to export only a specific database. However, working with the larger sql files can be more cumbersome than dealing with a file for a single database. So, to select just one database, click on the database name from the left-hand navigation, then go to the Export tab on that page.

This tab shows that it will be exporting tables from the single database, which is a bit more easy to manage to keep things straight. Then, to quickly export a single table, from the left-hand navigation click on the table name and then go to the Export tab on that page.

This page shows it’s exporting rows from only that single table. Under the Custom options, we can also choose to have it export just a specific range of rows.
Export Single Database
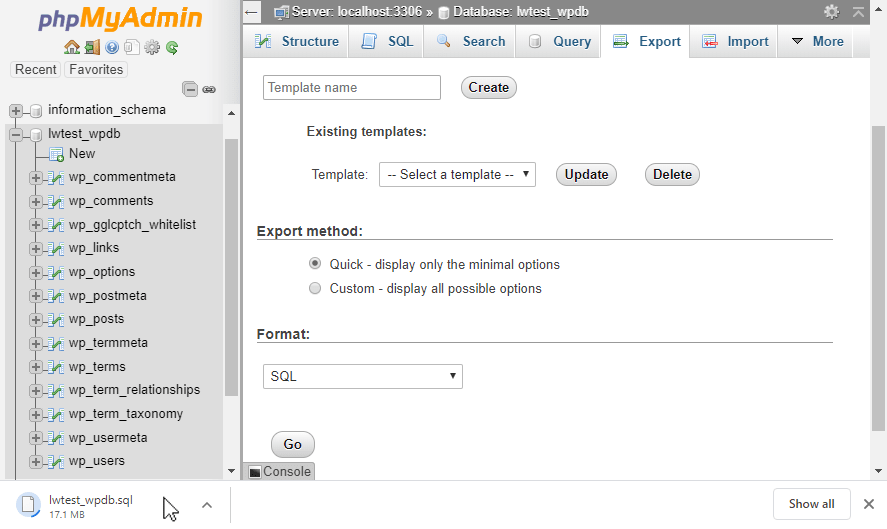
Let’s go through the process of actually exporting a single database though, so let’s click on the database name again and go back to the Export tab there.

When starting the export, it first asks us about a template. If we want to configure custom settings we can specify
- The tables we want
- The name the exported file will have
- The character set
- If the tables should each be separate files
- If the file should be zipped
- Other custom settings
These settings help customize the exported data in a way that best suited our needs. If this is done regularly, we can save those setting as a template and simply choose that option the next time, so we do not have to go through the entire list of customizations again.

Formatting the Export
The Format option can also be useful, depending on where the data will be imported to. If going from server to server or for backup purposes, the SQL format would be the general recommendation. Other settings available include:
- XML
- CSV
- XML
- JSON
- LaTex
- YAML
- Word Document
- Other formats
One of these may be a better option if the data needs to be imported into a third-party application, or even for reporting or accounting purposes.

Exporting Specific Tables
If tables have static data that does not change, or if the other tables are too large, it may not be worth the time trying to export them unless absolutely necessary. By selecting and exporting only the specific tables we need will help decrease the timeframe and server load required to complete our tasks.

Quick Export
If we do not want to deal with the customizations, just going with the Quick Export method will generate all the records within every table in the database. Next, we simply click Go and the file will be generated, and then begin to download.
Depending on how large the database is and what all is being exported, the export process could take a few seconds to a few minutes. Once the file is downloaded, we can store it, transfer it, or do whatever we need to do with the data from the server!
Conclusion
Exporting databases and tables through PhpMyAdmin can help with making backups, transferring data to another server, making reports, or even with creating a file that can be imported into another application. The export templates can help make a specific set of customizations easier to reproduce if that format is needed again in the future.
Open a chat or ticket with us to speak with one of our knowledgeable Solutions or Experienced Hosting advisors to learn how you can take advantage of these techniques today!