


Guide to Installing and Configuring Vault
What is Vault?
Vault protects and secures access to multiple types of confidential data. It stores and manages sensitive password information, API keys, and access tokens that exist in a low trust environment and generates dynamic access to authenticate users to ensure they have authorized ingress and availability to a file, location, service, or application.
Vault provides more granular clearance to tightly controlled environments by employing temporary tokens that are securely generated. In this tutorial, we explore HashiCorp’s Vault software. Security policies written in the HashiCorp Configuration Language (or HCL) are employed to ascertain which users have access to internal frameworks.

How Does Vault Work?
Below, we see a high-level overview of how Vault operates. In essence, we have only two externally facing elements:
- HTTP(s) API - This gateway or passage is initiated by the Vault server when it starts to allow users to interact with it.
- Backend Storage Environment - This storage location is considered untrusted and is only used to deposit the encrypted data by Vault reliably.
Every other component is locked inside Vault’s protected security perimeter.
Once the Vault software is started, it is considered to be in a sealed state. Prior to any functions being performed, a user or API process must unseal the Vault. This task is accomplished via an unseal key. When the Vault is created, an encryption key is generated to protect the information within the Vault. A master key further protects that encryption key. This master key is created using a technique known as Shamir's Secret Sharing algorithm.

This cryptographic algorithm divides the master key into multiple parts or shares. In order to reconstruct the original master key, a minimum number of these component shares are required. Vault divides the master key into five shares. To rebuild the master key, three of the five shares are needed.
Let’s provide an example. The Bank of LW has a vault. This vault contains all the secrets for Liquid Web. This vault has five keyholes. A single key is issued to five of the executives. For the vault to be unlocked, the vault must have at least three executive keys inserted. It does not matter which three executive keys out of the five are used, as any three executive keys will open the vault. Should one or two of the executive keys be lost or stolen, the Vault would still be accessible.
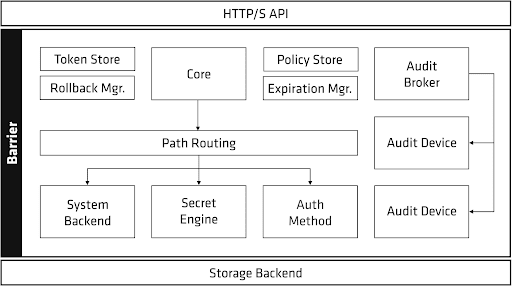
Once the encryption keys are engaged, Vault can decrypt the data contained in the backend storage location. When the Vault is unsealed, it loads all the configured Audit Devices, Auth Methods, and Secrets Engines.
These components must be stored in the Vault as they are considered to be sensitive information. Only users with the correct permissions level can modify them, meaning they cannot be utilized outside the barrier while it’s locked down. By storing them in Vault, any changes to those elements are rejected as they are protected by the Access Control List (ACL) system and tracked by audit logs. An ACL list is simply a user-created policy. Policies are kept and maintained by the internal Policy Store.
Vault functions exclusively on a zero-trust model and identity-driven access control. This means that unless access is explicitly granted via an ACL (policy), the operation is not permitted. After the Vault is unsealed, requests are processed through the HTTP API to the Core. The Core itself is used to regulate the flow of inquiries through the system, implement the ACL lists, and ensure an audit log is kept. A default "root" ACL is built-in and allows full access to all resources.
How To Install Vault
Clients can utilize Vault across multiple platforms, including stand-alone servers, AWS, Kubernetes, and other container-based systems.
Here, we demonstrate how to install Vault on a stand-alone server or as part of a server cluster. To use Vault, an administrator must first install it on the server using one of three installation methods:
- Source code - This is a typical git install of the software.
- Pre-compiled binary.
- Pre-packaged format.
We provide instructions below for installing Vault on Linux (CentOS and Ubuntu), macOS, and Windows.
CentOS/Ubuntu
As always, we first want to ensure that our system is up to date with one of two commands. One command option is below.
[root@host ~]# yum update -y && yum upgrade -yBelow is the alternative command.
[root@host ~]# apt-get update && apt-get upgradeCreate and Move Into Directory
[root@host2 ~]# mkdir -p /usr/src/vault
[root@host2 ~]# cd /usr/src/vault/
Download Vault
[root@host2 vault]# curl -sO https://releases.hashicorp.com/vault/1.6.3/vault_1.6.3_linux_amd64.zipUnzip Vault
[root@host2 vault]# unzip vault_1.6.3_linux_amd64.zip
Archive:  vault_1.6.3_linux_amd64.zip
  inflating: vault
Move Folder to Path
[root@host2 vault]# mv vault /usr/local/bin/Verify the Installation
To verify Vault is installed correctly, run vault -version or vault -h in your terminal. If you are executing it from the command line, make sure the vault command is in your PATH, or you may get a Vault not found error.
[root@host2 vault]# vault -version
Vault v1.6.3 (b540be4b7ec48d0dd7512c8d8df9399d6bf84d76)
Ubuntu
Ensure that our system is up to date.
[root@host ~]# apt-get update && apt-get upgradeAdd GPG Key
First, we need to add the HashiCorp GPG key.
[root@host ~]# curl -fsSL https://apt.releases.hashicorp.com/gpg | sudo apt-key add -Add Repository
Next, we will add the official Linux repository from HashiCorp.
[root@host ~]# apt-add-repository "deb [arch=amd64] https://apt.releases.hashicorp.com $(lsb_release -cs) main"Install Software
Finally, run another apt-get update and then install the software.
[root@host ~]# apt-get update && apt-get install vaultmacOS
Install Repository
First, we should install the HashiCorp tap. This is a repository of Homebrew packages, including Vault.
[root@host ~]# brew tap hashicorp/tapInstall Software
Next, we will install Vault using the hashicorp/tap/vault.
[root@host ~]# brew install hashicorp/tap/vaultWindows
There are two methods we can use to install Vault on a Windows system: Chocolatey and Scoop. Chocolatey is an open-source package manager for Windows. Here, we install Vault using the terminal.
[root@host ~]# choco install vaultScoop is another open-source package manager for Windows. To install Vault using Scoop, we run the following command in the terminal.
[root@host ~]# scoop install vaultStart Vault Server
The following command starts a default Vault dev server. The dev server is a pre-configured built-in server. While not used for production environments, it can be useful for exploring the Vault server commands locally.
[root@host ~]# vault server -dev
==> Vault server configuration:

             Api Address: http://127.0.0.1:8200
                     Cgo: disabled
         Cluster Address: https://127.0.0.1:8201
              Listener 1: tcp (addr: "127.0.0.1:8200", cluster address: "127.0.0.1:8201", max_request_duration: "1m30s", max_request_size: "33554432", tls: "disabled")
               Log Level: info
                   Mlock: supported: false, enabled: false
           Recovery Mode: false
                 Storage: inmem
                 Version: Vault v1.4.1

WARNING! dev mode is enabled! In this mode, Vault runs entirely in-memory
and starts unsealed with a single unseal key. The root token is already
authenticated to the CLI, so you can immediately begin using Vault.

You may need to set the following environment variable:

    $ export VAULT_ADDR='http://127.0.0.1:8200'

The unseal key and root token are displayed below in case you want to
seal/unseal the Vault or re-authenticate.

Unseal Key: 1+yv+v5mz+aSCK67X6slL3ECxb4UDL8ujWZU/ONBpn0=
Root Token: s.XmpNPoi9sRhYtdKHaQhkHP6x

Development mode should NOT be used in production installations!

==> Vault server started! Log data will stream in below:
Configure Vault
Once the server goes live (non-development mode), Vault can be configured using an HCL or JSON based file. Below is an example of a configuration file.
storage "consul" {
  address = "127.0.0.1:8500"
  path    = "vault"
}

listener "tcp" {
  address     = "127.0.0.1:8200"
  tls_disable = 1
}

telemetry {
  statsite_address = "127.0.0.1:8125"
  disable_hostname = true
}
Once the configuration is saved, admins will use the vault server -config command to denote the configuration file’s location.
Verify Running Server
To verify the dev server is running, run the vault status command. If the dev server is up, users should see the following output.
[root@host ~]# vault status

Key             Value
---             -----
Seal Type       shamir
Initialized     true
Sealed          false
Total Shares    1
Threshold       1
Version         1.5.0
Cluster Name    vault-cluster-4d862b44
Cluster ID      92143a5a-0566-be89-f229-5a9f9c47fb1a
HA Enabled      false
Copy
If the output looks different, restart the dev server and try again.
Add a Secret
To create a secret, we use the following syntax. The kv flag stands for keyvault, and the put flag indicates we are adding a secret to a path.
vault kv put <path> <key>=<value> command.

[root@host ~]# vault kv put secret/hithere user=password

Key              Value
---              -----
created_time     2021-03-12T21:40:01.635656Z
deletion_time    n/a
destroyed        false
version          1
This command writes the pair user=password to the path secret/hithere.
Retrieve a Secret
A secret can be retrieved using the following syntax.
[root@host ~]# vault kv get <path>[root@host ~]# vault kv get secret/hithere
====== Metadata ======
Key Value
--- -----
created_time 2021-03-12T21:41:17.568155Z
deletion_time n/a
destroyed false
version 2
===== Data =====
Key Value
--- -----
user passwordRemove a Secret
To remove a secret, we use the vault kv delete command.
[root@host ~]# vault kv delete secret/hithere

Success! Data deleted (if it existed) at: secret/hithere
Create Vault User
Best practice dictates we create a non-privileged system user to work with Vault.
[root@host ~]# useradd --system --home /etc/vault --shell /bin/false vault
[root@host ~]# chown -R vault:vault /etc/vault /var/lib/vault/
Secrets Engine
Each path of a secret engine is wholly separate and isolated from other secret engine paths. For example, the A secrets engine enabled at /path/foo cannot communicate with the B secrets engine enabled at /path/foo.
Enable Secrets Engine
[root@host ~]# vault secrets enable -path=A /path/foo
Success! Enabled the kv secrets engine at: kv/
Disable Secrets Engine
When a specific secrets engine is disabled, all secrets generated using that specific secrets engine are immediately revoked. To disable an existing secrets engine, we use the following command.
[root@host ~]# vault secrets disableConclusion
Vault is a reliable and effective software to create, manage, and encrypt sensitive API keys, database credentials, or other authentication-related user data within a dynamic infrastructure. Vault stores, secures, and rigorously controls access to many platform types. It is an essential tool that clients can extend for use across standalone OS versions and in containerized settings. Overall, it is an exceptional security product that any client can deploy.
Learn more about our managed hosting services, including dedicated servers, managed VPS hosting, VMware hosting, and more.
Related Articles:


Our Sales and Support teams are available 24 hours by phone or e-mail to assist.
Latest Articles
How to use kill commands in Linux
Read ArticleChange cPanel password from WebHost Manager (WHM)
Read ArticleChange cPanel password from WebHost Manager (WHM)
Read ArticleChange cPanel password from WebHost Manager (WHM)
Read ArticleChange the root password in WebHost Manager (WHM)
Read Article