


cPanel How To: Change a Domain’s MX Record
- Getting Started With WordPress Optimized Template
- How To Deploy A WordPress Optimized Template Server
- Adding Sites To Your WordPress Optimized Template Server
- Use SFTP To Connect To WordPress Optimized Template
- Using WP-CLI With Your WordPress Optimized Template Site
- How To Restore WordPress Optimized Template Backups
- cPanel How To: Change a Domain’s MX Record
In this guide, we will walk you through the process of changing a domain's Mail Exchange (MX) record(s) to point email at a different VPS server. MX records are a critically important part of a website's DNS because they tell the rest of the internet where to send email for a domain.
Important Note
Most domain-level cPanel interfaces include a tool for changing the domain's MX record. This tool will only work if the server that houses the active website is the same server that is handling DNS for the domain. The tool can make changes to the local DNS zone file but that file does nothing if the local server isn't running the domain's DNS as well.
Step 1: Preparations
Verify Nameservers
The first part of making any DNS change is to determine what nameservers are responsible for the domain's DNS records using the whois command on your local computer or a website online that provides the service.
Once you have obtained the nameservers you can start making DNS changes.
Please note: If you are using the Liquid Web nameservers (ns.liquidweb.com and ns1.liquidweb.com) you will need to contact support to update your domain's DNS.
Update DNS TTL Values
If you make a change to a domain's DNS without updating Time To Live (TTL) values then the new settings could take much longer to take effect.
Example MX Record:domain.com. 14400 IN MX 0 domain.com.
In this example, 14400 is the TTL value measured in seconds. Change this value to something lower, like 600 (five minutes).
We only want to alter the TTLs for now. Lowering them will cause the DNS for the domain to refresh more rapidly, so when you make the actual change it will take effect in less time.
Wait...
Wait at least 24 - 48 hours after lowering your TTL values before making changes. This will allow enough time for the lowered TTLs to be picked up by the rest of the internet.
Step 2: Updating the MX Record
Using the Terminal
Log in to your server using SSH as root and navigate to the /var/named directory. Using your favorite text editor, open the file called domain.com.db (where domain.com is the name of the domain you want to edit) and make your changes. Update the domain's serial number near the top right of the zone file and save your changes.
Finally, back at the command prompt, run rndc reload domain.com to tell the server to start using the new settings. Instead of running rndc reload you can choose to restart the named service, but depending on how many domains the DNS server is working with this can take much longer to complete, during which time your websites will be down.
Using WHM
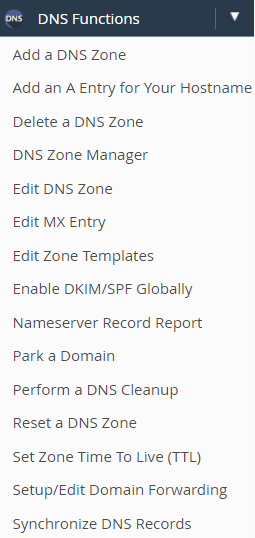
If you have a VPS or Dedicated cPanel server you can make DNS changes using the interface in the Web Host Manager (WHM). Log in to your WHM and find the section on the left labeled DNS Functions, as shown below:
If you choose Edit DNS Zone you will be taken to a list of domains. Pick the domain you want to change and click on the Edit at the bottom of the screen.
Find the line with a dropdown menu showing MX as the record type.
If you have the new e-mail server's hostname:
Enter the new MX server name in the text box on the far right (be sure to include a . (period) at the end of the name). Scroll to the bottom of the screen and click on the Save button.
If you only have the IP address of the new e-mail server:
MX records can only point at names, not IP addresses, so we will need to create a new name for that IP address. Find the line marked mail in the far left text box and change its type from CNAME to A (1, in the screen shot below). In the far right text box on the same line enter the IP address of the new e-mail server (2). Change the MX record to point at mail.domain.com (3).

IMPORTANT: If you choose to use this method everyone who uses e-mail on the domain you are changing MUST be using mail.domain.com (where domain.com is the domain you are changing) in their e-mail clients. Anyone who only uses domain.com for their e-mail server settings will be pointing at the wrong server once the MX record changes.
The above method can be used with any name, not just mail.domain.com. As long as it is a subdomain that ends in the domain name, and points at an IP address using the method above it should work correctly.
Also, you cannot simply point e-mail at a new IP address without first configuring an e-mail server to accept connections on the other end. Do not make these change without making sure that you are fully prepared.
Multiple MX Records
Domains that have a high volume of email traffic often need a layer of redundancy, so if a primary e-mail server goes down for whatever reason their email service remains available. This can be accomplished using multiple MX records and priority settings.
For example, let's look at the current MX records for gmail.com using the "dig mx gmail.com" command:
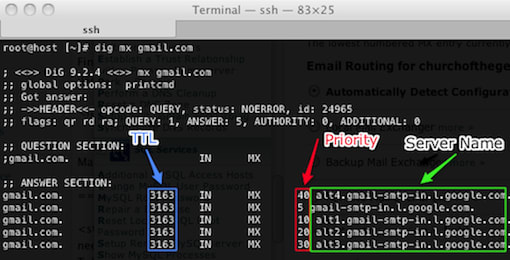
The dig command shows us the following information about Gmail's MX records:
- TTL - As discussed above, the TTL for the MX record is displayed here.
- Priority - The lowest numbered server is the primary MX server.
- Server Name - The hostname of the MX server itself.
Priority numbers determine which MX server is contacted first. In the example above, gmail-smtp-in.l.google.com is the primary MX record because it has the lowest priority number (5).
If an email is being sent to your domain and the primary MX server does not answer the first attempt then the sending server can contact the second server and so on down the list of entries until the message is accepted for delivery.
Related Articles:


About the Author: Jay Allen


Our Sales and Support teams are available 24 hours by phone or e-mail to assist.
Latest Articles
In-place CentOS 7 upgrades
Read ArticleHow to use kill commands in Linux
Read ArticleChange cPanel password from WebHost Manager (WHM)
Read ArticleChange cPanel password from WebHost Manager (WHM)
Read ArticleChange the root password in WebHost Manager (WHM)
Read Article