
 Matthew Stevens
 A pipe is a form of redirection in Linux used to connect the STDOUT of one command into the STDIN of a second command. It allows us to narrow the output of a string of commands until we have an easily digestible amount of data. The pipe character is the | symbol and is placed between any two commands. Pipes are one of the most used command-line features that Linux has. Every article showing Linux commands will almost inevitably include pipes.
Piping Syntax
The syntax of piping redirects the standard output of one command into another command or program. An example of combining commands using piped redirection is seen below.
command_a | command_b | command_z What’s the Difference Between the Pipe Command and Piping a Command?
The Linux pipe command is used to pass a program’s output into another program’s input. Piping redirects the output of one command to another. In the first example, we see the pipe command.
command1 > command2
vs
command1 | command2
In the second example, we see an example of piping a command into another command.
Pipe Example
I have created ten files named “File_n,” where n is the number of the file. The ls -l command will display these files and include each file’s name, permissions, ownership, size, and the date and time they were created.
ls -l | awk '{print $9}' | grep 10
In the example above, ls -l will display all files in the current folder. Pipe redirects the command’s output to the next command. Only the 9th string (separated by whitespace) will be displayed at the end of the line containing 10. The example above shows the pipe’s usefulness and how some commands can be joined together. I have created my own access log with random data to extract specific information from combining different commands.
Using Pipe on a Log File
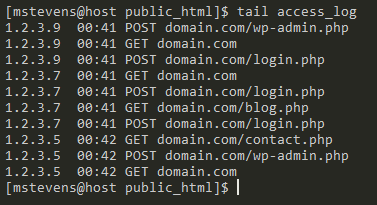
First off, let’s see how a file is structured. I will use the tail command to get the last 10 lines from the access log.
tail access_logAs you can see in the image below, we have the IP address, time of the request, type of request, and the URL they are trying to access.
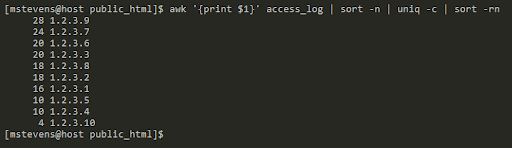
Let’s see from which IP we have the most requests.
awk '{print $1}' access_log | sort -n | uniq -c | sort -rnThen, using the awk command, we will extract each row’s first value (which is IP) and pass the pipe’s results to the next command. The command sort -n will rearrange the IP from lowest to highest, but we will only see the block of n number of the same IPs.
To count how many of the same IPs are in these blocks, we can pass the result to the uniq -c command. The -c flag is used to count the same value. We can use the sort- rn command if we would like to sort from the highest to lowest number of requests. We can see that IP “1.2.3.9” had 28 requests. Use the POST or GET request to see which part of the website was accessed.
The following command can be used to determine if an IP tried to use a brute force attack on your website.
grep "1.2.3.9" access_log | grep POST | wc -l
We can use the grep command to get only rows that contain the IP “1.2.3.9”, pass all these lines to the next grep command to check only the POST request, and count all the lines with the wc -l command. Out of 28 requests, 16 POST requests were made. Let’s expand a little bit to see where the POST request was issued.
grep "1.2.3.9" access_log | grep POST | awk '{print $4}' | sort | uniq -c | sort -rn
The wc command was removed and replaced with awk ‘{print $4}’ | sort | uniq -c | sort -rn command. We can dissect the command below.
- The command awk ‘{print $4}’ will output only the URLs.
- The sort command will alphabetically sort the URLs.
- The command uniq -c | sort -rn will count and sort all lines by the number of requests.
Named Pipes
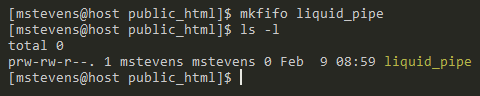
So far, we have discussed how to use unnamed pipes, which are created on-the-fly and only exist as long as the command using them is running. Now we move on to named pipes. Names pipes appear as persistent objects in the file system and will not be removed even after a system reboot. Named pipes can be located using the ls command. To create a named pipe, we need to use the mkfifo command.
mkfifo liquid_pipeWith the ls -l command, we can see details of the named pipe. The first character, “p,” indicates that “liquid_pipe” is a pipe. The most common first characters will be “d” for directory and “-” for a regular file.
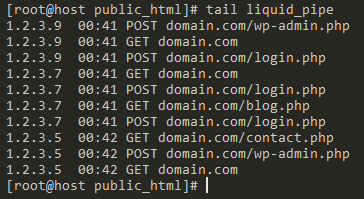
Two terminals are required to show how to use the named pipe. One is set on the “mstevens” and user while the other is set to “root.” Reuse access_log from the previous example to add all of the data to the named pipe. The data will get “stuck” on a new line, which indicates that something is going on, and it will stay this way until the data from the named pipe is read.
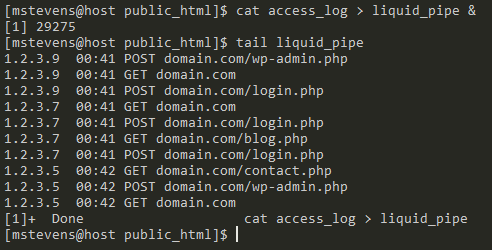
cat access_log > liquid_pipe
In another terminal, use the tail function to extract the last 10 lines from the named pipe.
tail liquid_pipeBoth outputs from tail liquid_pipe and tail access_log provide the same information. The only difference being that the first terminal returned you to the command prompt.
The same information is found when running cat access_log > liquid_pipe in the background using the & symbol, which allows us to continue working as the same user.
Conclusion
Using unnamed pipes will help you create one-liners to get specific data. Named pipes are not standard practice nowadays since using unnamed pipes accomplish the same result without an extra step. Without pipes, multiple commands would be required, and the results would have to be stored in different files to get the one line you needed. The best way to practice piping is to add a pipe after your previous command. It will provide the results you wanted instead of checking which of your multiple commands didn’t work.
Our Support Teams are filled with talented Linux technicians and System administrators who have an intimate knowledge of multiple web hosting technologies, especially those discussed in this article. If you are a fully managed VPS server, cloud dedicated, VMware private cloud, VPS reseller server (private parent), or a dedicated server owner and you are uncomfortable with performing any of the steps outlined, we can be reached via live chat, or support ticket to assist you with learning more about this topic!