
 David Singer
 What is Puppet?

Puppet is an intuitive, task-controlling software which provides a straightforward method to manage Linux and Windows server functions from a central master server. It can perform administrative work across a wide array of systems that are primarily defined by a “manifest” file, for the group or type of server(s) being controlled.
System Requirements
Puppet uses a master/client setup to communicate between the master and client servers. The master server will require more resources than the client servers utilize. The resources needed on the master server will mainly depend on:
- The number of remote agents (servers) being utilized
- How frequently those remote agents check in to the master server
- How many resources are being managed on each remote agent
- The complexity of the manifest files and modules in use
A Puppet master server must run on UNIX variants known as “ *nix ” operating systems. Currently, Puppet masters CANNOT run in a Windows environment.
Master Hardware Requirements
The minimum hardware requirements for the Puppet master servers will be based on multiple factors as stated above and noted in Puppet’s guidelines.

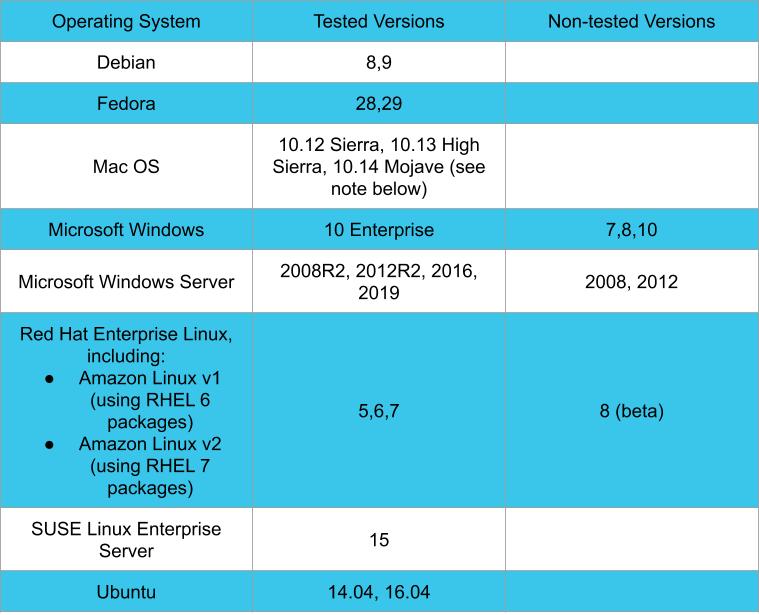
Client Software Platforms
The Puppet-agent (or client) packages are available for these platforms:
Dependencies
If you are installing the Puppet client using an official distribution package via a repository then your system’s package manager usually ensure that the proper dependencies are installed. If you install the agent on a platform without a supported package, you must also manually install the dependent packages, libraries, and gems:
- Ruby 2.5.x
- CFPropertyList 2.2 or later
- Facter 2.0 or later
- The msgpack gem from MessagePack, if you’re using msgpack serialization
Timekeeping and Name Resolution
Before installing the client, there are certain network requirements which you will require you to prepare, review and consider. The most important aspects include time syncing and implementing an idea for name resolution.
Timekeeping
You will want to make sure that the Network Time Protocol (NTP) service is in place to ensure that the time is in sync between the master server, (which acts as the certificate authority) and clients. This is recommended due to the issues that can develop if the servers time drifts out of sync. You may encounter odd certificate issues. A service like NTP (available on most servers) assures accurate timekeeping and will reduce the risk of error like this occurring.
Name resolution
The second part of this component is to decide on an iterable naming convention. For example, by using a master name like puppet.domain.com establishes the continuity of this naming convention. This also allows optimal master communication and that all future agents can reach the master. You can simplify this by utilizing a CNAME record (a name forwarding DNS entry) to ensure the master is always reachable.
Firewall Configuration
In a master/client setup, the master server must have port 8140 open to allow for incoming connections from the remote clients. You can use either of the following commands to check that the port is open and listening:
root@master [~]# netstat -tulpn | grep LISTEN |grep 8140
 root@master [~]# lsof -i -P -n | grep LISTEN |grep 8140
If nothing is returned with the above command then you’ll need to open port 8140. To open the port in the UFW firewall, use the following command:
root@master:~# ufw allow 8140/tcp
 Rules updated
 Rules updated (v6)
 root@master:~#
Puppet Installation
Usually, Puppet uses approximately 2 GB of RAM by default. Plan on this amount plus any additional RAM needed to run the server’s OS itself. If you plan on creating a 2 GB VPS server or dedicated server, opt for one that has 4 GB of RAM if you are going to use it as a Puppet master.
Puppet is available on multiple OS variants including:
- Red Hat/CentOS/Fedora
- Debian/Ubuntu
- SUSE Linux Enterprise Server
The basic installation steps across all the above mentioned OS is as follows:
root@master [~]# wget https://apt.puppetlabs.com/puppet-release-bionic.deb
 root@master [~]# dpkg -i puppet-release-bionic.deb
 root@master [~]# apt update
 root@master [~]# apt install puppetserver
Our Fully managed servers wouldn’t be good options for Puppet implementation since additional repositories may conflict.
Install the Puppet Master’s Software
Red Hat/CentOS/Fedora
yum install puppetserver
Debian/Ubuntu
apt-get install puppetserver
SUSE/OpenSuse
zypper install puppetserver
Start the Puppet Master Service
Red Hat/CentOS/Fedora
systemctl start puppetserver
Debian/Ubuntu
service puppetserver start
SUSE/OpenSuse
/etc/rc.d/puppetmaster start
Install the Puppet Client’s Software
Yum:
yum install puppet-agent
Apt:
apt-get install puppet-agent
Zypper:
zypper install puppet-agent
Puppet Configuration
Puppet contains around 200 different configuration settings located within the puppet.conf file. For most servers, you will only need to adjust about 20 settings or fewer in the file depending on your server’s setup. You can use the command below to set the needed values.
puppet config set <SETTING NAME> <VALUE> --section <CONFIG SECTION>
We’ve listed the 5 most requested settings to suit your specific needs:
- dns_alt_names – This is a list of allowed hostnames acting as the Puppet master.
- environment_timeout – This setting is defaulted to 0 and should be untouched unless you have a particular cause to alter it. You can adjust this setting to unlimited, to make master refreshes a part of your standard code deployment process.
- environmentpath – The environment path defines the locations where Puppet can find the specific directories for any unique environments. T
- basemodulepath – This is a list of directories that contains the Puppet modules used in various environments.
- reports – Directs which report handlers, listed below, to use.
- HTTPS – Sends reports via HTTP/HTTPS as a POST request to the address defined in the reporturl setting.
- Log – Sends reports to the local default log destination (usually syslog)
- Store – Hosts will send a YAML dump of data to a local directory (defined by the reportdir setting in the puppet.conf)
The config reference provides a more comprehensive array of available options in modifying your server to suit your specific needs
More Information
Overall, Puppet is an attractive addition to your everyday tool set for managing and automating tedious tasks. Once it is installed and configured, it will maintain your day-to-day servers tasks with ease. You may want to consult the Puppet documentation for more in-depth information on this topic or consult the following resources for additional info.
How Can We Help?
If you would like more information on how this software can benefit your current VPS setup, whether you’re hosting Ubuntu or Linux servers. simply reach out to us via a phone call, chat or ticket, and one of our Most Helpful Humans in Hosting will follow up with you to advise on how best you can integrate this process into your existing infrastructure! We are looking forward to speaking with you!