


Creating Storm Server Images
We have written previously about regularly backing up Storm Servers, but that only covers automated image backups. With the Storm platform, it is possible to take image snapshots of your server whenever you wish.
Image Creation
To get started creating your server’s image, open up the dashboard of your server and click the “Image” tab.
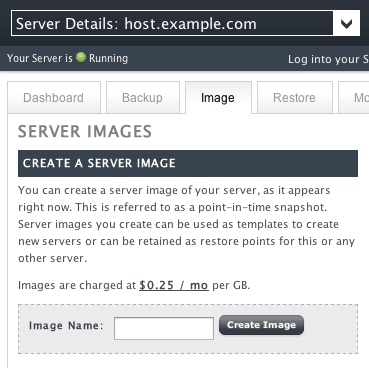
If you have multiple Storm servers, make sure that Server Details: above shows the server you want to turn into an image. Choose a name for your image, type it into the Image Name field, and click the Create Image button. A confirmation overlay will pop up. Click Create Server Image to start the image creation process.
Hot Copy Method
The confirmation overlay notes that the process that is used to create the server is a “hot copy” method. This means that occasionally, saving the image will catch the server as it is writing a file, and only save a partially written file. It is best to make an image when there is the least likelihood of this occurring, such as during off-peak hours for your server.
What Do I Do With This Server Image?
Server images are used to kick new servers. More on how to do that in our next article.
Related Articles:


About the Author: Patrick Hawkins
Patrick Hawkins is a former Test Engineer and Managed WordPress admin with Liquid Web


Our Sales and Support teams are available 24 hours by phone or e-mail to assist.
Latest Articles
In-place CentOS 7 upgrades
Read ArticleHow to use kill commands in Linux
Read ArticleChange cPanel password from WebHost Manager (WHM)
Read ArticleChange cPanel password from WebHost Manager (WHM)
Read ArticleChange the root password in WebHost Manager (WHM)
Read Article