How to Install and Configure Jupyter Notebook
What is Jupyter Notebook?
Jupyter Notebook is an extremely powerful open-source, web-based tool that facilitates the creation of documentation. There are many different avenues to provide technical documentation or demonstrations, but Jupyter Notebook makes it possible to embed visualizations and execute live code. It is useful to be able to utilize documentation to describe development concepts or planning, but providing working examples within documentation can be a more effective way of conveying information. This tutorial will cover how to install Jupyter Notebook on an Ubuntu 18.04 LTS server and connect to it remotely via an SSH tunnel.
Preflight Check:
- This tutorial is performed on a Self-Managed Ubuntu 18.04 LTS server as the root user.
- This tutorial assumes you have a working installation of Python 3 on your server and some means of creating a python virtual environment.
If you are curious about how to get started with either of those topics, please review these articles on installing Python on Ubuntu or how to set up a python virtual environment on Ubuntu.
Update the Environment
It is always a good idea to make sure system packages are up to date before beginning any Linux system endeavor. Run the following command to update the system packages:
root@ubuntu1804:~# apt update -ySetup Virtual Environment
The first thing to do is get a Python Virtual Environment set up to install the Jupyter package. It is a best practice to keep project dependencies encapsulated within virtual environments when working with Python. It prevents the system-level Python from having extraneous packages and makes dependency management within the project more straightforward.
To set up a virtual environment for Jupyter Notebook, run the following command:
root@ubuntu1804:~# python3 -m venv jupyterOnce that is finished, activate the virtual environment by running:
root@ubuntu1804:~# source jupyter/bin/activate
(jupyter) root@ubuntu1804:~#
Install the Jupyter Package
Now that the environment is ready, the next step is to install the Jupyter package. Jupyter is a Python package. To install it, we are using pip to activate the virtual environment.
(jupyter) root@ubuntu1804:~# python3 -m pip install jupyter
Collecting jupyter
  Downloading https://files.pythonhosted.org/packages/83/df/0f5dd132200728a86190397e1ea87cd76244e42d39ec5e88efd25b2abd7e/jupyter-1.0.0-py2.py3-none-any.whl
Collecting jupyter-console (from jupyter)
  Downloading https://files.pythonhosted.org/packages/65/de/8f9491c4b7e660a75a4eb54694292d918d2d29321936d26bad28cc0530a4/jupyter_console-6.2.0-py3-none-any.whl
Collecting ipywidgets (from jupyter)
  Downloading https://files.pythonhosted.org/packages/56/a0/dbcf5881bb2f51e8db678211907f16ea0a182b232c591a6d6f276985ca95/ipywidgets-7.5.1-py2.py3-none-any.whl (121kB)
    100% |████████████████████████████████| 122kB 1.8MB/s
Collecting ipykernel (from jupyter)
...
Successfully installed MarkupSafe-1.1.1 Send2Trash-1.5.0 argon2-cffi-20.1.0 attrs-20.2.0 backcall-0.2.0 bleach-3.1.5 cffi-1.14.2 decorator-4.4.2 defusedxml-0.6.0 entrypoints-0.3 importlib-metadata-1.7.0 ipykernel-5.3.4 ipython-7.16.1 ipython-genutils-0.2.0 ipywidgets-7.5.1 jedi-0.17.2 jinja2-2.11.2 jsonschema-3.2.0 jupyter-1.0.0 jupyter-client-6.1.7 jupyter-console-6.2.0 jupyter-core-4.6.3 mistune-0.8.4 nbconvert-5.6.1 nbformat-5.0.7 notebook-6.1.4 packaging-20.4 pandocfilters-1.4.2 parso-0.7.1 pexpect-4.8.0 pickleshare-0.7.5 prometheus-client-0.8.0 prompt-toolkit-3.0.7 ptyprocess-0.6.0 pycparser-2.20 pygments-2.6.1 pyparsing-2.4.7 pyrsistent-0.17.0 python-dateutil-2.8.1 pyzmq-19.0.2 qtconsole-4.7.7 qtpy-1.9.0 six-1.15.0 terminado-0.8.3 testpath-0.4.4 tornado-6.0.4 traitlets-4.3.3 wcwidth-0.2.5 webencodings-0.5.1 widgetsnbextension-3.5.1 zipp-3.1.0
Run the Jupyter Notebook
(jupyter) root@ubuntu1804:~# jupyter notebook --allow-root
[I 23:58:00.086 NotebookApp] Serving notebooks from local directory: /root
[I 23:58:00.087 NotebookApp] Jupyter Notebook 6.1.4 is running at:
[I 23:58:00.087 NotebookApp] http://localhost:8888/?token=8c42c6688b11e755bcc9afa8417cda781c9f0db9b9723f26
[I 23:58:00.087 NotebookApp] or http://127.0.0.1:8888/?token=8c42c6688b11e755bcc9afa8417cda781c9f0db9b9723f26
[I 23:58:00.087 NotebookApp] Use Control-C to stop this server and shut down all kernels (twice to skip confirmation).
[W 23:58:00.090 NotebookApp] No web browser found: could not locate runnable browser.
[C 23:58:00.090 NotebookApp]

    To access the notebook, open this file in a browser:
        file:///root/.local/share/jupyter/runtime/nbserver-18411-open.html
    Or copy and paste one of these URLs:
        http://localhost:8888/?token=8c42c6688b11e755bcc9afa8417cda781c9f0db9b9723f26
     or http://127.0.0.1:8888/?token=8c42c6688b11e755bcc9afa8417cda781c9f0db9b9723f26
    Or copy and paste one of these URLs:
http://localhost:8888/?token=8c42c6688b11e755bcc9afa8417cda781c9f0db9b9723f26
     or http://127.0.0.1:8888/?token=8c42c6688b11e755bcc9afa8417cda781c9f0db9b9723f26
If Jupyter Notebook were previously installed locally, it would be possible to copy and paste one of the provided URLs into a browser and get started. To connect to this Jupyter Notebook running on a remote server, it will be necessary to use SSH Tunneling. Kill the Jupyter Notebook for now by holding CTRL + C and entering y at the prompt.
Connect Via SSH Tunnel (Linux or macOS)
If you’re using a Windows server, consider utilizing the Linux subsystem to run these instructions. To forward a local port to the remote host, the Jupyter Notebook application runs the following command.
ssh -L 8000:localhost:8888 root@ubuntu1804.awesome.comReplace the hostname in the above command with the IP or the hostname of your remote server. This should log you back into your server.
jpavlav@jpalmer ~ ssh -L 8000:localhost:8888 root@ubuntu1804.awesome.com
Last login: Wed Sep 9 00:02:50 2020 from 10.255.233.139
root@ubuntu1804:~#
Run and Use Jupyter Notebook
Once reconnected to the server, start the Jupyter Notebook application by first activating the virtual environment.
root@ubuntu1804:~# source jupyter/bin/activate
(jupyter) root@ubuntu1804:~#
Then, rerun the application:
(jupyter) root@ubuntu1804:~# jupyter notebook --allow-root
[I 00:10:55.994 NotebookApp] Serving notebooks from local directory: /root
[I 00:10:55.995 NotebookApp] Jupyter Notebook 6.1.4 is running at:
[I 00:10:55.995 NotebookApp] http://localhost:8888/?token=c4d32d1701bccfdf8049be9832e1ef420f101402b11c0da8
[I 00:10:55.995 NotebookApp] or http://127.0.0.1:8888/?token=c4d32d1701bccfdf8049be9832e1ef420f101402b11c0da8
[I 00:10:55.995 NotebookApp] Use Control-C to stop this server and shut down all kernels (twice to skip confirmation).
[W 00:10:55.998 NotebookApp] No web browser found: could not locate runnable browser.
[C 00:10:55.998 NotebookApp]

    To access the notebook, open this file in a browser:
        file:///root/.local/share/jupyter/runtime/nbserver-18474-open.html
    Or copy and paste one of these URLs:
        http://localhost:8888/?token=c4d32d1701bccfdf8049be9832e1ef420f101402b11c0da8
     or http://127.0.0.1:8888/?token=c4d32d1701bccfdf8049be9832e1ef420f101402b11c0da8
It is now possible to grab one of the URLs provided in the output, change the port to the local forwarded port, and hit the Jupyter Notebook application via the browser on your local machine. For example:
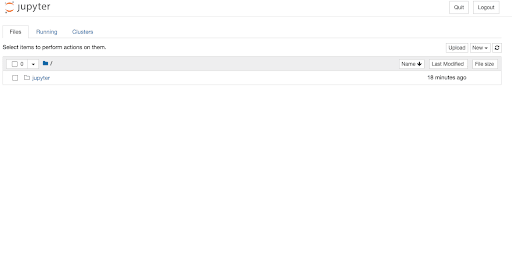
http://localhost:8000/?token=c4d32d1701bccfdf8049be9832e1ef420f101402b11c0da8Once connected in the browser, the application should look something like this:

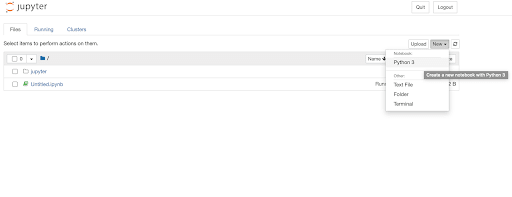
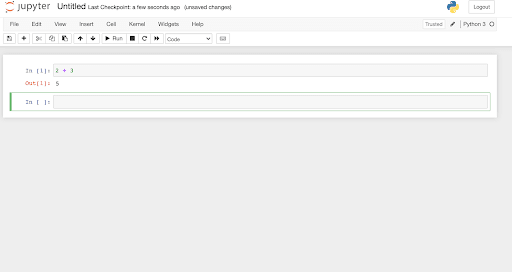
That’s it! To create a new Python 3 notebook, click the “New” dropdown in the upper right corner and click Python 3:

You’re now ready to start working with your new Python 3 notebook!

Conclusion
Jupyter Notebooks is a spin-off project from the IPython implementation. It allows us to produce, employ and share documents which contain code, visualizations, equations, and other narrative text. Its uses include such choices as data cleanup and modifications, numerical modeling and simulation, statistical representations, data visualization, machine learning, and more! It is the default choice for data scientists for sharing code, prototyping, and other analysis.
Want more information?
Give Us a Call!
We are available to speak with you when you call us at 1.800.580.4985. You can engage one of our knowledgeable Solutions Provider who can get you the info you need, to make an informed decision right away.
Too busy to talk? Click HERE to open a quick chat with us to find out more. Would you like the information in an email you can review at your leisure? Email us today to get solid advice on which product in our line up would best suit your needs.
We look forward to speak to you!
Related Articles:

About the Author: Justin Palmer
Justin Palmer is a professional application developer with Liquid Web
Our Sales and Support teams are available 24 hours by phone or e-mail to assist.
Latest Articles
Email security best practices for using SPF, DKIM, and DMARC
Read ArticleLinux dos2unix command syntax — removing hidden Windows characters from files
Read ArticleHow to use kill commands in Linux
Read ArticleChange cPanel password from WebHost Manager (WHM)
Read ArticleChange cPanel password from WebHost Manager (WHM)
Read Article


