
 Mike Sherman
 Migrating MSSQL between servers can be challenging without the proper guidelines to keep you on track. In this article, I will be outlining the various ways to migrate Microsoft SQL Server databases between servers or instances. Whether you need to move a single database, many databases, logins or stored procedures and views we have you covered!
There are many circumstances where you will need to move a database or restore databases. The most common reasons are:
- Moving to an entirely new server.
- Moving to a different instance of SQL.
- Creating a development server or going live to a production server.
- Restoring databases from a backup.
There are two main ways to move SQL databases. Manually with Microsoft SQL Server Management Studio (SSMS) or with the command line. The method you choose depends on what you need to accomplish. If you are moving a single database or just a few, manually backing up and restoring the databases with SSMS will be the easiest approach. If you are moving a lot of databases (think more than 10) then using the command line method will speed up the process. The command line method takes more prep work beforehand, but if you are transferring dozens of databases, then it is well worth the time spent configuring the script instead of migrating each database individually. If you aren’t sure which method to use, try the manual approach first while you get comfortable with the process. I recommend reading all the way through for a deeper understanding of the methodology.
Useful References for Terminology
SSMS – An acronym for Microsoft SQL Server Management Studio.
Source Server – The server or instance you are moving databases from or off.
Destination Server – The server or instance you are moving databases to.
The Manual Method
Moving SQL databases with the manual method can be very easy. It is the preferred process for transferring a few or smaller databases. To follow this part of the guide, you must have MSSQL, and Microsoft SQL Server Management Studio (SSMS) installed.
Backing Up Databases on the Source Server
1. Begin by logging into the Source server (the server you are moving databases from or off of). You will want to open Microsoft SQL Server Management Studio by selecting Start > Microsoft SQL Server > Microsoft SQL Server Management Studio.
2.Log into the SQL server using Windows Authentication or SQL Authentication.
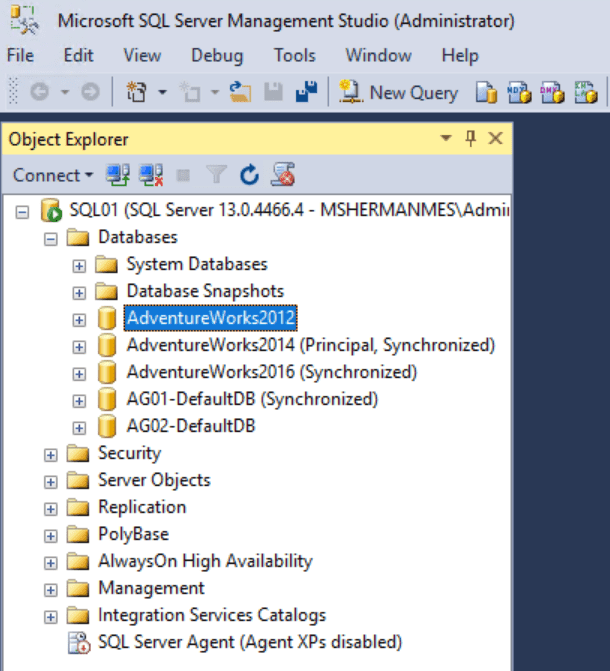
3. Expand the server(in our case SQL01), expand Databases, select the first database you want to move (pictured below).
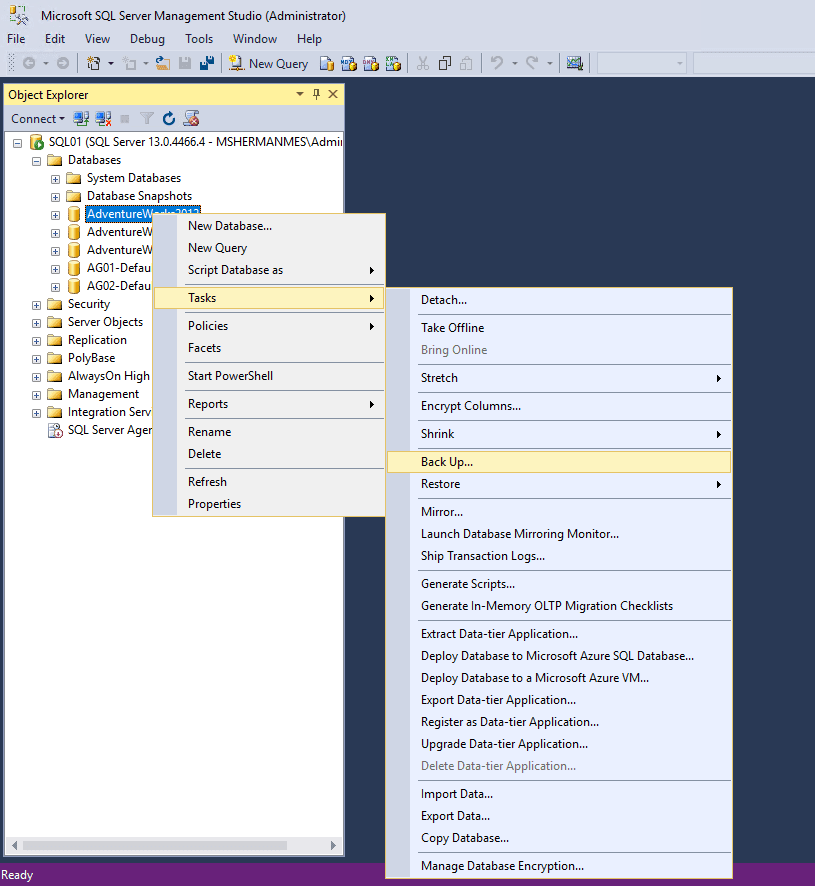
4. Right click on your database and select Tasks then click Back Up.
5. From here you are now at the Back Up Database screen. You can choose a Backup Type such as Full or Differential, make sure the correct database is selected, and set the destination for the SQL backup. For our example, we can leave the Backup Type as Full.
6. Under Backup Type, check the box for “Copy-only backup.” If you are running DPM or another form of server backup, backing up without the Copy-Only flag will cause a break in the backup log chain.
7. You will see a location under Destination for the path of the new backup. Typically you will Remove this entry then Add a new one to select a folder that SQL has read/write access. Adding a new Backup Destination shows a path similar to the following:
C:\Program Files\Microsoft SQL Server\MSSQL13.MSSQLSERVER\MSSQL\Backup\
This C:\ path is where your stored database backup is. Note this location for later reference, as this is the default path to stored backups and will have to have proper read/write access for SQL services.
[su_box title=”Note:” style=”glass” box_color=”#3ac6eb” title_color=”#ffffff” radius=”20″]Advanced users may be comfortable leaving the destination as is, provided the permissions are correct on the output folder. [/su_box]
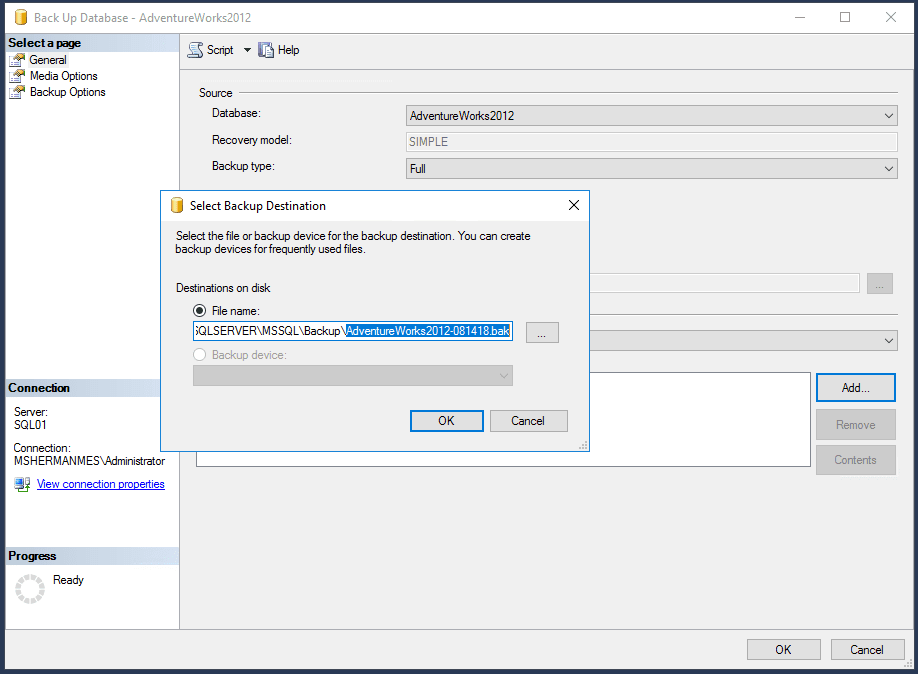
8. Next, append a filename to the end of this path such as AdventureWorks2012-081418.bak – Be sure to end the filename with the extension .bak and select OK
10. Once you have pressed OK on the Select Backup Destination prompt, you are ready to back up the database! All you need to do now is hit OK, and the database will begin backing up. You will see a progress bar in the bottom left-hand corner, and when the backup is complete, a window will appear saying ‘The backup of database ‘AdventureWorks2012’ completed successfully.‘
Navigate to the destination path, noted earlier, (in this case C:\Program Files\Microsoft SQL Server\MSSQL13.MSSQLSERVER\MSSQL\Backup\) you will see your newly created file (in this case AdventureWorks2012-081418.bak) – Congratulations! This file is the full export of your database and is ready to be imported to the new server. If you have more databases, then repeat the steps above for each database you are moving. After copying all database process to the next step of restoring databases to the destination server.
Restoring Databases to the Destination Server
You should now have a .bak file of all your databases on the source server. These database files need to be transferred to the destination server. There are numerous ways to move your data to the destination server; you can use USB, Robocopy or FTP. After copying a database you can store it on your destination server, for our example, we have stored it on the C drive in a folder named C:\dbbackups .
1. Open Microsoft SQL Server Management Studio.
2. Log in to the SQL server using Windows Authentication or SQL Authentication.
3. Expand the server and right click on Databases and select Restore Database.
4. The Restore Database screen looks very similar to the Back Up Database screen.Under Source, you will want to select Device instead of Database. Selecting Device allows you to restore directly from a file. Once you’ve chosen Device, click the browse icon […]
5. Select Add, then navigate to the folder in which your .bak files lives. (In this case, C:\dbbackups).
6. Select the first database .bak you would like to restore and click OK.

7. Click OK and now you are ready to import the database. Before importing, let’s take a look at the Options section on the left-hand side. Under Options, you will see other configurations for restoring databases such as Overwrite the Existing Database, Preserve the Replication Settings and Restrict Access to the Restored Database. In this case, we are not replacing an existing database so I will leave all these options unchecked. If you wanted to replace an existing database (for example, the backed up database has newer data than on the destination server or you are replacing a development or production database) then simply select Overwrite the Existing Database.
[su_box title=”Note:” style=”glass” box_color=”#3ac6eb” title_color=”#ffffff” radius=”20″]Advanced users may be comfortable leaving the destination as is, provided the permissions are correct on the output folder. [/su_box]
8. Clicking OK begins the restore process as indicated by the popup window that reads ‘Database ‘AdventureWorks2012′ restored successfully.’ You have migrated your database from the source to the destination server.
Repeat this process for each database that you are migrating. You can then update path references in your scripts/application to point to the new server, verify that the migration was successful.
Migrating Microsoft SQL Server Logins
After importing your databases if you are unable to connect using your SQL login, you may receive the error ‘Login failed for user ‘example.’ (Microsoft SQL Server, Error: 18456).‘ Because the database is in the Traditional Login and User Model, logins are stored separately in the source server and credentials are not contained within the database itself. From this point on, the destination server can be configured to use the Contained Database User Model which keeps the logins in your database and out of the source server. Until then, we will have to move and interact with the users as part of the Traditional model. Continue below to proceed with the migration of your SQL users.
Backing up and restoring the databases did move your SQL logins relation to the databases (your logins are still associated with the correct databases with the correct permissions) but the actual logins itself did not transfer to the new server. You can verify this by opening SSMS (SQL Server Management Studio) on the destination server and navigating to Server > Security > Logins. You will notice that any custom SQL logins you created on the previous server did not transfer over here, but if you go to Server > Databases > Your Database (AdventureWorks2012 in this case) > Security > Users you’ll see the correct login associated with the database.
If you have one or two SQL users, you can just delete the user’s association to the database in Servers > Databases > AdventureWorks2012 > Security > Users, re-create the user in Server > Security > Logins and map it to the proper database.
If you have many logins, you will have to follow an additional process outlined below. To migrate all SQL users, open a New Query window on the source server and run the following script:
USE master GO IF OBJECT_ID ('sp_hexadecimal') IS NOT NULL DROP PROCEDURE sp_hexadecimal GO CREATE PROCEDURE sp_hexadecimal @binvalue varbinary(256), @hexvalue varchar (514) OUTPUT AS DECLARE @charvalue varchar (514) DECLARE @i int DECLARE @length int DECLARE @hexstring char(16) SELECT @charvalue = '0x' SELECT @i = 1 SELECT @length = DATALENGTH (@binvalue) SELECT @hexstring = '0123456789ABCDEF' WHILE (@i <= @length) BEGIN DECLARE @tempint int DECLARE @firstint int DECLARE @secondint int SELECT @tempint = CONVERT(int, SUBSTRING(@binvalue,@i,1)) SELECT @firstint = FLOOR(@tempint/16) SELECT @secondint = @tempint - (@firstint*16) SELECT @charvalue = @charvalue + SUBSTRING(@hexstring, @firstint+1, 1) + SUBSTRING(@hexstring, @secondint+1, 1) SELECT @i = @i + 1 END SELECT @hexvalue = @charvalue GO IF OBJECT_ID ('sp_help_revlogin') IS NOT NULL DROP PROCEDURE sp_help_revlogin GO CREATE PROCEDURE sp_help_revlogin @login_name sysname = NULL AS DECLARE @name sysname DECLARE @type varchar (1) DECLARE @hasaccess int DECLARE @denylogin int DECLARE @is_disabled int DECLARE @PWD_varbinary varbinary (256) DECLARE @PWD_string varchar (514) DECLARE @SID_varbinary varbinary (85) DECLARE @SID_string varchar (514) DECLARE @tmpstr varchar (1024) DECLARE @is_policy_checked varchar (3) DECLARE @is_expiration_checked varchar (3) DECLARE @defaultdb sysname IF (@login_name IS NULL) DECLARE login_curs CURSOR FOR SELECT p.sid, p.name, p.type, p.is_disabled, p.default_database_name, l.hasaccess, l.denylogin FROM sys.server_principals p LEFT JOIN sys.syslogins l ON ( l.name = p.name ) WHERE p.type IN ( 'S', 'G', 'U' ) AND p.name <> 'sa' ELSE DECLARE login_curs CURSOR FOR SELECT p.sid, p.name, p.type, p.is_disabled, p.default_database_name, l.hasaccess, l.denylogin FROM sys.server_principals p LEFT JOIN sys.syslogins l ON ( l.name = p.name ) WHERE p.type IN ( 'S', 'G', 'U' ) AND p.name = @login_name OPEN login_curs FETCH NEXT FROM login_curs INTO @SID_varbinary, @name, @type, @is_disabled, @defaultdb, @hasaccess, @denylogin IF (@@fetch_status = -1) BEGIN PRINT 'No login(s) found.' CLOSE login_curs DEALLOCATE login_curs RETURN -1 END SET @tmpstr = '/* sp_help_revlogin script ' PRINT @tmpstr SET @tmpstr = '** Generated ' + CONVERT (varchar, GETDATE()) + ' on ' + @@SERVERNAME + ' */' PRINT @tmpstr PRINT '' WHILE (@@fetch_status <> -1) BEGIN IF (@@fetch_status <> -2) BEGIN PRINT '' SET @tmpstr = '-- Login: ' + @name PRINT @tmpstr IF (@type IN ( 'G', 'U')) BEGIN -- NT authenticated account/group SET @tmpstr = 'CREATE LOGIN ' + QUOTENAME( @name ) + ' FROM WINDOWS WITH DEFAULT_DATABASE = [' + @defaultdb + ']' END ELSE BEGIN -- SQL Server authentication -- obtain password and sid SET @PWD_varbinary = CAST( LOGINPROPERTY( @name, 'PasswordHash' ) AS varbinary (256) ) EXEC sp_hexadecimal @PWD_varbinary, @PWD_string OUT EXEC sp_hexadecimal @SID_varbinary,@SID_string OUT -- obtain password policy state SELECT @is_policy_checked = CASE is_policy_checked WHEN 1 THEN 'ON' WHEN 0 THEN 'OFF' ELSE NULL END FROM sys.sql_logins WHERE name = @name SELECT @is_expiration_checked = CASE is_expiration_checked WHEN 1 THEN 'ON' WHEN 0 THEN 'OFF' ELSE NULL END FROM sys.sql_logins WHERE name = @name SET @tmpstr = 'CREATE LOGIN ' + QUOTENAME( @name ) + ' WITH PASSWORD = ' + @PWD_string + ' HASHED, SID = ' + @SID_string + ', DEFAULT_DATABASE = [' + @defaultdb + ']' IF ( @is_policy_checked IS NOT NULL ) BEGIN SET @tmpstr = @tmpstr + ', CHECK_POLICY = ' + @is_policy_checked END IF ( @is_expiration_checked IS NOT NULL ) BEGIN SET @tmpstr = @tmpstr + ', CHECK_EXPIRATION = ' + @is_expiration_checked END END IF (@denylogin = 1) BEGIN -- login is denied access SET @tmpstr = @tmpstr + '; DENY CONNECT SQL TO ' + QUOTENAME( @name ) END ELSE IF (@hasaccess = 0) BEGIN -- login exists but does not have access SET @tmpstr = @tmpstr + '; REVOKE CONNECT SQL TO ' + QUOTENAME( @name ) END IF (@is_disabled = 1) BEGIN -- login is disabled SET @tmpstr = @tmpstr + '; ALTER LOGIN ' + QUOTENAME( @name ) + ' DISABLE' END PRINT @tmpstr END FETCH NEXT FROM login_curs INTO @SID_varbinary, @name, @type, @is_disabled, @defaultdb, @hasaccess, @denylogin END CLOSE login_curs DEALLOCATE login_curs RETURN 0 GO
This script creates two stored procedures in the source database which helps with migrating these logins. Open a New Query window and run the following:EXEC sp_help_revlogin
This query outputs a script that creates new logins for the destination server. Copy the output of this query and save it for later. You will need to run this on the destination server.
Once you’ve copied the output of this query, login to SSMS on the destination server and open a New Query window. Paste the contents from the previous script (it should have a series of lines that look similar to — Login: BUILTIN\Administrators
CREATE LOGIN [BUILTIN\Administrators] FROM WINDOWS WITH DEFAULT_DATABASE = [master]) and hit Execute.
You have now successfully imported all SQL logins and can now verify that the databases have been migrated to the destination server by using your previous credentials.
Migrating Views and Stored Procedures
Views and stored procedures will migrate with the database if you are using the typical SQL Tape backups. Follow the instructions below if you need to migrate views and stored procedures independently.
- Open Microsoft SQL Management Studio on the Source server.
- Log in to your SQL server.
- Expand the server and as well as Databases.
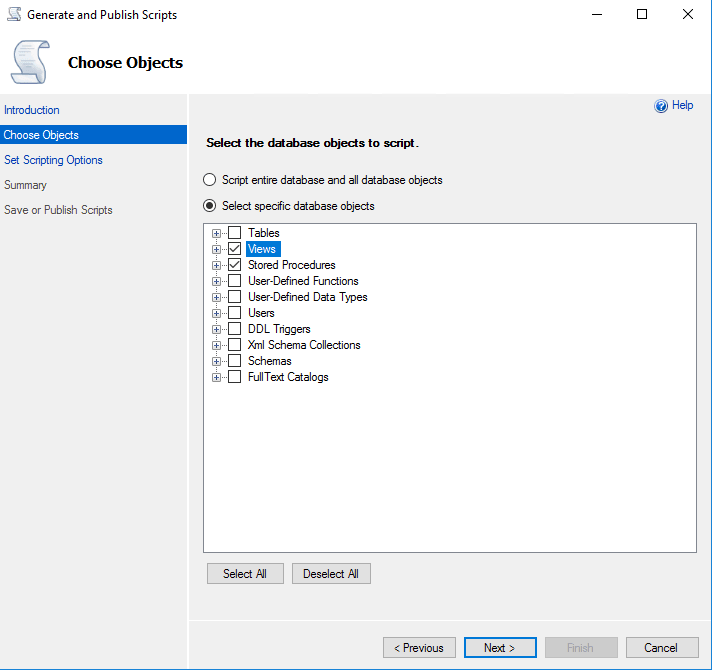
- Right click on the name of your database and go to Tasks > Generate Scripts.
- Click Next.
- We will change Script entire database and all database objects to Select specific database objects and only check Views and Stored Procedures.
- Click Next, notice the Save to File option. Take note of the file path listed. In my case, it is C:\Users\Administrator\Documents\script.sql – The path of saved views and stored procedures.
- Click Next >> Next >>Finish, and select C:\Users\Administrator\Documents\script.sql and copy it to the destination server.
- Go to the destination server, open SSMS and log in to the SQL server.
- Go to File > Open > File or use the keyboard shortcut CTRL+O to open the SQL script. Select the file C:\Users\Administrator\Documents\script.sql to open it.
- You will see the script generated from the source server containing all views and stored procedures. Click Execute or use the keyboard shortcut F5 and run the script.
Note: Unfortunately, there is no built-in way to do this with the command line. There are 3rd party tools and even a tool by Microsoft called mssql-scripter for more advanced scripting.
You have now migrated the views and stored procedures to your destination server! Repeat this process for each database you are migrating. A little guidance goes a long way in database administration. Every SQL server will have its own configurations and obstacles to face, but we hope this article has given you a strong foundation for your Microsoft SQL Server Migration.
Looking for a High Availability, platform-independent SQL service that is easily scalable and can grow with your business? Check out our SQL as a Service and managed database product offered at Liquid Web. Speak with one of our amazing Hosting Advisers to find the perfect solution for you!