


Installing Python WSGI Applications on cPanel
In this article, we will be installing a simple Python app on a cPanel server utilizing WSGI or Web Server Gateway Interface.

Let’s begin by installing the packages and dependencies for Python 3.
yum install python3 python3-pip python3-devel python-virtualenvNext, we’ll install the packages and dependencies for Passenger.
Note: Installing ea-ruby24-mod_passenger will disable the mod_userdir module.
yum install ea-ruby24-mod_passenger ea-apache24-mod_envNow, we need to change directories back to the home directory for the cPanel account this application will reside on.
cd /home/thisisatestNext, we’ll create a virtual environment using the following command:
virtualenv --python=python3 python_testNow, change directories into the virtual environment and run the following command to activate it:
source bin/activateIn this example, we’ll be creating a sample Flask application to demonstrate how to run a Python application with Passenger.
Let’s create the Flask file first.
vim python_test.pyNext, let's add the following info into the python_test.py file:
from flask import Flask

app = Flask(__name__)

@app.route("/")
def index():
  return "<h1>Hello, world!</h1>"
Now, let’s create the Passenger WSGI file.
vim passenfer_wsgi.pyNext, add the following info into the passenfer_wsgi.py file:
import sys, os
INTERP = "/home/thisisatest/python_test/bin/python"
if sys.executable != INTERP: os.execl(INTERP, INTERP, *sys.argv)
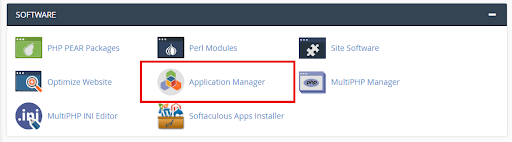
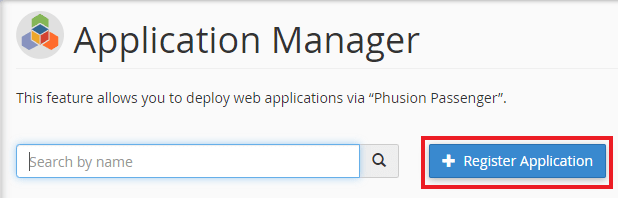
from python_test import app as applicationThe last step is to register this as an application inside of cPanel. Login to cPanel and navigate to the Software manager section, then click on Application Manager.
Next, enter the name for the application and click on Register Application.
Now, under the Register an Application, we name the app, then choose the domain it will be run on, and then finally, enter the path to the application itself. In this case, the name will be python_test. The domain will be the thisisatestingwebsite.com account, and the path will be /home/thisisatest/python_test. We have also selected "Development" under the Deployment Mode.
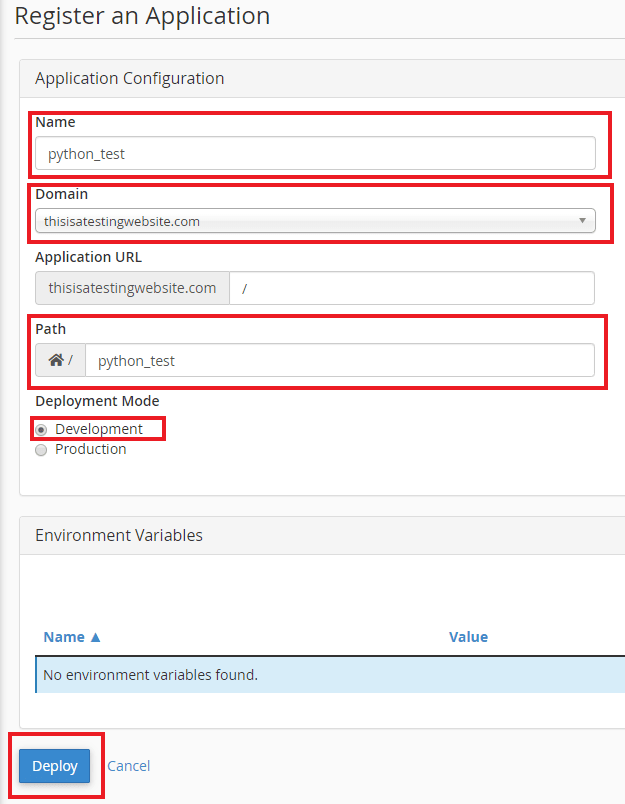
Save this application by clicking on the Deploy button.
Now, we can load this application in a browser window by entering the URL where the app was created. That's all there is to it!

Get Started Today!
Are you looking to begin pushing your web apps to a staging or production environment and need a solid platform to build on? Look no further as Liquid Web has you covered! Check out our line of VPS or Cloud Dedicated servers today. We can get you on the right path to owning your own development servers today! As a side note, this would also be useful in a HIPAA compliant hosting solution.
Related Articles:


About the Author: John Long


Our Sales and Support teams are available 24 hours by phone or e-mail to assist.
Latest Articles
In-place CentOS 7 upgrades
Read ArticleHow to use kill commands in Linux
Read ArticleChange cPanel password from WebHost Manager (WHM)
Read ArticleChange cPanel password from WebHost Manager (WHM)
Read ArticleChange the root password in WebHost Manager (WHM)
Read Article