
Node Version Manager, also known as NVM, is used to control and manage multiple active versions of Node.js in one system. It is a command line utility and a bash script that allows programmers to shift between different versions of Node.js.
While NVM facilitates easy installation and switching between Node.js versions — retaining globally installed packages for each version, Node Package Manager, also known as NPM, is a package manager that facilitates the installation of libraries, plugins, frameworks, and applications.
Using this “Install NVM Linux/Windows” guide, you will be able to install any available Node.js version using a single command and setting defaults using the command line utility.
Install NVM Linux/Windows Guide – Operating System #1: Installing Node Version Manager for Node.js on AlmaLinux
- These installation instructions are specifically for an AlmaLinux server.
- We use a Liquid Web VPS server running AlmaLinux 8 64-bit Core-managed server.
- We are logged in as the Root user.
Step #1: Update and Download the Package from GitHub
First, you need to make sure all of the packages are up to date:
yum updateor
dnf updateStep #2: Install NVM on Linux
Next, you will need to run the following NVM installation script to install NVM on Linux. This action will install the latest version of Node Version Manager (NVM) from GitHub.
[root@cloudvpstemplate ~]# curl -o- https://raw.githubusercontent.com/nvm-sh/nvm/v0.35.3/install.sh | bash
  % Total    % Received % Xferd  Average Speed   Time    Time     Time  Current
                                 Dload  Upload   Total   Spent    Left  Speed
100 13527  100 13527    0     0   125k      0 --:--:-- --:--:-- --:--:--  125k
=> Downloading nvm as script to '/root/.nvm'

=> Appending nvm source string to /root/.bashrc
=> Appending bash_completion source string to /root/.bashrc
=> Close and reopen your terminal to start using nvm or run the following to use it now:

export NVM_DIR="$HOME/.nvm"
[ -s "$NVM_DIR/nvm.sh" ] && \. "$NVM_DIR/nvm.sh"  # This loads nvm
[ -s "$NVM_DIR/bash_completion" ] && \. "$NVM_DIR/bash_completion"  # This loads nvm bash_completion
Step #3: Finish Update
Once the script completes without errors, you need to run a source command to immediately implement the changes.
[root@cloudvpstemplate ~]# source ~/.bash_profile
[root@cloudvpstemplate ~]#
Step #4: Select Node.js Version
Now NVM is ready to install the various versions of Node.js on your system. You need to run the following command to find out all the available versions of Node.js. This command will produce a long list of available versions including the LTS versions. LTS stands for Long Term Support:
[root@cloudvpstemplate ~]# nvm list-remote
       v18.17.0   (Latest LTS: Hydrogen)
        v19.0.0
        v19.0.1
        v19.1.0
        v19.2.0
        v19.3.0
        v19.4.0
        v19.5.0
        v19.6.0
        v19.6.1
        v19.7.0
        v19.8.0
        v19.8.1
        v19.9.0
        v20.0.0
        v20.1.0
        v20.2.0
        v20.3.0
        v20.3.1
        v20.4.0
        v20.5.0
Step #4: Install Node.js
Next, install the latest version of Node.js from the v20 release (or the current release’s version number) by running the nvm install 20 command (or the equivalent command for the current release’s version number). The output should look something like this:
[root@cloudvpstemplate ~]# nvm install 20
Downloading and installing node v20.5.0...
Downloading https://nodejs.org/dist/v20.5.0/node-v20.5.0-linux-x64.tar.xz...
################################################################################# 100.0%
Computing checksum with sha256sum
Checksums matched!
Now using node v20.5.0 (npm v9.8.0)
Creating default alias: default -> 20 (-> v20.5.0)
Step #5: Verify the Installation
To review which version of Node.js is currently active, you will run the following command.
[root@cloudvpstemplate ~]# nvm current
v20.5.0
[root@cloudvpstemplate ~]#
Step #6: Switch Between Node.js Versions Using NVM
After installing NVM on Linux, you can manage multiple versions of Node.js on your system. For example, to install an older version, you will run the following command:
[root@cloudvpstemplate ~]# nvm install v18
Downloading and installing node v18.17.0...
Downloading https://nodejs.org/dist/v18.17.0/node-v18.17.0-linux-x64.tar.xz...
################################################################################# 100.0%
Computing checksum with sha256sum
Checksums matched!
Now using node v18.17.0 (npm v9.6.7)
Installing a new version of Node.js automatically switches from the currently active version to the newly updated version. Observe the output of the nvm current command:
[root@cloudvpstemplate ~]# nvm current
v18.17.0
[root@cloudvpstemplate ~]#
Now that there are two versions of Node.js available, to use v20, you can run the following command to switch back to v20:
[root@cloudvpstemplate ~]# nvm use v20
Now using node v20.5.0 (npm v9.8.0)
Lastly, you can always use the nvm help command to get started on further Node.js management options:
nvm helpInstall NVM Linux/Windows Guide – Operating System #2: Installing Node Version Manager for Node.js on Windows Server 2019
- These installation instructions are specifically for a Windows server.
- We use a Liquid Web VPS server running Windows Server 2019 64-bit Standard Edition Core-managed server.
- We are logged in as the Administrator user.
Step #1: Download NVM Setup from GitHub
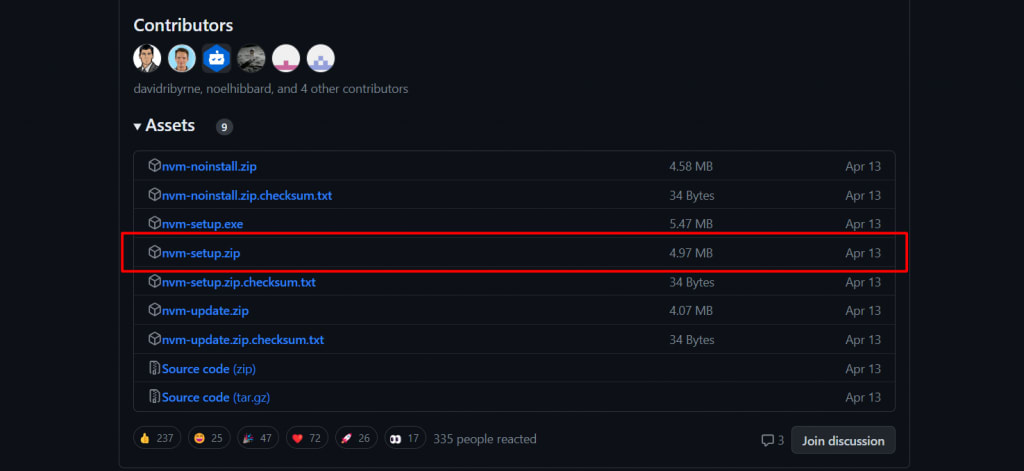
To install NVM on Windows, first, you must download the setup file from the appropriate GitHub page. You need to go to the Releases Page for NVM – Windows Edition and download the nvm-setup.zip compressed set of files by scrolling down to the Assets table:
Step #2: Locate and Extract the Zipped File
Generally, the file should download to your Downloads folder, or wherever you have configured your downloads to be saved:

Extract the zipped contents of the compressed file in the same location:
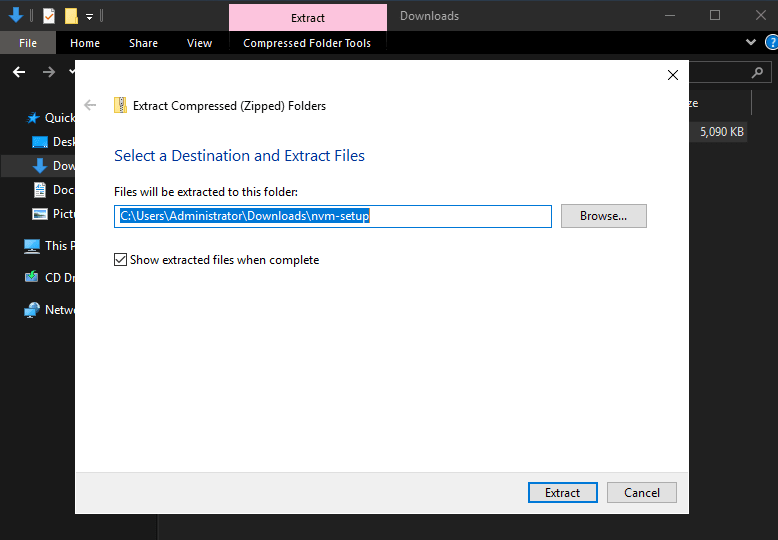
You will have the nvm-setup application extracted in the same folder:

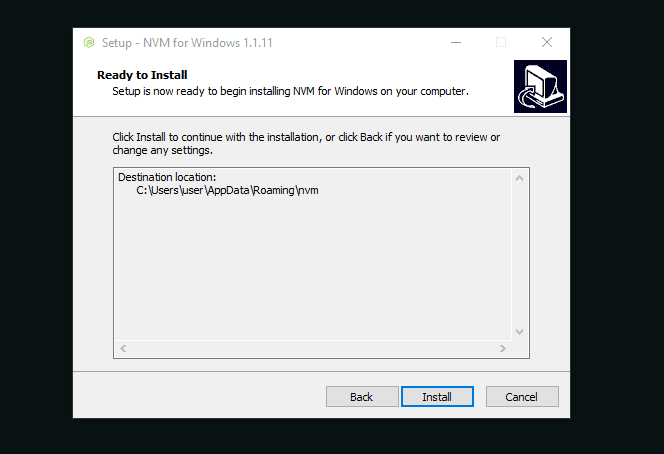
Step #3: Install NVM
Open the executable file to run the installer, select the “I accept the agreement” radio button option, and click the Next button:

Select the destination folder in the following window:

Set the Node.js symlink:

Now you are ready to click the Install button:
Once the installation process has been completed, click the Finish button:

Step #4: Verify the Installation
To verify that NVM was successfully installed, you can run the following command via the Window Command prompt or any Windows CMD utility you are using:
C:\Users\user>nvm --version
1.1.11
Step #5: Install NPM
You are able to install the latest version of Node Package Manager (NPM) using the following command in your CMD terminal. The output should look something like this:
C:\Users\user>nvm install latest
20.5.0
Downloading node.js version 20.5.0 (64-bit)...
Extracting node and npm...
Complete
npm v9.8.0 installed successfully.

Installation complete. If you want to use this version, type

nvm use 20.5.0
Or you can use this command to choose the version of NPM you would like to install:
C:\Users\user>nvm install 12
Downloading node.js version 12.22.12 (64-bit)...
Complete
Creating C:\Users\user\AppData\Roaming\nvm\temp

Downloading npm version 6.14.16... Complete
Installing npm v6.14.16...

Installation complete. If you want to use this version, type

nvm use 12.22.12
Step #6: Switch Between NVM and NPM Versions
To check which version of NVM and Node.js you are running, you can run the following commands:
C:\Users\user>node --version
v20.5.0

C:\Users\user>npm --version
9.8.0
If you have multiple versions of Node.js installed, you can use the following command to list them all. This will make it easier for you to choose between versions:
C:\Users\user>nvm list

  * 20.5.0 (Currently using 64-bit executable)
    12.22.12
In case you need to run an older version that is already installed on your system, you can run the following command:
C:\Users\user>nvm use 12
Now using node v12.22.12 (64-bit)

C:\Users\user>node --version
v12.22.12

C:\Users\user>npm --version
6.14.16
Bottom Line
Node Version Manager (NVM) allows you to easily manage multiple versions of Node.js across different projects that need different versions. Once Node.js is installed, your environment is ready for you to begin developing a Node.js application.
Would you like more information about setting up an advanced, stable development environment? Simply open a chat session with us. Our web hosting experts will help you make an informed decision.
Original Publication Date
This article was originally published in May 2020. It has since been updated for accuracy and comprehensiveness.