How To Set Up a New Email Account in Thunderbird
Posted on by dpepper | Updated:
- How To Set Up a New Email Account in Thunderbird
- How To Modify an Existing Email Account in Thunderbird
- How to Subscribe to IMAP Folders in Thunderbird
Reading Time: 4 minutes
Pre-Flight Check
- These instructions are intended specifically for setting up an email account in Mozilla Thunderbird 38.3.0 on Mac OS X 10.11.1.
- While the steps should be similar across platforms and operating systems, they may not necessarily apply to older versions of Thunderbird.
- For help with general email account settings, see How to Set up Any Email Client.
Step #1: Create the Account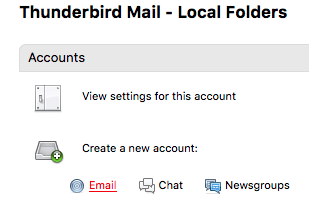
- From Thunderbird’s main screen, select Email under the Create a new account section, or use the main menu to pull down to File -> New -> Existing Mail Account.
- On the window that pops up, select Skip this and use my existing email to proceed to the Mail Account Setup screen.
- Here you will enter some basic information about the account:
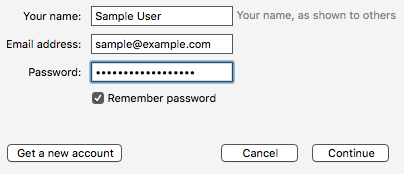 Your name should be your name as you want it to appear in emails that you send.
- Email address should simply be the email address you're setting up.
- Password is the email account’s password.
- Select Continue. Thunderbird now will attempt to discover the settings for your account automatically. If autoconfigure is not successful, you will need to configure the account manually.
Step #2: Set Account Type
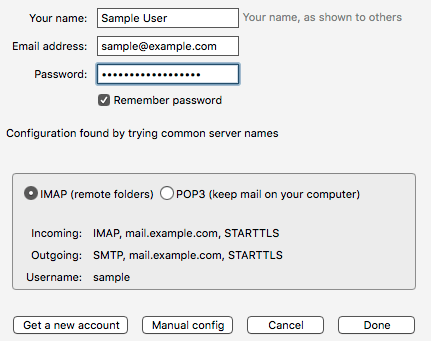
- Select your account type, IMAP or POP3. For its ability to keep email in sync across multiple devices (desktop, laptop, phones and tablets), IMAP generally is recommended.
- Now click on the Manual config button to expand the settings window and set your connection type.
Step #3: Set Connection Method
- Fill out the Account Information fields using the instructions below as a guide.
- Click Done to complete the setup process.
- If you're using standard (non-SSL) connection settings or are using secure (SSL) connection settings and have an SSL certificate installed on your mailserver, that's all you'll need to do set up the account. If you're using SSL connection settings and are using the server's self-signed SSL certificate, you will have one more step to complete.
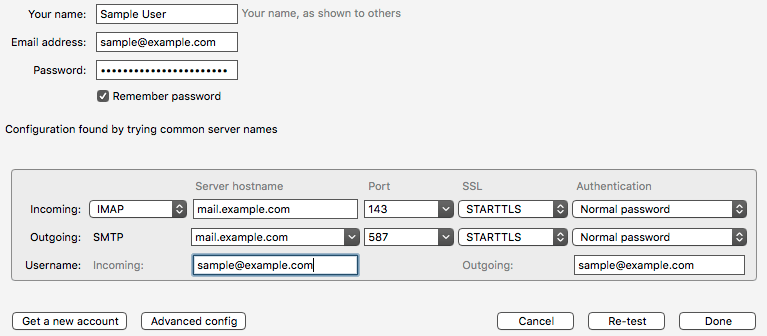
Standard (non-SSL) settings
- Server hostname column: Enter your domain name (e.g., mail.yourdomainname.com or yourdomainname.com) on both the Incoming and Outgoing rows.
- Port column:
- Incoming: For an IMAP connection, select "143"; For POP3, select "110".
- Outgoing: Select "25" or "587"
- SSL column: Select "STARTTLS" on both the Incoming and Outgoing rows.
- Authentication: This should be set to "Normal password" on both the Incoming and Outgoing rows.
- Username: Your full email address, not just the part before the “@” symbol, on both the Incoming and Outgoing rows.
Note: If you accidentally set the SSL fields to "None", you will see a warning popup notifying you of the security risks associated with foregoing any form of encryption. You should click on the Change Settings button to go back and change both SSL fields to "STARTTLS", or configure a secure (SSL) connection.
Secure (SSL) Settings
- Server hostname column: Enter your server’s hostname (e.g., host.yourdomainname.com) on both the Incoming and Outgoing rows.
- Port column:
- Incoming: For an IMAP connection, select "993"; For POP3, select "995".
- Outgoing (SMTP): Select "465".
- SSL: This should be set to "SSL/TLS" for both the Incoming and Outgoing rows.
- Authentication: This should be set to "Normal password" on both the Incoming and Outgoing rows.
- Username: This is your full email address, not just the part before the “@” symbol, for both the Incoming and Outgoing rows.
Step #4: Security Certificate
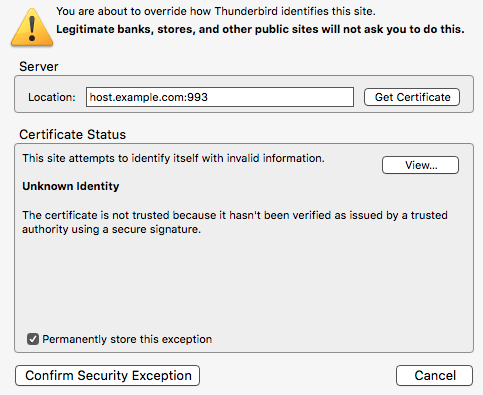 If your server has a self-signed (free) SSL certificate installed on the mailserver and you attempt to make a secure connection using Thunderbird, you should see a warning in a popup window such as the one on the right.
- If that is the case, you will need to click the Confirm Security Exception button to accept the certificate and complete the setup process.
- If you choose, you also may check the box to Permanently store this exception so that you don’t need to continue to accept the certificate each time Thunderbird connects to your server.
Note: A self-signed certificate uses the same level of encryption as a verified certificate, except that it is you who are verifying your server’s identity, rather than a third party. However, if you would prefer to use a third-party verified SSL certificate to cover core services (cPanel/WHM, POP3, IMAP, SMTP and FTP) on your server, you can find instructions for ordering and installing an SSL certificate at Install an SSL certificate on a Domain using cPanel, and you’ll find a guide to installing your certificate on email and other core server services at Installing Service SSLs in cPanel. Should you find that you need any assistance, please feel free to contact a Heroic Support® technician who can assist with obtaining and installing an SSL from the vendor of your choice.
Related Articles:

About the Author: dpepper
Categories
Have Some Questions?
Our Sales and Support teams are available 24 hours by phone or e-mail to assist.
1.800.580.4985
1.517.322.0434
Latest Articles
In-place CentOS 7 upgrades
Read ArticleHow to use kill commands in Linux
Read ArticleChange cPanel password from WebHost Manager (WHM)
Read ArticleChange cPanel password from WebHost Manager (WHM)
Read ArticleChange the root password in WebHost Manager (WHM)
Read ArticleWant More Great Content Sent to Your Inbox?


