Using SSH Client Natively in Windows 10
Have you ever wanted to use SSH to control your Linux server from Windows? You’ve most likely downloaded and launched third-party applications like PuTTY or KiTTY to get this functionality on your Windows computer. Thankfully, with the Windows 10 Fall Creators Update, you can now use a built-in SSH client directly within your Windows OS.
Third party applications are not fully managed. However, our support team will do their best to provide help when they can. For further support, we recommend contacting the applications’ developer for extensive issues, since these applications are not supported by Liquid Web.
How to set up SSH to natively connect to your server from Windows 10
Since the OpenSSH client in Windows 10 is still in the beta stage, the client is not installed by default in Windows 10. But not to worry! The process is simple and only requires a few clicks and a restart of your computer to begin using SSH right from the command prompt or Powershell. Let’s take a look at how to install OpenSSH on your Windows workstation.
Enable Windows 10 Developers Mode
Because this feature is only available in Developers Mode, you’ll need to first make sure you’ve enabled that option. Don’t worry, it should only take a few minutes to download the 6 MB file necessary to enter Developers Mode.
- Click the windows start menu and type Developers Settings in the search bar on the lower left hand side of the screen.
- You should see an option called For developers settings in the results. To open you can hit the Enter key, or mouse click the option.
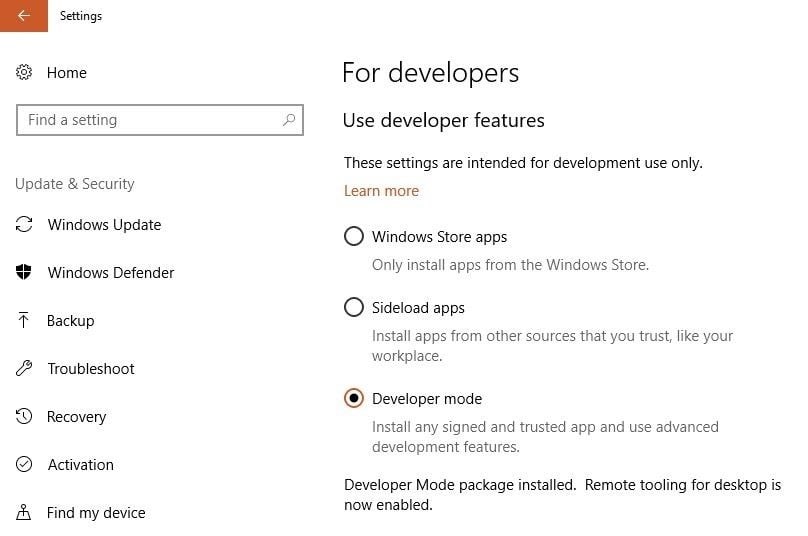
- With the windows settings opened to the For Developers menu you can change the mode. By default, under Use developer features, you should see Windows Store Apps selected. However, we want to select Developer Mode.

Install the OpenSSH Client
Now that we have Windows 10 in developer mode the SSH client can be installed on Windows.
- Click the windows start menu and type start typing Apps in the search bar on the lower left hand side of the screen.
- You should see an option called Apps & Features in the results. To open you can hit the Enter key, or mouse click the option.
- Find and click Manage Optional Features.

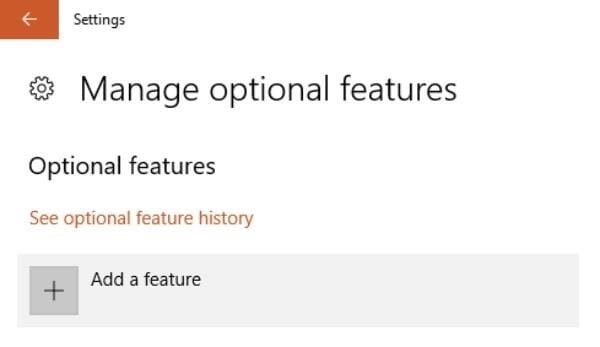
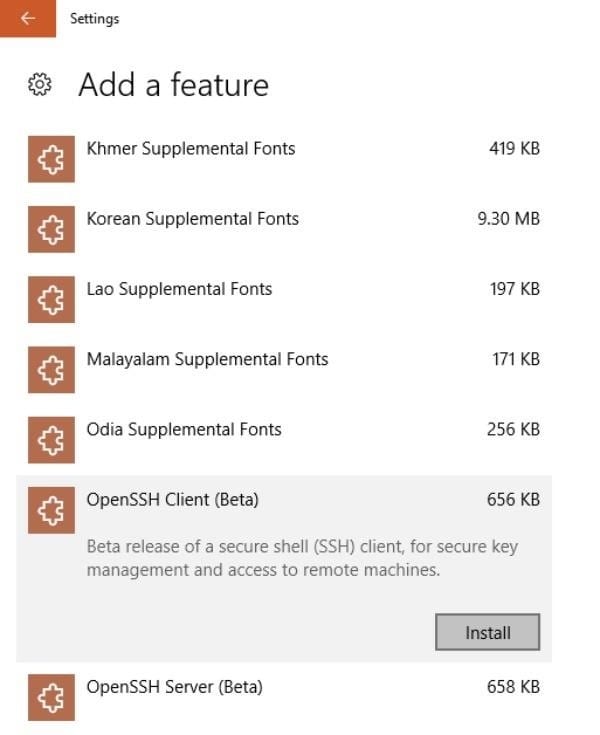
- Next, click Add a feature. You should be presented with a list of features. Scrolling to the bottom, you should find Open SSH Client(Beta).
Note:There is also an OpenSSH Server option, but this will allow others to connect to your computer using SSH, which may be a security issue..

- Click OpenSSH Client to expand it and then select Install. Once installed, it will disappear from the list.
All you need to do now is reboot your computer and you are ready to start using SSH from the command prompt or Powershell!
Using OpenSSH in Windows 10
To use OpenSSH, after you’ve completed the above steps, just open Powershell or the command prompt and enter the command SSH to see the list of current arguments it accepts.
OpenSSH in Windows works just like it does in other operating systems. For example, to connect to a server example.com with username Dave, I would enter the command:
ssh dave@example.com
By default, the client attempts to make the connection on port 22. If you need to specify a different port, just use the –p flag, followed by the alternate port number:
ssh dave@example.com -p 7654 (using the port that is open on your server for ssh)
And that is it. Your Windows computer can now use SSH directly from the operating system. No more having to download or launch any third-party applications.
For further explanation of SSH and the optional commands visit SSH Communications Security, the company behind SSH (Secure Shell).
Related Articles:

About the Author: Helpful Humans of Liquid Web
Our Sales and Support teams are available 24 hours by phone or e-mail to assist.
Latest Articles
How to use kill commands in Linux
Read ArticleChange cPanel password from WebHost Manager (WHM)
Read ArticleChange cPanel password from WebHost Manager (WHM)
Read ArticleChange cPanel password from WebHost Manager (WHM)
Read ArticleChange the root password in WebHost Manager (WHM)
Read Article


