


Integrating Cloudflare Access with a Bitwarden instance
In this article we will examine how to integrate a Bitwarden instance with the Cloudflare Access product from Cloudflare, Inc. Adding an additional degree of security and control is typically required for this integration to communicate with the Bitwarden service for password management.
What is the Bitwarden password manager?
Bitwarden is an open source, secure password storage solution that includes an extensive range of features at an affordable price. It allows you to generate and manage unique passwords and passkeys, increasing online productivity and strengthening your privacy from any device or location.
Bitwarden uses strong AES-256 encryption, Two-Factor Authentication (2FA), and zero-knowledge architecture, and outside firms and researchers routinely audit its security. Bitwarden utilizes a cipher used by banks and government agencies, ensuring the highest security standards. Additionally, Bitwarden's two-factor authentication options and zero-knowledge architecture ensure security.
Bitwarden has a robust security architecture to protect your confidential data. Its multi-layered strategy includes two-factor authentication, encryption utilized by banks and government agencies worldwide, and frequent security assessments to guarantee that your passwords remain uncrackable. These audits show Bitwarden's commitment to upholding the strictest security guidelines.
How to enable the Cloudflare Access product for your domain
To use Cloudflare's security, performance, and reliability features, you need to set up the Cloudflare Access product and configure its detailed settings for your domain. The setup steps are as follows:
1. Open a new Cloudflare account and populate your information in the account settings.
2. Reduce downtime for your domain.
3. Add your website. Add and activate a new domain to use Cloudflare.
4. Permit IP addresses from Cloudflare (for some). If your origin server is within your control, check your server setup if you intend to use Cloudflare's proxy. This check is to ensure that you are not inadvertently banning Cloudflare IP addresses.
5. Optimize the site's configuration. After activating Cloudflare for your website, you may enhance SEO and site speed and add extra application security layers.
Configuring authentication methods
Cloudflare provides a couple of choices for authentication at the time of signing in:
1. You can log in using your email address and password.
2. You can do a one-time login or authenticate using the Single Sign-On (SSO) method. If SSO is enabled, enter your email address.
3. You can log in with an Apple ID:
- If your Apple ID and Cloudflare account email are the same, you can access them using your Apple ID or email account and password.
- If the email for a Cloudflare account differs from an Apple ID, you must create a new one on Cloudflare. To access an existing account, ensure your email address is the same as the one associated with your Apple ID.
An overview of access management when using the Cloudflare Access product
Cloudflare Access decides who can access your application by using the Access policies you set. An Action and Rules that establish the scope of that Action form an access policy. Selecting a Rule Type, a Selector, and a Value for the Selector is necessary before creating a rule.
Actions
You can provide or withhold authorization to a specific person or group using Actions. Each policy can only have one Action set:
- Allow Action: Permit users who satisfy particular requirements can access to an application hidden behind Cloudflare Access using the Allow action. You might include a Require rule in the same policy action to impose further checks. Lastly, people who fit the policy's description of an Exclude rule are blocked from accessing the application.
- Block Action: Users cannot access an application behind Cloudflare Access by using the Block action.
Bypass Action: Any access enforcement for traffic that satisfies the specified rule criteria is disabled by the Bypass Action. Usually, the Bypass Action allows applications that need specific endpoints to be publicly accessible. - Service Auth Action: These rules govern authentication flows like mutual TLS and service tokens that don't require an Identity Provider login.
Rule Types
Rules operate like logical operators, and they assist you in identifying the user categories that your policy will impact. The Rule types include:
- Include Rule Type: The logical operator OR and the Include rule are comparable. When multiple Include rules are defined, users only need to fulfill one of the requirements.
- Exclude Rule Type: Similar to a NOT logical operator, the Exclude rule operates in such a way where user won't be able to access the application if they match any exclusion criteria.
Require Rule Type: Similar to an AND logical operator, the Require rule operates to grant access wen a user fulfills all requirements.
An Include rule needs to be included in every Access policy. This generates the first group of qualified users who can access an application. Next, Exclude and Require rules can be added.
Selector for defining rules
When you add a rule to your policy, you will be prompted to define the requirements you want users to fulfill. All access application types, including self-hosted, SaaS, and non-HTTP applications, can use these criteria. While other properties are continually polled for changes throughout the session, identity-based attributes are only verified once a user authenticates. Here is an example:
| Selector | Description | Checked at Login | Checked Continuously |
| Your email | Yes | No | |
| IP range | Your IP | Yes | Yes |
Installing and configuring a Bitwarden server instance
Here are the steps to install Biwarden on a Linux server:
1. Set up your domain. Configure the domain name with its DNS records set to point to your host server, and make sure ports 80 and 443 are open. You may also use different ports during installation.
2. Next, install Docker and Docker Compose. Install Docker and Docker Compose on your computer. Docker containers will be used to deploy and operate Bitwarden on your system. You can use any Docker edition or plan to run Bitwarden. Determine which edition works best for your setup.
3. Create a Bitwarden user and directory.
3.1. Make a Bitwarden user and directory so that you can finish the installation from there, The command to add a Bitwarden user and set the user's password is as follows:
sudo adduser testuser
sudo passwd testuser
3.2. Create a Docker Group and add the Bitwarden user to the Docker Group:
sudo groupadd docker
sudo usermod -aG docker bitwarden
3.3. Now, create a Bitwarden Directory and set appropriate permissions and ownership.
sudo mkdir /opt/bitwarden
sudo chmod -R 700 /opt/bitwarden
sudo chown -R testuser:testuser /opt/bitwarden
4. Install Bitwarden. Bitwarden offers a shell script that makes installation on Windows and Linux simple. To install Bitwarden using the shell script, you can download and run the following installation script:
curl -Lso bitwarden.sh "https://func.bitwarden.com/api/dl/?app=self-host&platform=linux" && chmod 700 bitwarden.sh
./bitwarden.sh install
5. To complete the installation process, get an installation ID and key by following the instructions found at the URL of https://bitwarden.com/host/. Set up Bitwarden on your computer. Make changes to the settings in the /bwdata/env/global.override.env file to configure your environment since some features of Bitwarden are not configured by the installation script.
6. Launch the instance. Open a web browser and navigate to the configured domain to test your installation. You can start the Bitwarden instance using the following command:
./bitwarden.sh startYou may now log in or create a new account. To validate the email associated with your new account, you must have set up SMTP environment variables.
Creating the Bitwarden + Cloudflare Access application instance with Zero Trust security
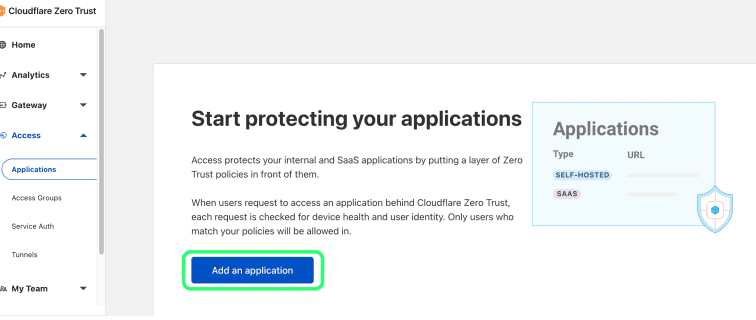
Now, we will be developing the Bitwarden + Cloudflare Access application instance with Zero Trust security. We will build a Security Assertion Markup Language (SAML) application here using the following steps:
1. Click on Access > Applications > Add an Application button.
2. Choose the SaaS option as the application type.
3. Open your organization in the Bitwarden web vault and go to the Settings > Single Sign-On screen. Enter the details on the Configure App screen using data from the web vault:
| Key | Description |
| Application | Enter Bitwarden. |
| Entity ID | Copy the SP entity ID from the Single Sign-On page of Bitwarden. |
| Assertion Consumer Service URL | Copy the URL for the Assertion Consumer Service (ACS) from the Bitwarden Single Sign-On page. |
| Name ID Format | From the dropdown menu, select Email value. |
4. Navigate to the Identity Providers menu. Choose the Identity Provider(s) you configured earlier, scroll back to the top, and click Next.
5. Next, define user access policies for the application. Fill out the fields for each policy's Action, Session Duration, and Policy Name.
6. Assigning a group policy (Access > Groups) or specific user policy rules (emails, emails ending in, country, or everyone) is the next step.
7. After defining access policies, choose Next by scrolling to the top.
8. Copy the following values from the Setup screen and enter them in the corresponding fields on the Bitwarden Single Sign-On page.
| Key | Description |
| SSO Endpoint | The SSO endpoints determine the location of Saas application login requests. The Single Sign On Service URL box in Bitwarden will be filled in with this value. |
| Access Entity ID or Issuer | Your SaaS application can be uniquely identified by its Access Entity ID or Issuer. This value will be entered into Bitwarden's Entity ID field. |
| Public Key | The public certificate that will be used to confirm your identity is called the public key. This value will be input into Bitwarden's X509 Public Certificate field. |
9. To save the application after entering the values into Bitwarden, choose Save on the Bitwarden Single Sign-On screen and Done on the Cloudflare page.
10. Now, click Add an Application > Bookmark to add a bookmark to the Bitwarden Login with SSO screen. Verify that the app launcher's bookmark is visible.
Testing Bitwarden access for Cloudflare
Now it's time to test everything out:
1. To test the configuration, navigate to https://vault.bitwarden.com, enter your email address, click the Continue option, and then click the Enterprise Single Sign-On button:
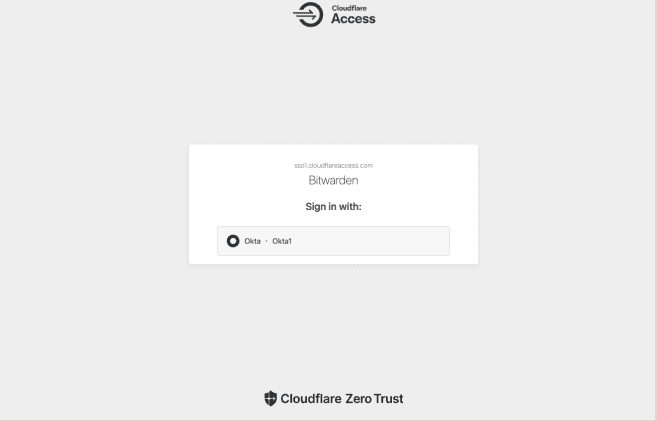
2. Now, enter the chosen organization ID and click the Log In option. You will be routed to a Cloudflare Access screen if your implementation has been successfully configured. Here you can select which Identity Provider to use for the current login:
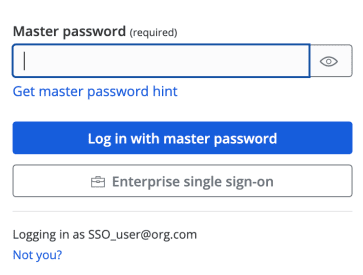
3. Your Identity Provider login page appears once you choose your Identity Provider. Enter the details that were needed to log in using your Identity Provider. To unlock your vault, enter your Bitwarden master password after authenticating with your Identity Provider credentials.
About integrating Cloudflare Access with Bitwarden
This article explored how to integrate a Bitwarden instance with the Cloudflare Access product. You may now set up gateways and tunneling for secure platform access with your successful configuration of the Cloudflare Access with Bitwarden solution. To be able to use Docker you would need to be using a VPS or similar plan type at Liquid Web.
Be sure to engage our knowledgeable Liquid Web customer service staff with any questions.
Related Articles:


About the Author: Sapta Upendran
Sapta is a passionate Linux system engineer, a voracious reader, a dexterous cook, and a wanderlust. She is also interested in technical and non-technical writing.


Our Sales and Support teams are available 24 hours by phone or e-mail to assist.
Latest Articles
In-place CentOS 7 upgrades
Read ArticleHow to use kill commands in Linux
Read ArticleChange cPanel password from WebHost Manager (WHM)
Read ArticleChange cPanel password from WebHost Manager (WHM)
Read ArticleChange the root password in WebHost Manager (WHM)
Read Article