In addition to better security, the main reason users upgrade or install PHP 8.2 on Ubuntu 22.04 is the significant performance increase over previous versions when it is installed and using the OPcache module. This combination greatly decreases the time it takes for your web page to load. If you are developing a site locally or launching it on one of Liquid Web's Ubuntu VPS or Dedicated Servers, having installed the PHP 8.2 version or newer is the way to go.
PHP 8.2 offers enhanced data processing in addition to additional features and optimizations, which can increase the speed and functionality of your website. Frequent security updates are available for PHP versions more recent than to guard against unwanted attacks and vulnerabilities.
Newer PHP versions have come out since then (including PHP 8.3), and it is highly recommended to use the most recent versions because of software improvements and security updates. Still, there are some who use legacy software for one reason or another. However, older PHP versions can leave open security holes on a server if they are not replaced. Therefore, this guide will cover how to install PHP 8.2 on Ubuntu 22.04.
Prerequisites
Correct permissions
First, ensure you have proper root or sudo permissionsto be able to manage the system and applications on the server. If you only have access to a non-root user on the system, then you may have to get more permissions from the server admin.
Existing PHP versions
Check to see if PHP is already installed. An older version of PHP may be the primary option if you choose the default LAMP stack when installing the Ubuntu image on the server for the first time. It's possible that the server doesn't have any version of PHP installed if you used a different image or performed a basic install. Access the terminal and run the below command to check the PHP version:
user@test:~# php -vIf you see an older PHP version, then you will have to install the new version and switch the version Apache connects to subsequently. If the "Command php not found" message is given, then no PHP version is currently installed.
Creating a quick backup
If you do have an existing PHP version installed already on your system, you may want to make a backup of any configurations before doing the upgrade in case there are issues (like if your site code isn't compatible) and you need to downgrade again. You can check on the current configuration directory by running following command:
user@test:~# php --ini
 Configuration File (php.ini) Path: /etc/php/7.0/cli
 Loaded Configuration File:         /etc/php/7.0/cli/php.ini
 Scan for additional .ini files in: /etc/php/7.0/cli/conf.d
This command shows the configurations are all in the /etc/php/7.0/ directory. So, if you want to make a quick backup, you can run a command similar to the following one:
user@test:~# sudo cp -a /etc/php/7.0/ /etc/php/7.0.backupAlso, you can save a list of existing PHP modules by running:
user@test:~# sudo cp -a /etc/php/7.0/ /etc/php/7.0.backupThis step can help when comparing the existing modules to the modules in PHP 8.2, as demonstrated later in this article.
How to install PHP 8.2 on Ubuntu 22.04
Step #1. Adding the official PHP repository on Ubuntu
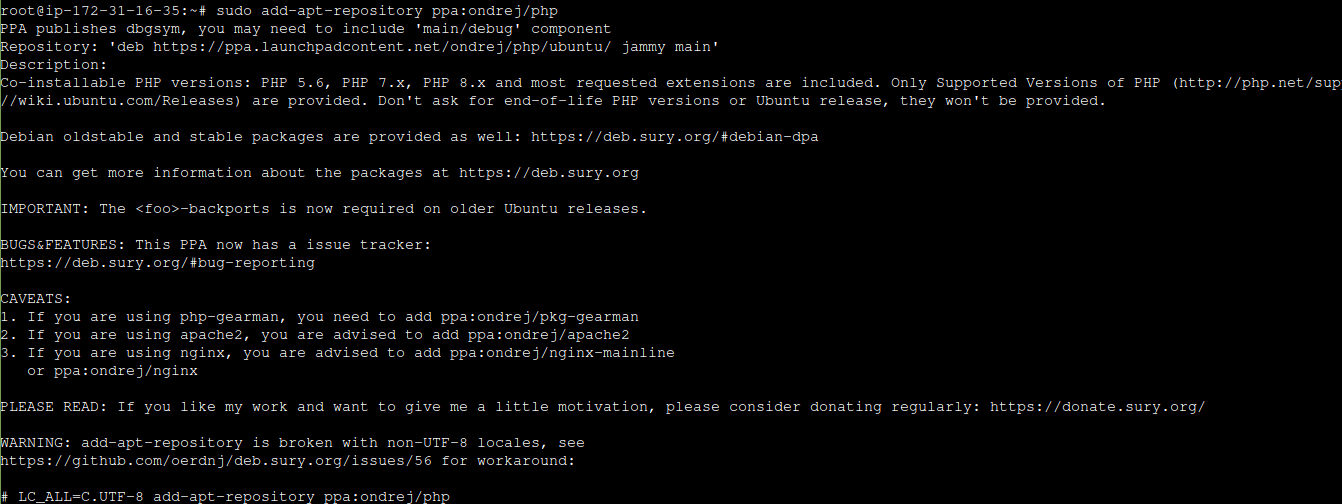
In order to run PHP 8.2, we must use an external repository and establish the dependencies required for installing PHP 8.2 in Ubuntu 22.04. The official repository for PHP on Ubuntu is from Ondřej Surý on launchpad. You may use the given command to include it in your system:
apt-get install python-software-properties
sudo add-apt-repository ppa:ondrej/php
Press the Enter key when the system prompts you to. This allows your system to use the repository as a source for new software:

Step #2. Performing the PHP installation on Ubuntu
Now let's proceed with the installation of PHP 8.2 on Ubuntu 22.04 using this command:
apt-get update
sudo apt-get install php8.2
The output is as follows:


It should show several different packages that it will install and how much total disk space they will use. When it prompts you, type Y and submit it. After a few moments the install of PHP on Ubuntu should be completed.
Step #3. Configuring the operating system (OS) to use the new PHP version
The above steps will install the PHP 8.2 on Ubuntu 22.02 but not make the operating system use it by default. To accomplish this, enter the following command into the terminal:
update-alternatives --set php /usr/bin/php8.2It should display various packages that it will set up along with their estimated combined disc space requirements. When prompted, enter Y and submit the form. The installation of PHP 8.2 on Ubuntu should be finished shortly.
Step #4. Verifying the PHP version
You can now check the PHP version installed using the php -v command:
root@ip-172-31-16-35:~# php -v
PHP 8.2.13 (cli) (built: Nov 24 2023 08:47:18) (NTS)
Copyright (c) The PHP Group
Zend Engine v4.2.13, Copyright (c) Zend Technologies
	with Zend OPcache v8.2.13, Copyright (c), by Zend Technologies
root@ip-172-31-16-35:~#
It should now display PHP 8.2, but we must now set up Apache to use the more recent PHP 8.2 version that was just installed.
Configuring Apache to use the PHP 8.2 version
Ubuntu 22.04 uses a few different commands to help manage Apache modules, so it utilizes a specific PHP version depending on which module is loaded. You can view the list of available modules by running the following command:
root@ip-172-31-16-35:~# ls /etc/apache2/mods-available/php*
/etc/apache2/mods-available/php8.2.conf  /etc/apache2/mods-available/php8.2.load
/etc/apache2/mods-available/php7.0.conf
/etc/apache2/mods-available/php7.0.load
You may have other modules as well. The default LAMP stack install would have PHP 7.0 and the new PHP 8.2 install we just made, but running the next command shows that PHP 7.0 is still active:
userroot@ip-172-31-16-35:~# ls /etc/apache2/mods-available/php*
 /etc/apache2/mods-enabled/php7.0.conf
 /etc/apache2/mods-enabled/php7.0.load
To switch the active version so that it is the newer PHP 8.2 version, first, turn off the older PHP 7.0 version using the following command:
root@ip-172-31-16-35:~# sudo a2dismod php7.0Then enable PHP 8.2 using this command:
root@ip-172-31-16-35:~# sudo a2enmod php8.2The output will be similar to the following output:

Before restarting Apache, check the Apache configuration syntax by running this command:
root@ip-172-31-16-35:~# apachectl -t
 Syntax OK
If it says the syntax is OK, then restart Apache:
root@ip-172-31-16-35:~# sudo service apache2 restartVerifying Apache's PHP version
Now, to verify your work, rerun the previously used command below to confirm the installed and enabled PHP module. It should show the PHP 8.2 version:
root@ip-172-31-16-35:~# ls /etc/apache2/mods-enabled/php*
 /etc/apache2/mods-enabled/php8.2.conf
 /etc/apache2/mods-enabled/php8.2.load
If you see different results or errors in any output, check the syntax of commands and make sure the sudo command was used if you are not running as the root user.
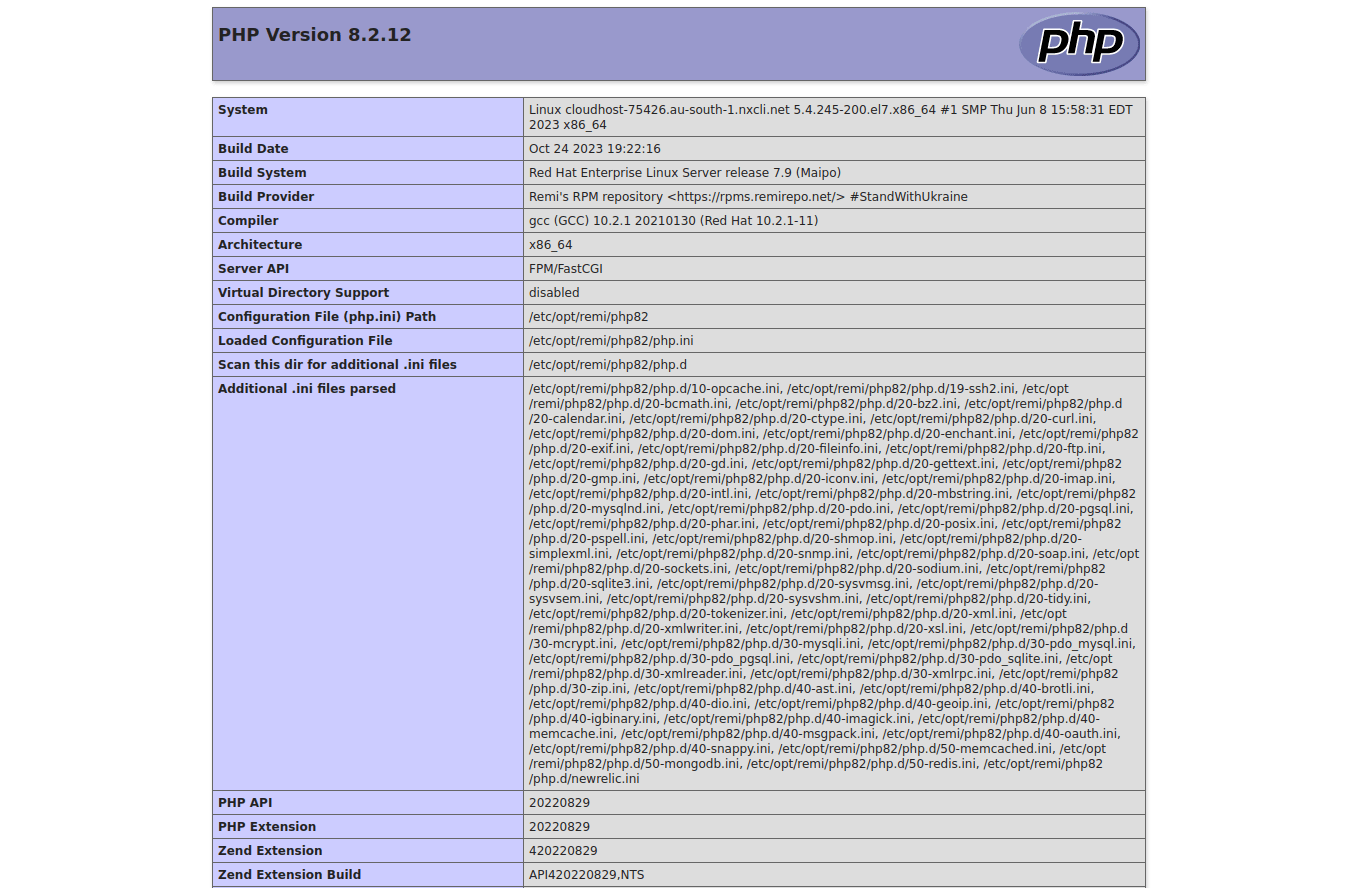
Then, to test it on your site, we recommend making a phpinfo file you can view on your domain. This shows the PHP version as well as information about current configurations, variables, and all the added modules. Create a new .php file in your site's home folder or in Apache’s document root (/var/www/html by default) and include this code:
<?php phpinfo(); ?>Then, once you visit the page in your browser, the result will be as shown in the image below:

If your website was previously up and running with a prior version of PHP, check to see if there are any issues now. You can try to diagnose further if your code is incompatible or displaying errors. Also, you can investigate if you need to restart Apache right away. If necessary, you can downgrade the PHP version once more by using the a2dismod and a2enmod commands to turn off PHP 8.2 and then turn on PHP 7.0 or whatever previous version was installed on the server.
You may also check Apache’s PHP version in various other versions of Ubuntu like Lubuntu, Kubuntu, or Xubuntu using one of the following commands or by uploading an info.php page:
php -versionphp -vIf you are building a new site and have a list of modules that are required, the next section can assist you to add additional modules. Some sites may now display an error stating that a module is missing and cannot operate.
Adding modules to PHP 8.2
Not every module from earlier PHP versions is automatically carried over to PHP 8.2. Type the command below first to install any necessary basic modules if you don't need to compare the list to an earlier PHP version. Instead of pressing the Enter key, hold down the Tab key twice to bring up a list of 8.2-specific modules that are available:
ubuntu@ip-172-31-16-35:~# sudo apt-get install php8.2[tab][tab]An example of the output is shown below:
ubuntu@ip-172-31-16-35:~$ sudo apt-get install php8.2
php8.2             	php8.2-dba         	php8.2-gmp         	php8.2-ldap        	php8.2-msgpack     	php8.2-protobuf    	php8.2-snmp        	php8.2-uopz        	php8.2-yaml
php8.2-amqp        	php8.2-decimal     	php8.2-gnupg       	php8.2-libvirt-php 	php8.2-mysql       	php8.2-ps          	php8.2-soap        	php8.2-uploadprogress  php8.2-zip
php8.2-apcu        	php8.2-dev         	php8.2-grpc        	php8.2-lz4         	php8.2-oauth       	php8.2-pspell      	php8.2-solr        	php8.2-uuid        	php8.2-zmq
php8.2-ast         	php8.2-ds          	php8.2-http        	php8.2-mailparse   	php8.2-odbc        	php8.2-psr         	php8.2-sqlite3     	php8.2-vips        	php8.2-zstd
php8.2-bcmath      	php8.2-enchant     	php8.2-igbinary    	php8.2-maxminddb   	php8.2-opcache     	php8.2-raphf       	php8.2-ssh2        	php8.2-xdebug
php8.2-bz2         	php8.2-excimer     	php8.2-imagick     	php8.2-mbstring    	php8.2-pcov        	php8.2-rdkafka     	php8.2-stomp       	php8.2-xhprof
php8.2-cgi         	php8.2-fpm         	php8.2-imap        	php8.2-mcrypt      	php8.2-pgsql       	php8.2-readline    	php8.2-swoole      	php8.2-xml
php8.2-cli         	php8.2-gd          	php8.2-inotify     	php8.2-memcache    	php8.2-phpdbg      	php8.2-redis       	php8.2-sybase      	php8.2-xmlrpc
php8.2-common      	php8.2-gearman     	php8.2-interbase   	php8.2-memcached   	php8.2-pinba       	php8.2-rrd         	php8.2-tideways    	php8.2-xsl
php8.2-curl        	php8.2-gmagick     	php8.2-intl        	php8.2-mongodb     	php8.2-propro      	php8.2-smbclient   	php8.2-tidy        	php8.2-yac
You might need to look up instructions on installing additional modules since this is not a comprehensive list. You can add numerous modules with the same install command by typing the modules you wish, as in show below:
ubuntu@ip-172-31-16-35:~$ sudo apt-get install php8.2-memcached php8.2-opcache php8.2-mbstringIf you used the command earilier in this guide to save the list of modules from a prior version of PHP, you can save a list of the modules in PHP 8.2 and compare them to the older version. To do so, run the following command:
php -m > /tmp/8.2.modulelist.txtThen, you can run the below command to compare it to the list that was created before:
user@test:~# diff  /tmp/8.0.modulelist.txt /tmp/8.2.modulelist.txt
fileinfo
ftp
hash
filter
gettext
iconv
json
If you want a graphical way to compare the two lists, then run this command:
vimdiff /tmp/8.0.modulelist.txt /tmp/8.2.modulelist.txtA page like this will appear in the terminal:

The various MySQL modules and soap show up on the list of modules on the left but are missing from the list of modules on the right. So for this example, we can install the missing modules with the following command:
sudo apt-get install php8.2-mysql php8.2-soapAfter those missing modules are successfully installed, we can save an updated list of modules and can compare them again. Your setup is now ready for development. Hopefully, this guide helped with your upgrade to PHP 8.2 — or your new install of PHP on Ubuntu. Please let our Linux Support Team know if you have any issues or need further help with your Ubuntu server on Liquid Web hosting.
Conclusion
This guide demonstrated how to set up and install PHP 8.2 on Ubuntu 22.04 on Linux, macOS, Windows, and other supported operating systems. The php -v command can be used to check PHP versions. You should be able to learn everything you need to know about your PHP installation on Ubuntu by using the methods listed above.
Related Articles:

About the Author: Sapta Upendran
Sapta is a passionate Linux system engineer, a voracious reader, a dexterous cook, and a wanderlust. She is also interested in technical and non-technical writing.
Our Sales and Support teams are available 24 hours by phone or e-mail to assist.
Latest Articles
Linux dos2unix command syntax — removing hidden Windows characters from files
Read ArticleHow to use kill commands in Linux
Read ArticleChange cPanel password from WebHost Manager (WHM)
Read ArticleChange cPanel password from WebHost Manager (WHM)
Read ArticleChange the root password in WebHost Manager (WHM)
Read Article


