
 Nick Campbell
 osquery is a powerful tool for system monitoring and operating system instrumentation that collects system metrics and data points for Security, DevOps, and Compliance teams. The information is stored in a high-performance relational database and can be accessed locally or remotely by using SQL-like statements.
An open-source program, osquery can run on Windows, macOS, or Linux. Documentation about the topic is extensive, and it also has a very active user community online.
This guide will cover the installation of osquery for data collection locally on CentOS 7. The steps provided will also work for CentOS 8.
osquery Installation Process
Step 1. Install yum-utils Package
Before we begin, we’ll install the yum-utils package to help with the installation of osquery.
# yum install yum-utilsStep 2. osquery Repository Installation
Now, we must first add the osquery repository and package signing key to our system. We can fetch and store the signing key with the following command.
# curl -L https://pkg.osquery.io/rpm/GPG | tee /etc/pki/rpm-gpg/RPM-GPG-KEY-osqueryNow that we have the key, we can add the package repository to our system.
# yum-config-manager --add-repo https://pkg.osquery.io/rpm/osquery-s3-rpm.repoNext, enable the package repository.
# yum-config-manager --enable osquery-s3-rpm-repoStep 3. Installing osquery
Now that we have the package repository installed and enabled, we can install osquery.
# yum install osqueryA prompt will pop up asking you to approve the package install and accept the signing key for the package. Say yes to both of these prompts.

Now that we have osquery installed, we can see some of the things we can do with it.
Step 4. Accessing osquery
Access osquery locally using the provided interactive shell.
# osqueryiThe below output is generated from the above command.

You can now use SQL-like statements to view the system, software, and processes that are running. If you need help, use the .help command to get additional information using the osquery interactive shell.
Available Data in osquery
Tables
To get a list of all the different types of available data, use the .tables command from the interactive shell. As you can see below, the list of tables is extensive.

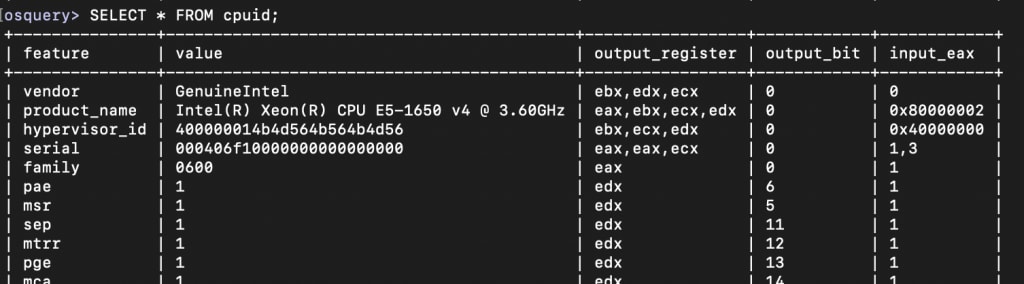
CPU Information
The CPU’s server information is available by querying the cpuid table.
You can get a list of all users on a system very easily with the following command.
osquery> SELECT * FROM users;
IP Address Information
If you wanted to get information about which IP addresses the server has on specific network interfaces without showing the loopback, you could try the following.
osquery> SELECT interface,address FROM interface_addresses WHERE interface NOT LIKE '%lo%';
Step 5. Configuring osquery
Up until now, we’ve been working with osqueryi. It is a good way to get a quick view into the current state of the operating system, but if you’d like to log output or track changes to various items on your system, then we’ll want to configure and enable osqueryd. It runs persistently as a service. Unfortunately, the method of installation we chose to get osquery on our system does not set this up by default, so we’ll want to set up a configuration file and enable the daemon.
Create the configuration file using the editor of your choice.
[root@morty ~]# vim /etc/osquery/osquery.confPaste in the following configuration file.
{
  // Configure the daemon below:
  "options": {
    // Select the osquery config plugin.
    "config_plugin": "filesystem",

    // Select the osquery logging plugin.
    "logger_plugin": "filesystem",

    // The log directory stores info, warning, and errors.
    // If the daemon uses the 'filesystem' logging retriever then the log_dir
    // will also contain the query results.
    "logger_path": "/var/log/osquery",

    // Set 'disable_logging' to true to prevent writing any info, warning, error
    // logs. If a logging plugin is selected it will still write query results.
    "disable_logging": "false",

    // Splay the scheduled interval for queries.
    // This is very helpful to prevent system performance impact when scheduling
    // large numbers of queries that run a smaller or similar intervals.
    "schedule_splay_percent": "10",

    // A filesystem path for disk-based backing storage used for events and
    // query results differentials. See also 'use_in_memory_database'.
    "database_path": "/var/osquery/osquery.db",

    // Comma-delimited list of table names to be disabled.
    // This allows osquery to be launched without certain tables.
    //"disable_tables": "foo_bar,time",

    // Comma-delimited list of table names to be enabled.
    // This allows osquery to be launched with certain tables only.
    //"enable_tables": "foo_bar,time",

    "utc": "true"
  },

  // Define a schedule of queries:
  "schedule": {
    // This is a simple example query that outputs basic system information.
    "system_info": {
      // The exact query to run.
      "query": "SELECT hostname, cpu_brand, physical_memory FROM system_info;",
      // The interval in seconds to run this query, not an exact interval.
      "interval": 3600
    }
  },

  // Decorators are normal queries that append data to every query.
  "decorators": {
    "load": [
      "SELECT uuid AS host_uuid FROM system_info;",
      "SELECT user AS username FROM logged_in_users ORDER BY time DESC LIMIT 1;"
    ]
  }
}
Now that our configuration file is in place, we must start the osqueryd daemon.
[root@morty ~]# systemctl start osquerydNow we should enable the osqueryd daemon so it will run automatically in the future.
[root@morty ~]# systemctl enable osquerydWe can check the status of the osqueryd daemon to ensure that it started properly.
[root@morty ~]# systemctl status osqueryd
Conclusion
In this guide, we’ve stepped through the installation, basic usage, and configuration of osquery. It can be installed on macOS, Linux, and Windows and has a multitude of potential use cases such as monitoring, compliance, security, incidence response, and vulnerability management. In addition, Osquery is an incredibly configurable tool that can help drive more quick insight into your systems.
Do you need monitoring, security, or compliance help? Liquid Web offers a variety of products to enhance your server so contact us today!