
 Justin Palmer
 In this article, we are going to cover the available options for installing software on a dedicated Ubuntu server. By the end of this article, you’ll be equipped with an arsenal of tools for installing the exact software you want on your Ubuntu server! We will be installing three different software packages from source, deb, and flatpack.
Typically, the Ubuntu OS ships with an excellent package management system called APT. Apt-get, or the more recent apt command, are the interfaces users would typically utilize to search for, download, and install packages.
What happens when you need to install something on your Ubuntu server, but the software package isn’t available for installing via apt?
What if you need to build a software package from source to access the newest features from the latest version of that package?
How do I locate the dependencies for the software I need?
We will answer those questions below!

Pre-flight Check
- This tutorial assumes you have root access to your Ubuntu server and are logged in as the root user.
- The steps in this tutorial were executed from a Liquid Web unmanaged cloud dedicated server running Ubuntu 18.04 LTS server.
How Do I Locate The Software Dependencies?
In order to locate the software dependencies. we will need to search for the software package in packages.ubuntu.com. Click the link and review the information there to get started.
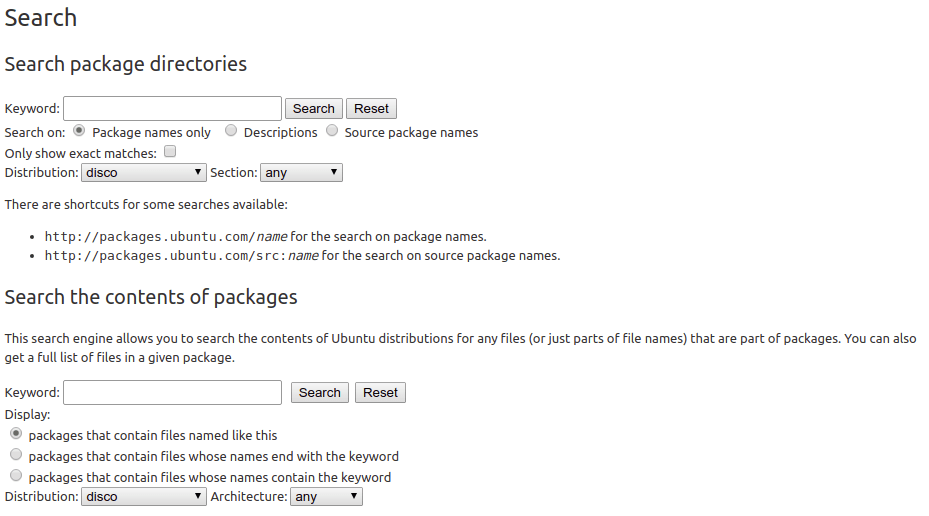
In the above interface, type in the package name in the keyword field, select the Ubuntu distribution and then the Section from which the software may be located. You will have four options for the Sections dropdown:
- Main
- Multiverse
- Restricted
- Universe
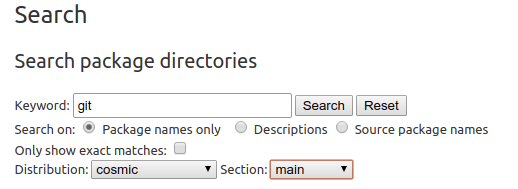
Let’s start our search for git in the “Distribution” Cosmic and “Section” Main repository:

Next, click on Search to locate the results of the research. The results page will open listing exact hits and Other hits. In this case, we have an exact match in the main epel repository as well as four other references under Other hits.
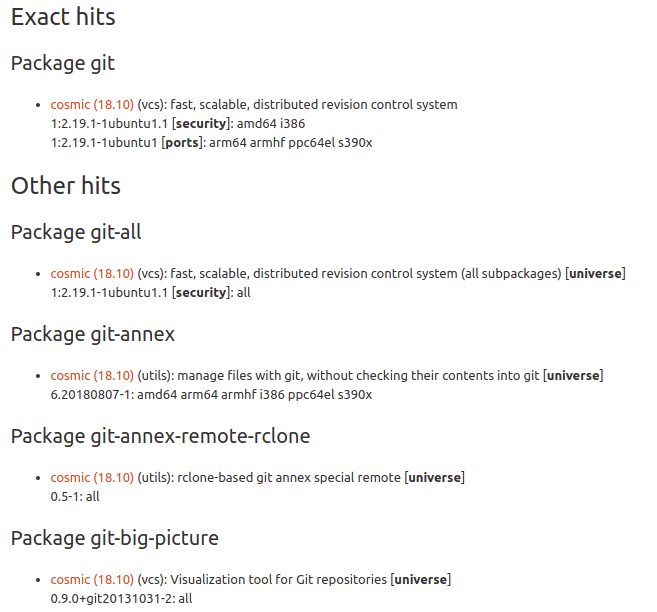
Next, click on the link in the Exact hits section:
cosmic (18.10) (vcs): fast, scalable, distributed revision control system
1:2.19.1-1ubuntu1.1 [security]: amd64 i386
1:2.19.1-1ubuntu1 [ports]: arm64 armhf ppc64el s390x
This would take us to the additional dependencies packages page related to the git software. The next section identifies whether the software is required, recommends, suggests, or enhances the software in some way:

So, we can now see the required dependencies identified by the red dot next to the package names. This lets us know that we need to install those packages in order for git to work correctly.

Install Software From Source
In the following summary, we will be installing the git versioning software system based on the information we located above.
Step 1: Get The Server Ready
As a best practice, make sure your packages are up to date:
apt-get update -yNext, you’ll need to make sure you have a compiler available. Run this command to install build-essential:
apt-get install build-essential -yStep 2: Download Dependencies
When installing a package from source code, you’ll need to manage the installation of the package dependencies. We’ll use apt-get to install git’s dependencies:
apt install build-essential dh-autoreconf libcurl4-gnutls-dev libexpat1-dev gettext libz-dev libssl-dev -yStep 3: Download The Source Package
Once the package dependencies are in place, it’s time to download the package with wget:
[su_box title=”Note:” style=”glass” box_color=”#3ac6eb” radius=”20″]We used the link below from the git Releases page on github.com. At the time of writing this article, v2.23.0 was the most recent release version of git.[/su_box]
wget https://github.com/git/git/archive/v2.23.0.tar.gzNext, we need to extract the archive and cd (change directories) into the new git directory:
tar -xvzf v2.23.0.tar.gz
cd git-2.23.0/
Step 4: Install Git
Now that we have our package extracted and ready to go, we need to configure it:
make configureYou should see an output similar to this:
GIT_VERSION = 2.23.0
  GEN configure
Next, let’s verify that all of the dependencies necessary to build the package are available by running this command:
./configure --prefix=/usrAfter that, we’ll build the source code:
make allNow that the binaries are all built, its time to install git:
make installThat’s it! The last thing to do is to verify that git is working:
git --versionThe output should look something like this:
git version 2.23.0The short version of the commands above for reference:
wget file
tar -xvzf file
cd into folder
./configure && make && make install
Install Software From A .deb File
In this scenario, we will be installing ‘jq’ from a deb file. Jq is a lightweight and flexible command-line JSON processor.

Step 1: Download the deb File
The first thing we need to do is get the .deb file to install. The actual file and its location may be subject to change.
In this example, we will be grabbing the exceedingly useful JSON parsing utility jq:
[su_box title=”Note:” style=”glass” box_color=”#3ac6eb” radius=”20″]The download link in this article came from the Ubuntu Package website.[/su_box]
wget http://mirrors.kernel.org/ubuntu/pool/universe/j/jq/jq_1.5+dfsg-2_amd64.deb Step 2: Install Dependencies
Much like our previous lessons from installing a package from source, it may be necessary to install dependencies ahead of actually installing a package via a .deb file. The dependencies for this version of jq can be found here: https://packages.ubuntu.com/bionic/jq
apt-get install libjq1 libc6 -y
Step 3: Install the package
Now that our dependencies are squared away, we can install the package with dpkg. Under the hood, apt-get and apt, use dpkg to install packages:
dpkg -i jq_1.5+dfsg-2_amd64.debGreat! Now all that is left to do is verify jq is installed:
dpkg -i jq_1.5+dfsg-2_amd64.debThe output should be as follows:
jq-1.5-1-a5b5cbeInstalling Software From A Personal Package Archive (PPA):
The Personal Package Archive or PPA is a proprietary repository for developers to provide versions of their software packages in a specific storage medium.
This scenario allows for installing software that may not be available in the official Ubuntu package repositories. In the next section, we will be installing flatpack itself and then use it to install Cowsay.
The Cowsay program is familiar to many but for those who may not know, Cowsay creates an ASCII picture of a cow stating a specific message you add:
cowsay hello there
 _____________
< hello there >
 -------------
           ^__^
           (oo)_______
            (__)       )/
                ||----w |
                ||     ||
Step 1: Setup The PPA Archive
First, we need to add the PPA as a source for apt. Later, we are going to walk through installing packages on the command line with Flatpak, so we are going to take this opportunity to install Flatpak via the official FlatPak PPA:
add-apt-repository ppa:alexlarsson/flatpak -yNext, we will update apt, so it is aware of the package repository we’ve added, by updating it:
apt-get update -yStep 2: Install Flatpak
Now that the PPA is set up, we can install Flatpak:
apt-get install flatpak -yLet’s verify Flatpak is installed by checking the version:
flatpak --version
Flatpak 1.4.3
Installing Software With Flatpak
[su_box title=”Note:” style=”glass” box_color=”#3ac6eb” radius=”20″]In the previous section we installed Flatpak via the official PPA. Installing Flatpak is a prerequisite to this section of the tutorial.[/su_box]
Flatpak is another package management tool, not unlike Snap. It encapsulates the dependencies of a given application and makes them installable across most Linux distributions. Flatpak is used to install desktop Linux applications. It offers a command-line interface to install applications which is what we will cover here.
Add a Flatpak Remote Repository
Like all other package management systems, Flatpak requires a reference to a repository of packages in order to be able to download packages for installation. Run this command to add the Flathub repository:
flatpak remote-add --if-not-exists flathub https://flathub.org/repo/flathub.flatpakrepoLocate an Application And Install It
All that’s left to do is find an app and install it. First to search for an app run this command:
flatpak search Cowsay
Name  Cowsay

Description  Cowsay, a state of the art Cowsay generator using GNOME conventions

Application ID  org.gnome.gitlab.Cowsay 1.7.1

Version Branch Remotes  stable flathub

(broken down into a more readable format)
To install it, run this command.
flatpak install Cowsay -y

Looking for matches…

Required runtime for org.gnome.gitlab.Cowsay/x86_64/stable (runtime/org.gnome.Platform/x86_64/3.34) found in remote flathub

org.gnome.gitlab.Cowsay permissions:

    ipc   network   wayland x11

        ID                                            Arch Branch Remote     Download

 1. [] org.gnome.Platform                            x86_64 3.34 flathub 207.8 MB / 318.4 MB

 2. [ ] org.gnome.Platform.Locale                     x86_64 3.34 flathub < 322.7 MB (partial)

 3. [ ] org.freedesktop.Platform.GL.default           x86_64 19.08 flathub < 90.8 MB

 4. [ ] org.freedesktop.Platform.openh264             x86_64 19.08 flathub < 593.4 kB

 5. [ ] org.gnome.gitlab.Cowsay                       x86_64 stable flathub < 56.3 kB

Installing 1/5… ███████████████▊      79% 3.2 MB/s 00:17

Installation complete.
Final Thoughts
And that’s it! We have installed software from source, a deb file, and then installing a program using flatpack.
Join Us Today!
Would you like to know more about this topic? Having issues installing an application from source? Reach out to us today and our Level 3 admins will be more than happy to assist you with this or any other issues you may be experiencing.
Also, check our line of fully HIPAA compliant web hosting or managed private cloud solutions today!
Open a chat or ticket with us to speak with one of our knowledgeable Solutions Team or an experienced Hosting Advisors today!