Top 4 Lessons Learned Using Ubuntu
When choosing a server operating system, there are a number of factors and choices that must be decided. An often talked about and referenced OS, Ubuntu, is a popular choice and offers great functionality with a vibrant and helpful community. However, if you’re unfamiliar with Ubuntu and have not worked with either the server or desktop versions, you may encounter differences in common tasks and functionality from previous operating systems you’ve worked with. Here are the top four lessons I’ve learned while running Ubuntu on a server.
- Understanding the “server” vs. “desktop” model
- Deciphering the naming scheme/release schedule
- Figuring out the package manager
- Networking considerations on Ubuntu
Understanding “Server” vs. “Desktop” Model
Ubuntu comes in a number of images and released versions. One of the first choices to consider is whether you want the “desktop” or “server” release. When running an application or project on a server the choice to make is the “server” image. You may be wondering what the difference is, and it comes down to two main differences:
- The “desktop” image has a graphical user interface (GUI) where the “server” image does not
- The “desktop” image has default applications more suited for a user’s workstation, whereas the “server” image has default applications more suited for a web server.
It is really that simple. Currently, the majority of the differences relate to the default applications offered when installing Ubuntu and whether you need a GUI. When I started using Ubuntu, there were a number of differences between the two (such as a slightly tweaked Linux kernel on the “server” image designed to perform better on server grade hardware), but today it is a much more simplified decision process.
The choice comes down to saving time for the individual by either adding or removing applications (also called “packages”) that they do or don’t need. At Liquid Web we offer VPS “server” images since it’s best designed for operating on a web server. You do have the choice of the Ubuntu version, which brings me to my next lesson learned:
Deciphering the Naming Scheme/Release Schedule
Both Ubuntu and CentOS are based on what is called an “upstream” provider, or another operating system that then CentOS/Ubuntu tweak and re-publish. For Ubuntu, this upstream provider is the OS, Debian, whereas CentOS is based on Red Hat (which is further based on Fedora). It was confusing at first for me to try and understand what the names for an Ubuntu release meant: “Vivid Vervet”, “Xenial Xerus”, “Zesty Zapus”; but that’s just a cute “name” the developers give a particular version until it is released.
The company that oversees Ubuntu, called Canonical, has a regular and set release schedule for Ubuntu. This is a distinct difference between CentOS, which relies on Red Hat, which further relies on Fedora. Every six months a release of Ubuntu is published, and every fourth release (or once every two years) a “long-term support” or LTS release is published. The numbering they use for releases is fairly straightforward: YY.MM where YY is the two digit year and MM is the month of the release. The latest release is 19.04, meaning it was released in April 2019.
This was tricky for me to initially navigate and created a headache since the different versions have different levels of support and updates provided to them. For some people, this is not an issue. As a developer, you may want to build your application on the latest and greatest OS that takes advantage of new technologies. Receiving support may not matter because you won’t be using the server for very long. You may also be in a position where you need to know that your OS won’t have any server-crashing bugs.
Which version do you choose? How do you know whether your OS will be stable and receive patches/updates? I ran into these issues with when accidentally creating a server that lost support just a few months later; however, I learned an easy-to-use trick to ensure that in the future I chose an LTS release:
- LTS releases start with an even number and end in 04
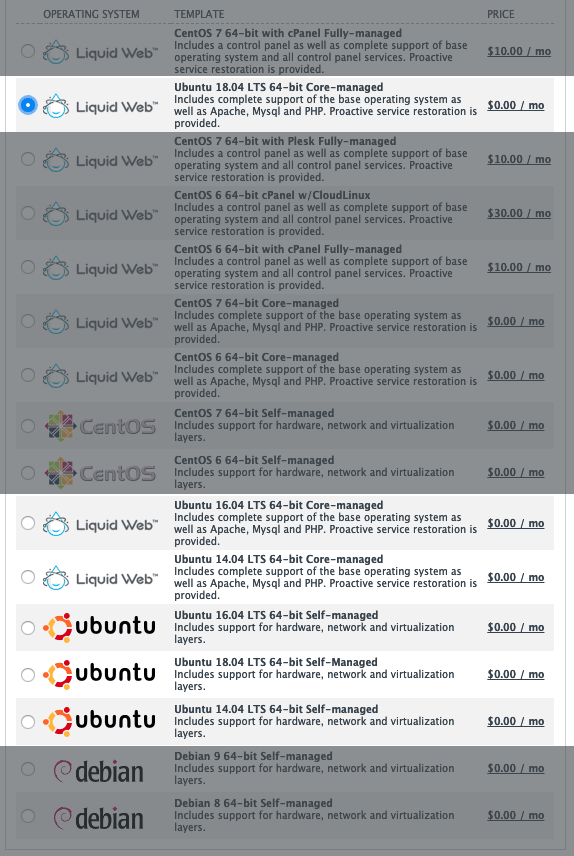
Notice that all the versions of Ubuntu that we offer are the .04 releases. These are all LTS releases, ensuring that you receive the longest possible lifespan and vital security updates for your OS.
Ubuntu’s Package Manager
Before working with Ubuntu, I had the most experience with CentOS. Moving to Ubuntu meant having to learn how to install packages since the CentOS package manager, yum, was no longer available. I discovered that the general process is the same with a few minor differences.
The first difference I encountered is that Ubuntu uses the apt-get command. This is part of the Apt package manager and follows a very similar syntax to the yum command for the most basic command: installing packages. To install a package, I had to use:
apt-get install $package
Where $package was the name of the package. I didn’t always know the name of the package I wanted to find though, so I thought I could search much like I could with yum search $package; however there is another utility that Apt uses for searching: apt-cache search $package
If you forget, you’ll get an error that you’ve run an illegal operation:

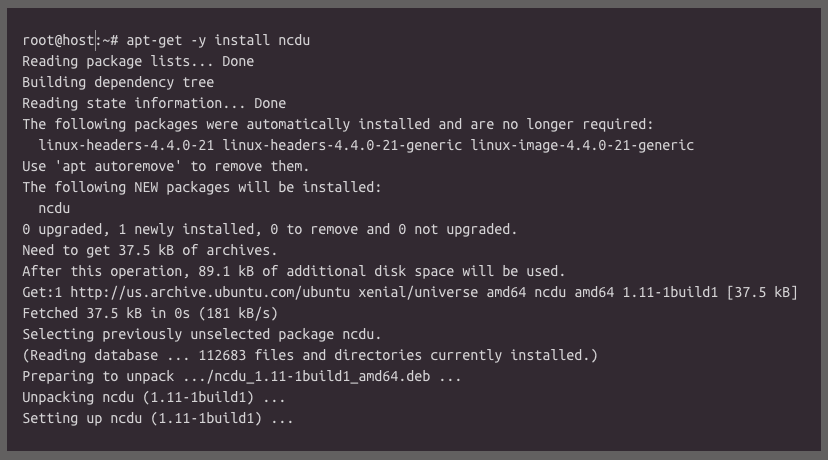
One similarity to yum that is super useful: the “y” flag to bypass any prompts about installing the package. This was my favorite “trick” on CentOS to speed up installing packages and improve my efficiency. Knowing that it works the same on Ubuntu was a major relief:
Of course installing packages meant I had to add the repositories I wanted. This was a significant change since I was used to the CentOS location of /etc/yum.repos.d/ for adding.repo files. With the shift in the Apt system on Ubuntu, I learned that I needed to add a.list file, pointing to the repository file in question in the /etc/apt/sources.list.d/ folder. Take Nginx for example; it was straightforward to add once I realized what had to go where:

From here it was as straightforward as installing Nginx with the apt-get install nginx command:
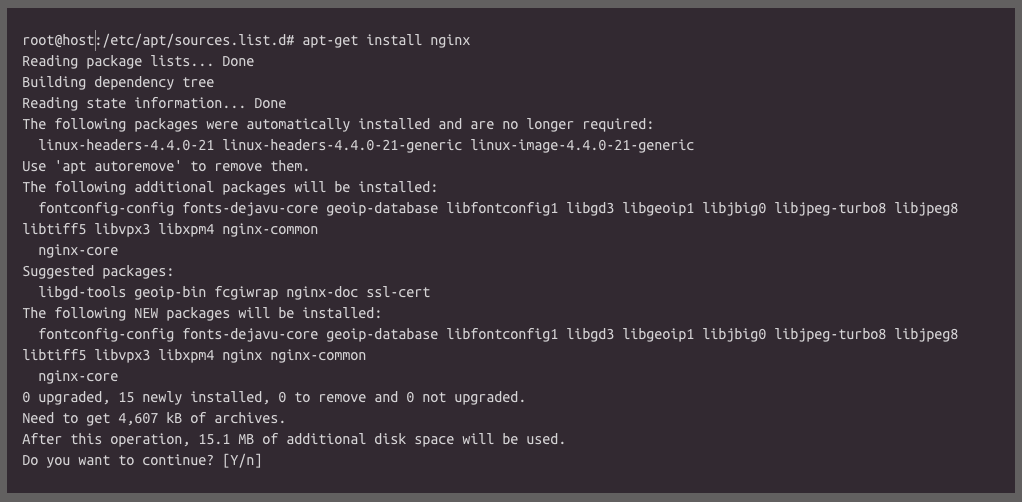
There was a time when adding a repository did not immediately work for me; however, it was quickly resolved by telling Apt that it needed to refresh/update the list of repos it uses with the apt-get update command.
Networking Consideration on Ubuntu
The last major lesson I want to talk about was one learned painfully. Networking on Ubuntu, by default, is handled from the /etc/network/ directory:

There is a flat file called interfaces, and this will contain all the networking information for your host (configured IPs/gateways, DNS servers, etc…):
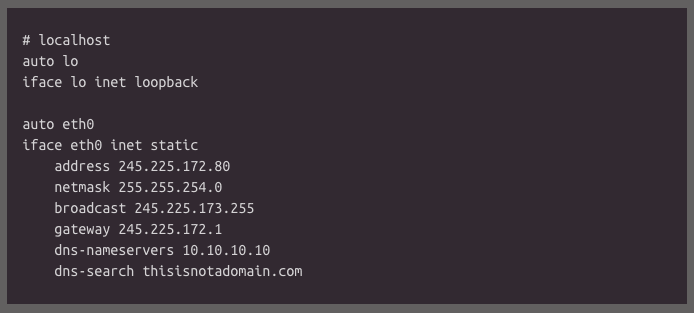
Notice in the above configuration that both the primary eth0 interface and the sub-interface, eth0:1, are configured in the same file (/etc/network/interfaces). This caught me in a bad spot once when I made a configuration syntax mistake, restarted networking, and suddenly lost all access to my host. That interfaces file contained all the networking components for my host, and when I restarted networking while it contained a mistake, it prevented ANY networking from coming back up. The only way to correct the issue was to console the server, correct the mistake, and restart networking again.
Though this is the default configuration for Ubuntu, there is now a way to ensure that you have the configuration setup for individual interfaces so, a simple mistake does not break all the networking: /etc/network/interfaces.d/
To properly use this folder and have individual configuration files for each interface, you need to modify the /etc/network/interface file to tell it to look in the interfaces.d/ folder. This is a simple change of adding one line:
source /etc/network/interfaces.d/*
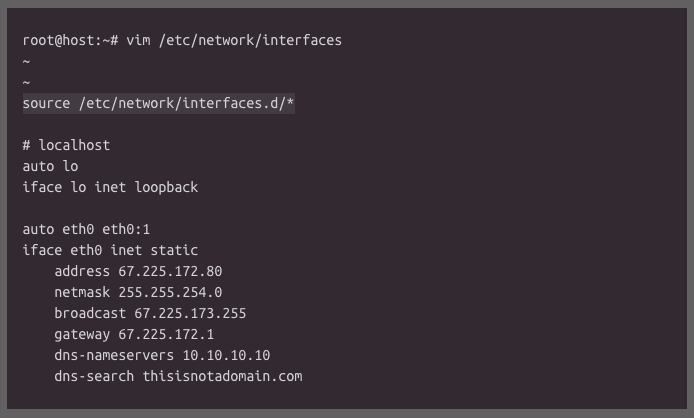
This will tell the main interface’s configuration file to also review /etc/network/interfaces.d/ for any additional configuration files and use those as well. It would have saved me a lot of hassle had I known about it earlier.
Hopefully, you can use my mistakes and struggles to your advantage. Ubuntu is a great operating system, is supported by a fantastic community, and is covered by “the most helpful humans in hosting” of Liquid Web. If you have any questions about Ubuntu, our support or how you might best use it in your environment feel free to contact us at support@liquidweb.com or via phone at 1-800-580-4985.
Related Articles:

About the Author: Michael McDonald
Michael has been a member of the Most Helpful Humans in Hosting for over six years. Starting down a path of education and teaching, Michael returned to his passion of working with technology and helping people around the world embrace the Internet. In his free time, Michael can be found in the northern parts of Michigan spending time on the great lakes or engrossed in a good book.
Our Sales and Support teams are available 24 hours by phone or e-mail to assist.
Latest Articles
How to use kill commands in Linux
Read ArticleChange cPanel password from WebHost Manager (WHM)
Read ArticleChange cPanel password from WebHost Manager (WHM)
Read ArticleChange cPanel password from WebHost Manager (WHM)
Read ArticleChange the root password in WebHost Manager (WHM)
Read Article


