
 Alex Gorzen
 GitHub is a free repository hosting service, used as version control for web developers to download and push their code from their servers to other users. In our previous article on Installing Git on Ubuntu 18.04, we’ve instructed on how to add Git to your Ubuntu VPS server. We’ll continue on and show you how to add and clone a repo from GitHub to your server.

Preflight
- Log into your Ubuntu 18.04 server as the root user
- Have a version of Git installed onto the server
Step 1: Set up a GitHub Account
If you haven’t done so already, make a Github.com account, it’s free! This is where you’ll be creating a repo and putting in files. Once you’re in your GitHub account, click Create a repository (or New Repository), which will take you to a page where you can add details for your repo.
Step 2: Create a Repo
Fill out the details for your repo and be sure to take note your repo name, you’ll need it later in this tutorial. If you are curious about the options on this screen, the README file is common for writing instructions to your users. The licensing option can seem confusing but if you are questioning which one to choose you can check out this site to guide you. Once all details are in, click Create repository.

Once created, you’ll see two files in your repository if you chose the licensing and README file.
Step 3: Configuring Git per User
After installing Git, configuration is needed for commit messages to be sent out. Without setting the name and email address you’ll see warnings when making commitments to git. If you have multiple user who utilize git, make an entry for each user. You can easily set these details for a user with two commands within your server’s terminal. (If you need to access the information set you can find it in the .gitconfig file.)
git config --global user.name "Your_Name"
git config --global user.email "[email protected]"
Step 4: Create A Directory
When you create a directory, you can use this space to sync newly written/edited code to your GitHub account. I’m going to call this environment git_environment and move into the directory using the cd command.
mkdir git_environment
cd git_environment
Step 5: Copy your GitHub URL
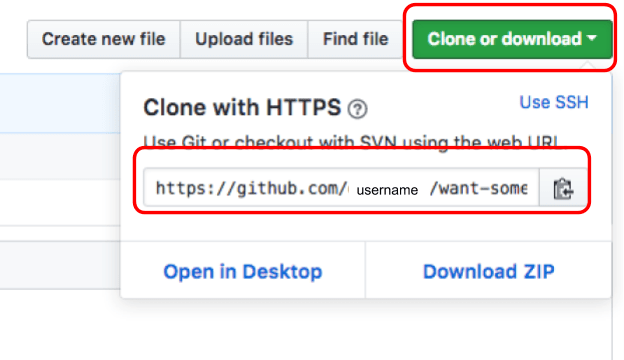
First, its necessary to clone or download our already pre-existing README and licensing file from our GitHub account. Jump back to your GitHub account, click Clone or download and copy your GitHub link.
Step 6: Clone your Repo
In your terminal, you should find yourself in the GitHub directory. We will first clone our repo with our copied GitHub URL and then change directories to our project name. Note that the URL used in our example may change.
git clone https://github.com/username/want-some-java.git
cd want-some-java
By listing the want-some-java directory, you’ll see the two files in your repo, verifying that the cloning has worked.
ls
Example Output:LICENSE README.md
In our next tutorial, where will teach you how to edit/create a file on your server and push the script to your GitHub account.
We pride ourselves on being The Most Helpful Humans In Hosting™!
Our talented Support Teams are full of experienced Linux technicians and System administrators who have an intimate knowledge of multiple web hosting technologies, especially those discussed in this article. We are always available to assist with any issues related to this article, 24 hours a day, 7 days a week 365 days a year.
If you are a Fully Managed VPS server, Cloud Dedicated, Private Cloud powered by VMware, Private Parent server or a dedicated server owner and you are uncomfortable with performing any of the steps outlined, we can be reached via phone @800.580.4985, a chat or support ticket to assisting you with this process.