Liquid Web WHMCS Plugin Installation Methods
In our main series on WHMCS we cover installation using CLI, as the directions are easy to copy and paste. However, as not all users are comfortable in a CLI, here, we will cover other methods that can be used to install the WHMCS plugin.
While written specifically for the Liquid Web WHMCS plugin the installation methods used here can work with almost any WHMCS plugin.
WHMCS Plugin Installation
Installing a WHMCS plugin can be pretty simple, the main goal is to get the plugin files to the right spot on the server. Where that spot is on the server depends on where you have WHMCS installed.
Since the goal is to simply get the files in the right spots there are a few methods you can use to do this. In our main article the method used is SSH, however here we’ll also cover FTP and the cPanel File manager.
cPanel File Manager
- Login to your cPanel account, most often located at: https://$IP_or_Domain:2083/. For more details see our article on how to login to cPanel.
Note: You will need to replace $IP_or_Domain with the actual IP Address or Domain name.
- Open the File Manager. Once logged into cPanel you should see the File Manager item at the very top, listed under the “files” section. Click this icon to open.
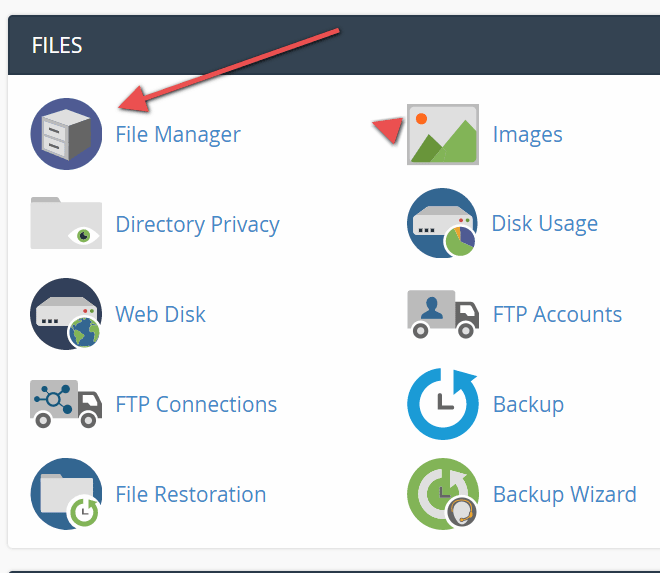 When you first open the File Manager you will be placed in your home directory. The first thing you want to do is navigate to “public_html” directory. You can do this by double-clicking on the folder icon, or by typing out the path in the box on the left-hand side.
- Navigate to your WHMCS folder. Depending on how you installed WHMCS, you may have WHMCS installed directly under public_html, or it may be in a sub-directory under public_html.
- Upload the WHMCS Plugin Zip file.
- Once in the WHMCS directory, click the Upload button and upload the Liquid Web WHMCS Plugin. This file should be called “LiquidWeb-WHMCS-Plugin-master.zip”.

- After clicking upload you will land on a page that allows you to either select the file or drag and drop it onto the page.
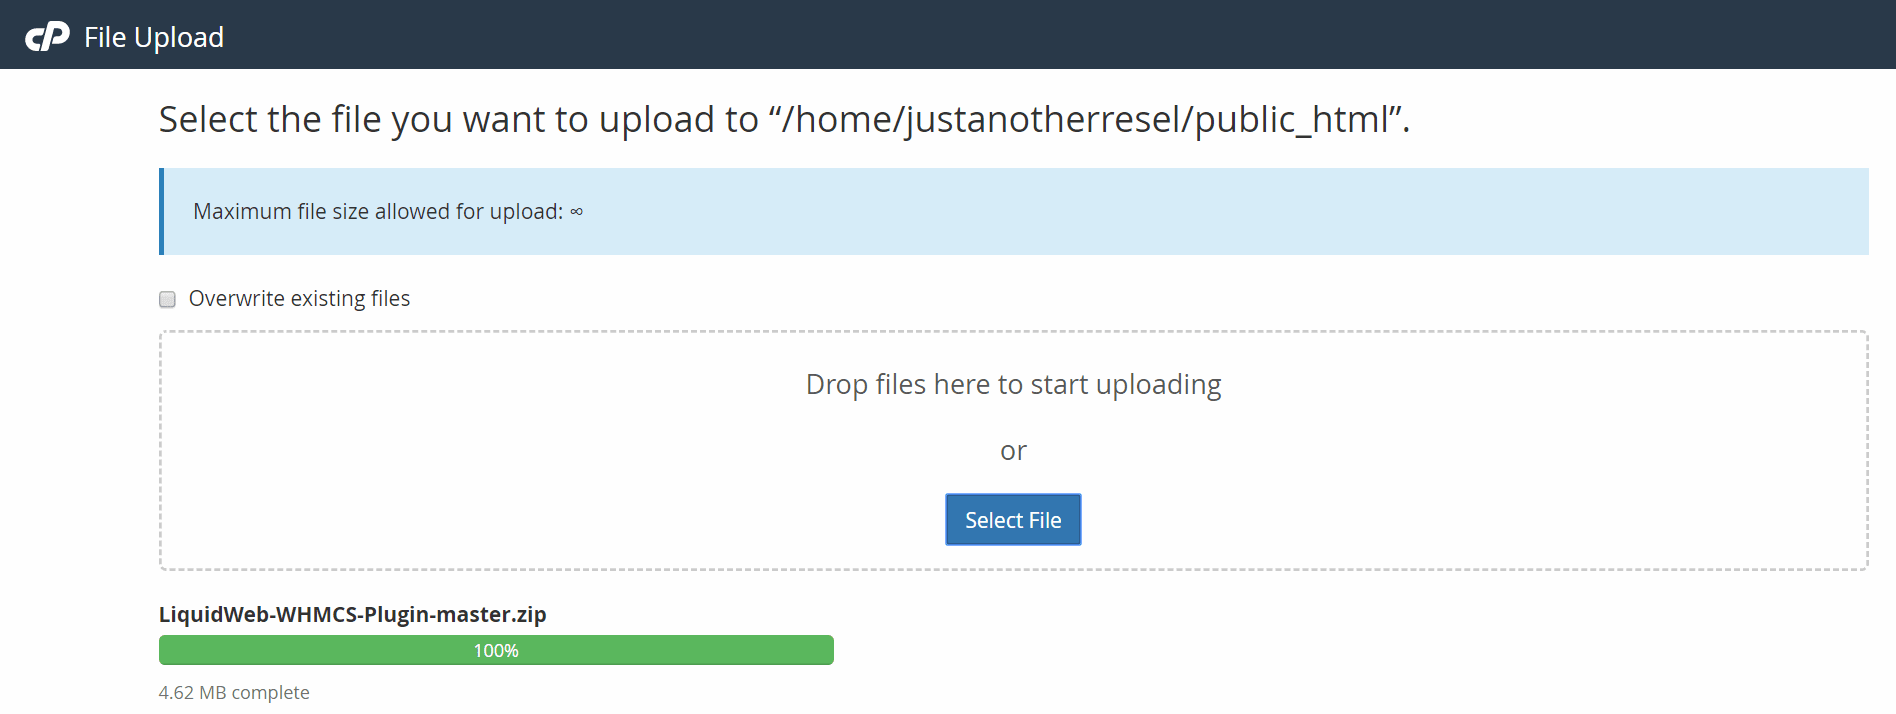
- Once the upload is complete, go back to the file manager and you should now see the new zip file.
- Once in the WHMCS directory, click the Upload button and upload the Liquid Web WHMCS Plugin. This file should be called “LiquidWeb-WHMCS-Plugin-master.zip”.
- Extract the Zip file’s contents.
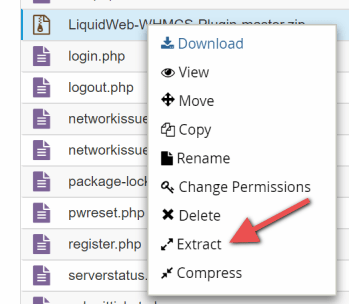
- In the File Manger list, locate the file and then right-click on it and select the “Extract” option.
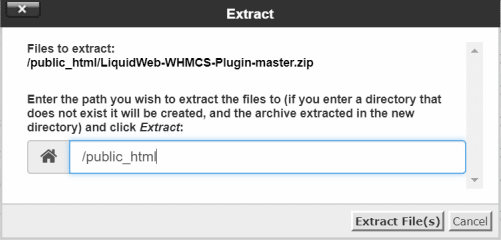
- This will pop-up a dialog to choose where to extract to. You can leave the path as is, as we want to extract the files under public_html, or your WHMCS directory. Click on “Extract File(s)”.
- In the File Manger list, locate the file and then right-click on it and select the “Extract” option.
- Verify the extracted files are there. You should now see a new directory called “LiquidWeb-WHMCS-Plugin_master”. Double-click on this new directory to open it.
- Verify that you see an includes and modules folder along with some other document files.
- Once these are verified continue to the next step, otherwise download a new copy of the zip and start over with the upload and extract.
- Move the Liquid Web WHMCS plugin files in place. The two directories we just verified need to be copied/moved into the right place. To move the folders use the following process.
- Right click on the folder and then click “Move”.
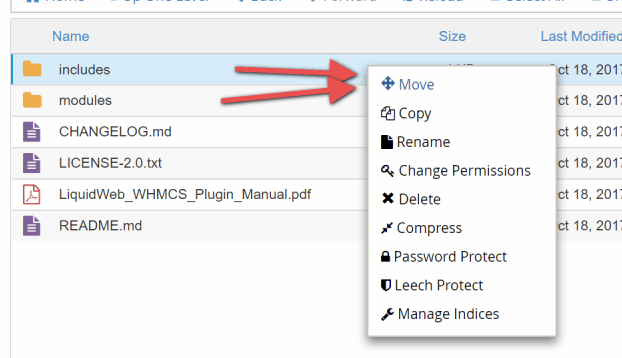
- In the dialog box adjust the file path to the proper location. Assuming you’re following along you can simply delete the plugin folder from the end.
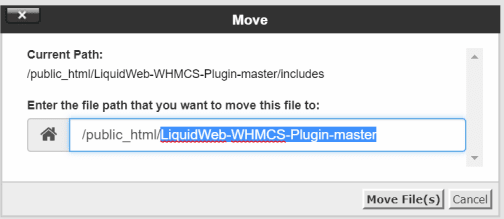
- Click “Move Files”, this will move all the files from the current directory in the plugin folder to the main WHMCS directory.
- Repeat these steps for both folders!
Note:It may seem like we’re replacing the original folders by moving these into place. However, cPanel is smart enough to simply “merge” the files into place. Doing a direct move like this in CLI will produce different results!
- Right click on the folder and then click “Move”.
- That’s it! You’re all done installing the plugin, now just to activate it and set up your first products.
If you installed WHMCS under say, “public_html/i_like_directories” then you will want to modify the paths above! If you installed WHMCS under “public_html” then you should be all set.
Keep in mind that the plugin upgrade process is the exact same as the installation process. When a new version is released you can simply re-upload the updated zip file, extract it, then move the includes and modules files into your WHMCS install.
FTP
For the most part, these directions are the same as the cPanel File Manger method. The only major difference being that you’ll fire up an FTP client, connect to the server (as the WHMCS user) and then begin the directions above!
What’s next?
With the Liquid Web WHMCS plugin installed on the server next you just need to activate it. For further direction in setting up the plugin in see our article series on WHMCS and the Liquid Web plugin. Once you’ve completed the steps in the series you’ll be all set to create products and get your business rolling! If you would like more details on Reseller hosting, or WHMCS, our team is here to assist you 24/7!
Looking for more directions on installing our WHMCS plugins? Continue on to the next page where you’ll find detailed directions on how to install using SSH, or command line!
Using SSH, or Command Line
While using the cPanel file manager is pretty convenient for most users, some users prefer to use a shell-based installation. Maybe you’re a power user and love using CLI, or maybe you just want to quickly copy and paste a series of commands*!
First things first, to start off you’ll want to log in to the server via SSH. You will need to be logged in as the cPanel user that owns the WHMCS install. So, you’ll need to either SSH in as that user, or assume that user role with sudo / su.
- Navigate to the directory WHMCS is installed in.
cd /home/$cpanel_user/public_html/ - Grab the latest version of our WHMCS plugin from GitHub.
wget https://github.com/liquidweb/LiquidWeb-WHMCS-Plugin/archive/master.zip - Extract the files.
unzip master.zip - Place the files in their proper locations.
cd LiquidWeb-WHMCS-Plugin-master/
rsync -avH includes/ ../includes/
rsync -avH modules/ ../modules/
- That’s it! Go activate WHMCS now!
* = Don’t ever blindly copy and paste commands that you don’t understand. This can be a huge security risk and will inevitably lead to something breaking.
Related Articles:

About the Author: David Singer
I am a g33k, Linux blogger, developer, student, and former Tech Writer for Liquidweb.com. My passion for all things tech drives my hunt for all the coolz. I often need a vacation after I get back from vacation....
Our Sales and Support teams are available 24 hours by phone or e-mail to assist.
Latest Articles
In-place CentOS 7 upgrades
Read ArticleHow to use kill commands in Linux
Read ArticleChange cPanel password from WebHost Manager (WHM)
Read ArticleChange cPanel password from WebHost Manager (WHM)
Read ArticleChange the root password in WebHost Manager (WHM)
Read Article


