


Web server configuration — NGINX install on AlmaLinux
Ensuring optimal performance for your website or web application requires, among other steps, the installation of a reliable web server. NGINX — a popular and reliable open-source web server — is one of the best options for optimizing your site's or web app's performance. Its primary function is to manage incoming traffic, directing it to the appropriate server while ensuring server security and performance.
However, proper installation and configuration are crucial to fully realize NGINX's potential. In this NGINX install guide, we will walk you through installing and configuring the NGINX web server step by step. But first, let’s discuss the basics of NGINX to ensure you’re up to speed with this tool before diving into the NGINX install steps.
About NGINX
NGINX is an open-source software program initially designed to solve the challenge of handling lots of connections to servers simultaneously. It was originally designed to make it the fastest web server, but its capabilities expanded significantly beyond being just a web server. Now, it does much more than serve web pages; it acts as a traffic controller, managing incoming web traffic, balancing the load on servers, caching content for faster access, and even facilitating media streaming and email services.
The reliable performance and scalability of NGINX have made it a go-to solution for various web-related tasks beyond traditional web serving. Beyond its primary role as a high-speed web server, NGINX also serves as a reverse proxy, load balancer, and content cache. With its ability to handle diverse connections and support modern web features, NGINX has become an essential component for powering a wide array of websites and online services. To learn more about the basics of NGINX, its core features, and what it is used for, check out our What is NGINX, and What Does It do article.
Some popular tech brands that use NGINX in their products include Microsoft, IBM, Meta, Intel, and DuckDuckGo. When compared to alternative web servers like Apache, NGINX is better in terms of its speed and efficiency in handling a lot of connections at once, making it great for serving static content and managing high traffic. Our NGINX vs. Apache article describes the difference between the two web servers.
Install NGINX on AlmaLinux — step-by-step procedure
What you need before installation
Before you install NGINX on your AlmaLinux server, here is what you should do first:
1. Update the system. Ensure your AlmaLinux system is up to date. At the time of writing this guide, AlmaLinux Version 9.3 was the latest. Update your system by issuing the following command:
sudo yum update2. Check your firewall settings. When and if you have the firewall enabled on your system (which you should), ensure it allows traffic on the ports NGINX will use. Typically ports 80 for HTTP and 443 for HTTPS. You can use the appropriate commands to allow HTTP and HTTPS traffic. We will explore these details during the step-by-step procedure for installation.
3. Plan your configuration. Before installing NGINX, you must have a clear idea of what you want NGINX to do. You need to ask yourself whether you will use it to serve web pages, act as a reverse proxy, or handle other tasks. This intentionality will help with the configuration process after installation.
With the above prerequisites out of the way, let’s dive into the steps for installation.
Step #1. Install NGINX
Open a terminal window on your AlmaLinux system and type the command shown below to install NGINX:
sudo yum install nginxThis command uses the yum package manager for AlmaLinux to install the latest version of NGINX.
Step #2. Enable and start the NGINX service
Enable and start the NGINX service using the following commands after the installation has successfully been completed:
2.1. sudo systemctl enable nginx — This command configures NGINX to start automatically upon system boot. It creates symbolic links to enable the service.
2.2. sudo systemctl start nginx —This command starts the NGINX service immediately. Once executed, NGINX begins running and is available to serve web content.
Step #3. Open port 80 (HTTP port)
By default, NGINX uses port 80 for HTTP traffic. You must open this port on your system's firewall for websites to be accessible. The default firewall configuration tool on AlmaLinux is FirewallD. Use these commands to open port 80 and make the changes permanent:
3.1. sudo firewall-cmd --zone=public --add-service=http— This command Adds the HTTP service to the firewall's public zone temporarily. That means it will allow HTTP traffic for the current session.
3.2. sudo firewall-cmd --zone=public --add-service=http –permanent — This command permanently adds the HTTP service to the firewall's public zone, ensuring it persists after a system reboot.
3.3. sudo firewall-cmd –reload—This command reloads the firewall configuration, applying any recent changes to ensure these newly added rules take effect immediately.
Step #4. Verify your NGINX installation
Verify NGINX is properly installed and running as expected. To do open your web browser and navigate to your server's domain name or IP address. For instance, if your website’s domain name is mysite.com, navigate to http://mysite.com. Or if your IP address is 192.0.2.1, navigate to http://192.0.2.1. If the installation was successfully implemented, you should see the default NGINX welcome page.
NGINX web server configuration
After you install NGINX and verify that everything is successful, here are the website management steps to take to ensure a functioning implementation:
Disabling the default website
Follow these steps to disable the default website:
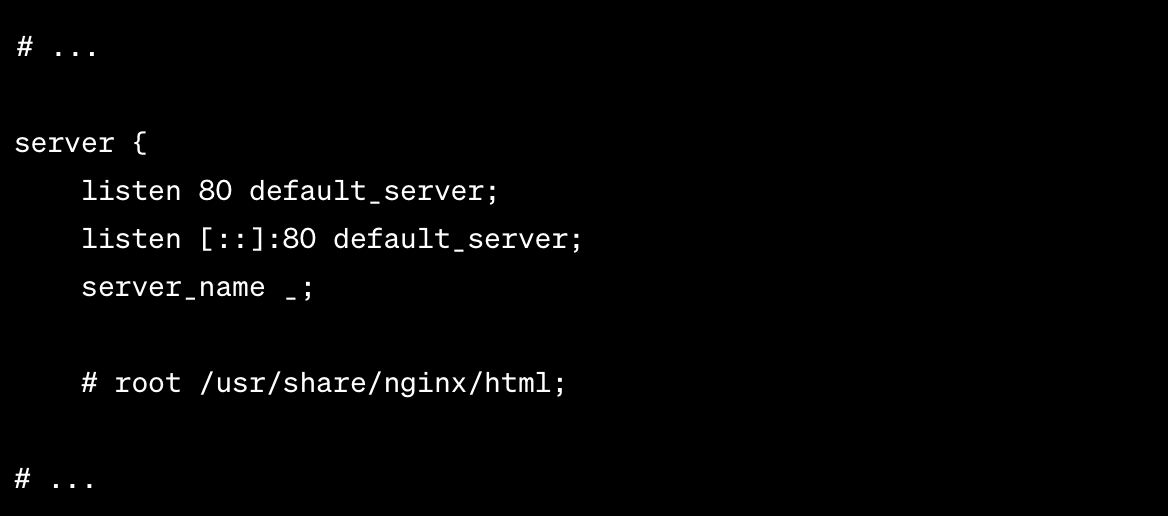
1. Locate the primary NGINX configuration file /etc/nginx/nginx.conf and open it.
2. Locate the "server" block (in the code) that defines the default website.
3. Using the # character, comment out the root line to prevent NGINX from serving the default web content located in /usr/share/nginx/html. This setup ensures your custom website takes precedence. Your file should look like the one represented in the screenshot shown below:
Creating a new web server configuration
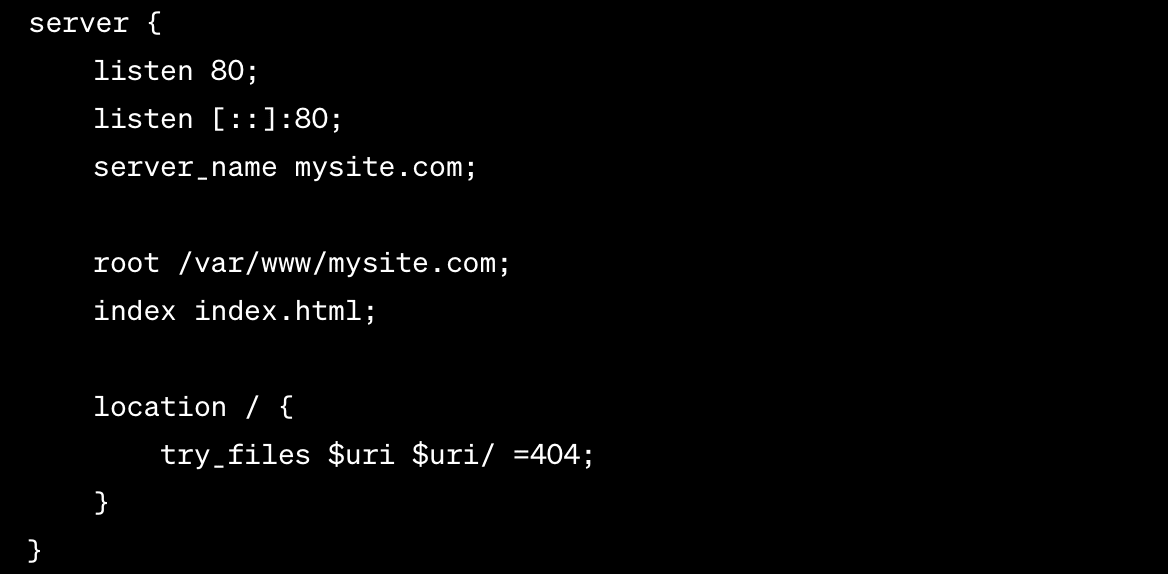
To create a new server configuration, create a file in the /etc/nginx/conf.d directory with the name of your website, like mysite.com.conf. Inside the file, define a new server block with the following details:
- listen 80; and listen [::]:80;: — These two lines specify that the server listens for requests on port 80 (HTTP) for both IPv4 and IPv6 connections.
- server_name mysite.com;: — This line defines the domain name for which the server handles requests.
- root /var/www/example.com;: — This line specifies the root directory where NGINX searches for website files.
- index index.html;: — This line defines the default index file to serve when no specific file is requested.
- location / { try_files $uri $uri/ =404; }: — This line specifies a location block that serves the requested file or its index file if it exists, otherwise it returns a 404 error.
After adding the above configurations, the details in your new file should look like those in the screenshot below:
Testing and restarting NGINX
Run the sudo nginx -t command in your terminal to check your configuration for syntax errors. If no errors occur, restart NGINX with the sudo systemctl restart nginx command to apply the new configuration.
Creating website content
Follow the steps below you put up your initial content for the website:
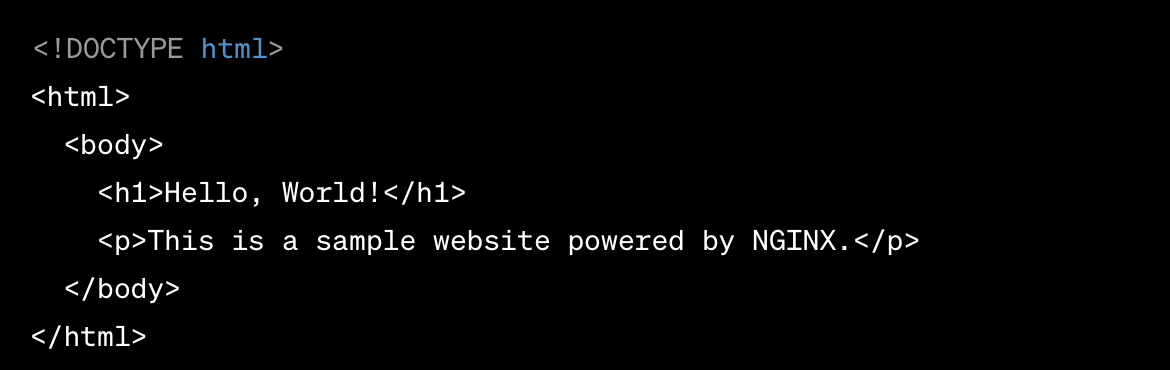
1. To create new website content, you will start by making a directory for your website content using the command sudo mkdir -p /var/www/mysite.com.
2. Create an index.html file within the directory containing your website's content. The contents in your index.html should look like those shown in the screenshot below:
3. Change ownership of the website directory by running these two commands in your terminal:
3.1. sudo chown -R nginx:nginx /var/www/mysite.com
3.2. sudo chmod -R +x /var/www
4. Set the SELinux security context for the website directory to httpd_sys_content_t and httpd_sys_rw_content_t to enable serving web content. To do this, open the terminal and run these commands:
4.1. sudo chcon -t httpd_sys_content_t /var/www/example.com -R
4.2. sudo chcon -t httpd_sys_rw_content_t /var/www/example.com -R
Test your website
In a browser, navigate to your website's domain name (for example, http://mysite.com/). If everything is configured correctly, you should see the "Hello, World!" page displayed on your website. Read this Installing NGINX on your cPanel server article to learn more about how to configure NGINX on cPanel.
NGINX web server management
After successfully installing NGINX on your AlmaLinux, you need a couple of commands to configure or manage NGINXs functionality and features. It is important to note that NGINX runs on systemd, which essentially means you can manage it using systemctl commands. In this section, we will explore the common systemctl commands that you will use to run NGINX as you prefer.
Enable the NGINX service at startup
To enable the NGINX service at startup, use the following command:
sudo systemctl enable nginxThis command ensures NGINX automatically starts when the system boots, making your websites or services readily accessible.
Start the NGINX service
To start the NGINX service, use the following command:
sudo systemctl start nginxIf NGINX isn't already running, this command starts the service, bringing your websites online.
View the NGINX status
To view the NGINX status, use the following command:
sudo systemctl status nginxThe current status of the NGINX service is checked using this command, confirming its activity and identifying any potential issues.
Reload the NGINX configuration
To reload the NGINX configuration, use the following command:
sudo systemctl reload nginxIf change NGINX's configuration files, use this command to update the service without interrupting website access.
Restart the NGINX service
To restart the NGINX service, use the following command:
sudo systemctl restart nginxThis command fully restarts the NGINX service, applying any configuration changes and potentially resolving minor service issues.
Stop the NGINX service
To stop the NGINX service, use the following command:
sudo systemctl stop nginxThis command stops the NGINX service, making your websites unavailable. Use it for maintenance or troubleshooting purposes.
Disable the NGINX service startup
To disable the NGINX service startup, use the following command:
sudo systemctl disable nginxThis command prevents NGINX from automatically starting on system boot. One of the scenarios in which this command might be useful for is if you only need NGINX occasionally.
Final thoughts
This NGINX install guide provides a comprehensive overview of the NGINX installation process, NGINX web server configuration, and managing the NGINX web server on AlmaLinux. With the outlined steps above, one can effectively leverage NGINX to power any website or web application, taking advantage of its speed, scalability, versatility, security, and cost-effectiveness. Remember, NGINX is a powerful tool for delivering a stellar online presence, so you will need a reliable hosting service to take full advantage of it. Think about Liquid Web in this regard.
At Liquid Web, we have several server offerings, including Dedicated and Cloud Metal servers to select from based on your hosting requirements and budget. If you’re unsure of the category of hosting product that suits your needs, contact our team for further guidance.
Related Articles:


About the Author: Chika Ibeneme
Chika Ibeneme is a Community Support Agent at The Events Calendar. He received his BA in Computer Science in 2017 from Northern Caribbean University and has over 5 years of technical experience assisting customers and clients. You can find him working on various WordPress and Shopify projects.


Our Sales and Support teams are available 24 hours by phone or e-mail to assist.
Latest Articles
In-place CentOS 7 upgrades
Read ArticleHow to use kill commands in Linux
Read ArticleChange cPanel password from WebHost Manager (WHM)
Read ArticleChange cPanel password from WebHost Manager (WHM)
Read ArticleChange the root password in WebHost Manager (WHM)
Read Article