


Setting Up Your Liquid Web Server in WHMCS
Posted on by Chris White | Updated:
Reading Time: 4 minutes
- Log in to your WHMCS Admin dashboard
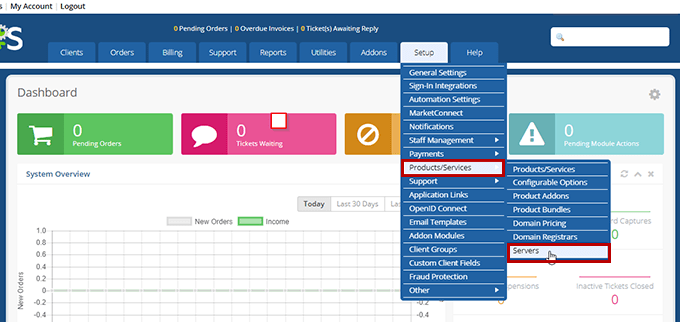
- Navigate to Setup -> Products/Services -> Servers
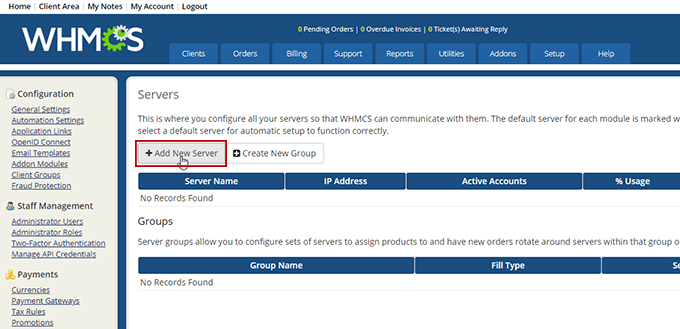
- If this is your first server in WHMCS, you will not see any servers or groups.
- You can create a group if you would like to add future servers to the group at a later date. The benefit of this is to have multiple servers to distribute clients. You can always add this at a later time.
- Select “Add New Server”
- Adding Your Server
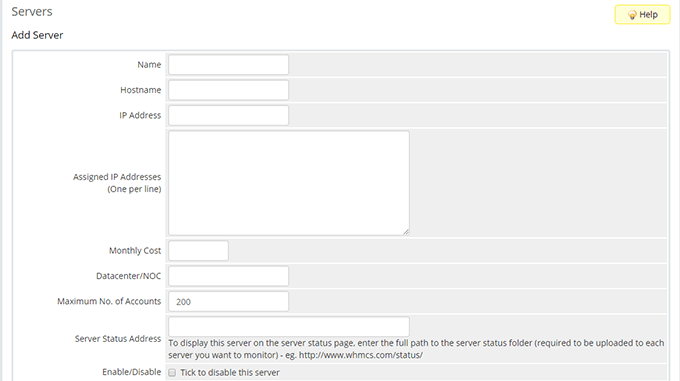
- Name: Name your server. This is internal and only you and your team will be able to see the name.
- Hostname: It is best practice to match the hostname with your Liquid Web hostname so you can easily determine which server it is when you have multiple servers.
- IP Address: Enter the primary IP address of your server. This can be found by logging in to Manage and copying the IP from the server you are adding.
- Assign IP Addresses: If your server has multiple IP addresses and you would like WHMCS to be able to assign across them, you would enter them here.
- Monthly Cost: This is a field that is for your use to monitor cost of server internally. You can always view this in Manage, or by contacting a member of our Solutions or Billing Department.
- Datacenter/NOC: This field is for you to specify internally. Liquid Web has 3 distinct data center locations, the most common being Lansing, Michigan. We also have a DC in Arizona (US West) and Amsterdam (EU). If you have any questions about the location of your server, you can check in Manage or contact Solutions or Billing.
- Maximum No. of Accounts: Setting a “Maximum No. of Accounts” will restrict the server from provisioning more than that number on a single server. You can modify this however you like, this field is primarily for internal stock control of shared accounts. It will be easily viewable at a glance in the “Servers” page after the setup is complete.
- Server Status Address: The location of this directory will depend on the installation. It is typically within the install directory, so if you install it to /public_html using Softaculous, the “Status” directory will exist at www.domain.com/status. If you install it to a directory, i.e. /public_html/whmcs it would be at www.domain.com/whmcs/status.
- Nameservers
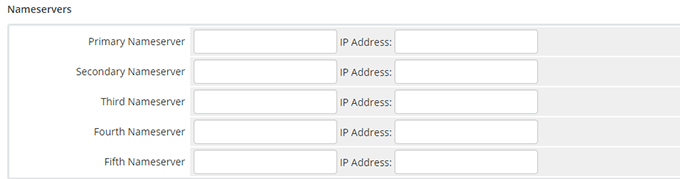
- Primary Nameserver / IP Address: This will assign to new accounts that get signed up.
- Secondary Nameserver / IP Address: Same as above.
- Optional Third/Fourth/Fifth Nameservers: same as above.
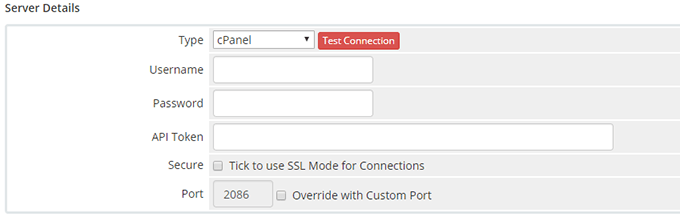
- Server Details
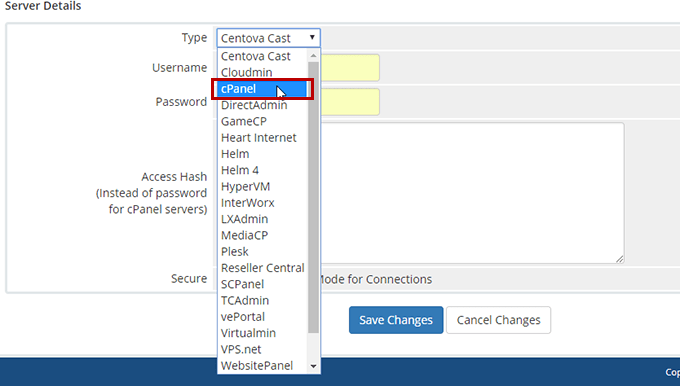
- If it is a Fully Managed Liquid Web server with cPanel/WHM, you’ll want to select the “Type” as “cPanel”.
- Enter the root credentials for WHM, typically:
- Username: root
- Password: WHM Root Password
- If using “Username/Password”, leave the API Token field blank. If you would prefer to utilize the API token, you will want to create a new API token by logging in to WHM and navigating to “Manage API tokens”.
- You would still need to enter the username assigned to the API token.
- Leave Password field blank.
- Enter the new API token.
- Enter the root credentials for WHM, typically:
- If you are using SSL, you will need to “Tick to use SSL Mode for Connections”.
- If you are using a custom port, select to override and enter the port. Otherwise this will read 2086 for standard, 2087 for SSL.
- If it is a Fully Managed Liquid Web server with cPanel/WHM, you’ll want to select the “Type” as “cPanel”.
- SSO Access Control

- This is setting up Single Sign On for your admin dashboard. From “Servers” there will be a single sign on to get into WHM. If you are having “staff” log in to your admin dashboard and you do not want them to have access to that, you can adjust it here. If you are the only WHMCS user, or if your staff will have full access, you can leave it unrestricted.
- Select “Save Changes”. Congratulations! Your first server is now set up, and you can begin setting up products to resell.
Related Articles:


About the Author: Chris White
Chris has been a part of Liquid Web for over 5 years. He has worked with WHMCS for 4+ years, helping develop Liquid Web's plugin as well as implementing WHMCS in ways to help achieve each partner's unique goals. As the Partner Operations Manager, he continues to develop Liquid Web's Partner Program tools, including WHMCS, to ensure partners have every resource they need to be successful at Liquid Web.


Categories
Have Some Questions?
Our Sales and Support teams are available 24 hours by phone or e-mail to assist.
1.800.580.4985
1.517.322.0434
Latest Articles
Linux dos2unix command syntax — removing hidden Windows characters from files
Read ArticleHow to use kill commands in Linux
Read ArticleChange cPanel password from WebHost Manager (WHM)
Read ArticleChange cPanel password from WebHost Manager (WHM)
Read ArticleChange the root password in WebHost Manager (WHM)
Read ArticleWant More Great Content Sent to Your Inbox?