


Installing and configuring HAProxy on Linux (AlmaLinux)
In today's connected and dynamic digital landscape, scalable and fault-tolerant applications are critical. HAProxy, with its high availability and load balancing features, is essential for attaining these objectives. HAProxy, which stands for High Availability Proxy, is an open-source software solution that provides TCP- and HTTP-based applications with high availability, load balancing, and proxying. It is often used to divide incoming network traffic among numerous servers to maximize resource utilization, increase application speed and dependability, and achieve high availability.
Installing HAProxy on AlmaLinux is essential to building a solid infrastructure that ensures seamless user experiences and optimal resource utilization. It involves implementing a robust and versatile load balancing solution to improve the performance, availability, and reliability of your web applications. Continue reading to understand the steps involved for installing and configuring HAProxy on Linux (AlmaLinux).
About configuring HAProxy on Linux (AlmaLinux)
Prerequisites
- Use the AlmaLinux OS 8 with regard to the operating system and version when working with the instructional content provided in this article.
- Dedicate a minimum of 1 GB of RAM for small to medium-sized deployments. For larger deployments or high-traffic loads, consider allocating more RAM.
- Remember that HAProxy's disk space requirements are minimal.
- Ensure you have root or sudo access to install and configure HAProxy.
Step #1. Updating the AlmaLinux system
You should update the AlmaLinux system before installing HAProxy to ensure you have the most up-to-date package details. To update the AlmaLinux system, run the following command:
sudo dnf updateStep #2. Installing HAProxy on AlmaLinux
HAProxy is available in the AlmaLinux 8 default repository. To install HAProxy, run the following command:
sudo dnf install haproxyHere is the output:
]# sudo dnf install haproxy
Last metadata expiration check: 0:08:31 ago on Tue 19 Dec 2023 02:47:50 PM UTC.
Dependencies resolved.
==============================================================================================================================================================================================================================================
 Package                                                 Architecture                                           Version                                                       Repository                                                 Size
==============================================================================================================================================================================================================================================
Installing:
 haproxy                                                 x86_64                                                 1.8.27-5.el8                                                  appstream                                                 1.4 M

Transaction Summary
==============================================================================================================================================================================================================================================
Install  1 Package

Total download size: 1.4 M
Installed size: 4.2 M
Is this ok [y/N]: y
Downloading Packages:
haproxy-1.8.27-5.el8.x86_64.rpm                                                                                                                                                                                19 MB/s | 1.4 MB     00:00
----------------------------------------------------------------------------------------------------------------------------------------------------------------------------------------------------------------------------------------------
Total                                                                                                                                                                                                         8.8 MB/s | 1.4 MB     00:00
Running transaction check
Transaction check succeeded.
Running transaction test
Transaction test succeeded.
Running transaction
  Preparing        :                                                                                                                                                                                                                      1/1
  Running scriptlet: haproxy-1.8.27-5.el8.x86_64                                                                                                                                                                                          1/1
  Installing       : haproxy-1.8.27-5.el8.x86_64                                                                                                                                                                                          1/1
  Running scriptlet: haproxy-1.8.27-5.el8.x86_64                                                                                                                                                                                          1/1
  Verifying        : haproxy-1.8.27-5.el8.x86_64                                                                                                                                                                                          1/1

Installed:
  haproxy-1.8.27-5.el8.x86_64

Complete!
After installing HAProxy, issue the following commands to start the service and enable it to start on system reboot:
sudo systemctl start haproxy
sudo systemctl enable haproxy
Here is the output:
]# sudo systemctl start haproxy
]# sudo systemctl enable haproxy
Created symlink /etc/systemd/system/multi-user.target.wants/haproxy.service → /usr/lib/systemd/system/haproxy.service.
Next you should verify the installation before configuring HAProxy.
Step #3. Verifying the installation
To make sure there are no issues, use the following command to check the HAProxy status:
sudo systemctl status haproxyHere is the output:
]# sudo systemctl status haproxy
● haproxy.service - HAProxy Load Balancer
   Loaded: loaded (/usr/lib/systemd/system/haproxy.service; enabled; vendor preset: disabled)
   Active: active (running) since Tue 2023-12-19 14:57:16 UTC; 1min 5s ago
 Main PID: 47306 (haproxy)
    Tasks: 2 (limit: 11852)
   Memory: 2.6M
   CGroup: /system.slice/haproxy.service
           ├─47306 /usr/sbin/haproxy -Ws -f /etc/haproxy/haproxy.cfg -f /etc/haproxy/conf.d -p /run/haproxy.pid
           └─47308 /usr/sbin/haproxy -Ws -f /etc/haproxy/haproxy.cfg -f /etc/haproxy/conf.d -p /run/haproxy.pid

Dec 19 14:57:16 HAProxy systemd[1]: Starting HAProxy Load Balancer...
Dec 19 14:57:16 HAProxy systemd[1]: Started HAProxy Load Balancer.
Now, you're ready to proceed with configuring HAProxy.
Step #4. Configuring HAProxy
HAProxy's configuration file has a default location of /etc/haproxy/haproxy.cfg. Now, change the frontend and backend sections. You must specify the HAProxy IP, its port, the stats Universal Resource Identifier (URI), and the backend name in the frontend section. In the backend section, you must specify the backend server name, IP address, port, and load balancing algorithm.
First, open HAProxy's configuration file using your favorite text editor (for example, nano):
sudo nano /etc/haproxy/haproxy.cfgModify the following lines:
Frontend HAProxy_Server
    bind 192.168.76.19:80
    option http-server-close
    option forwardfor
    stats uri /haproxy?stats

default_backend    Apache_Web_Servers

Backend Apache_Web_Servers
    mode        http
    balance     roundrobin
    option httpchk HEAD / HTTP/1.1\r\nHost:\ localhost
    server  Apache_Web_Server_1  192.168.76.20:80  check
    server  Apache_Web_Server_2 192.168.76.21:80  check
This example sets up a basic HTTP load balancer with two backend servers. Based on your specific requirements, modify the configuration as needed. It's a good idea to check the configuration file for syntax issues before restarting HAProxy:
sudo haproxy -c -f /etc/haproxy/haproxy.cfgYou should receive a message saying the configuration is valid, if everything is correct.
Here is the output:
[root@HAProxy ~]# sudo haproxy -c -f /etc/haproxy/haproxy.cfg
Configuration file is valid
To apply the changes, restart the HAProxy service:
sudo systemctl restart haproxyStep #5. Configuring the firewall
If you have a firewall, open the relevant ports (for example 80 for HTTP) to enable HAProxy traffic:
sudo firewall-cmd --add-port=80/tcp --permanent
sudo firewall-cmd --reload
Step #6. Configuring the backend servers
Implement the Apache HTTP Server on both backend servers by running the following command:
sudo dnf install httpdHere is the output:
[root@Apache_Web_Server_1 ~]# sudo dnf install httpd
AlmaLinux 8 - BaseOS                                                                                                                                                                                           18 MB/s | 4.0 MB     00:00
AlmaLinux 8 - AppStream                                                                                                                                                                                        48 MB/s |  11 MB     00:00
AlmaLinux 8 - Extras                                                                                                                                                                                          197 kB/s |  20 kB     00:00
Last metadata expiration check: 0:00:01 ago on Tue 19 Dec 2023 02:59:46 PM UTC.
Dependencies resolved.
==============================================================================================================================================================================================================================================
 Package                                                     Architecture                                 Version                                                                       Repository                                       Size
==============================================================================================================================================================================================================================================
Installing:
 httpd                                                       x86_64                                       2.4.37-62.module_el8.9.0+3646+acd210d0                                        appstream                                       1.4 M
Installing dependencies:
 almalinux-logos-httpd                                       noarch                                       84.5-1.el8                                                                    appstream                                        29 k
 apr                                                         x86_64                                       1.6.3-12.el8                                                                  appstream                                       128 k
 apr-util                                                    x86_64                                       1.6.1-9.el8                                                                   appstream                                       105 k
 httpd-filesystem                                            noarch                                       2.4.37-62.module_el8.9.0+3646+acd210d0                                        appstream                                        43 k
 httpd-tools                                                 x86_64                                       2.4.37-62.module_el8.9.0+3646+acd210d0                                        appstream                                       110 k
 mailcap                                                     noarch                                       2.1.48-3.el8                                                                  baseos                                           39 k
 mod_http2                                                   x86_64                                       1.15.7-8.module_el8.9.0+3660+29a7abf6.3                                       appstream                                       154 k
Installing weak dependencies:
 apr-util-bdb                                                x86_64                                       1.6.1-9.el8                                                                   appstream                                        24 k
 apr-util-openssl                                            x86_64                                       1.6.1-9.el8                                                                   appstream                                        26 k
Enabling module streams:
 httpd                                                                                                    2.4

Transaction Summary
==============================================================================================================================================================================================================================================
Install  10 Packages
—-
—-
Installed:
  almalinux-logos-httpd-84.5-1.el8.noarch     apr-1.6.3-12.el8.x86_64                                      apr-util-1.6.1-9.el8.x86_64                                        apr-util-bdb-1.6.1-9.el8.x86_64
  apr-util-openssl-1.6.1-9.el8.x86_64         httpd-2.4.37-62.module_el8.9.0+3646+acd210d0.x86_64          httpd-filesystem-2.4.37-62.module_el8.9.0+3646+acd210d0.noarch     httpd-tools-2.4.37-62.module_el8.9.0+3646+acd210d0.x86_64
  mailcap-2.1.48-3.el8.noarch                 mod_http2-1.15.7-8.module_el8.9.0+3660+29a7abf6.3.x86_64

Complete!
[root@Apache_Web_Server_2 ~]# sudo dnf install httpd
AlmaLinux 8 - BaseOS 13 MB/s | 4.0 MB 00:00
AlmaLinux 8 - AppStream 41 MB/s | 11 MB 00:00
AlmaLinux 8 - Extras 219 kB/s | 20 kB 00:00
Dependencies resolved.
==============================================================================================================================================================================================================================================
Package Architecture Version Repository Size
==============================================================================================================================================================================================================================================
Installing:
httpd x86_64 2.4.37-62.module_el8.9.0+3646+acd210d0 appstream 1.4 M
Installing dependencies:
almalinux-logos-httpd noarch 84.5-1.el8 appstream 29 k
apr x86_64 1.6.3-12.el8 appstream 128 k
apr-util x86_64 1.6.1-9.el8 appstream 105 k
httpd-filesystem noarch 2.4.37-62.module_el8.9.0+3646+acd210d0 appstream 43 k
httpd-tools x86_64 2.4.37-62.module_el8.9.0+3646+acd210d0 appstream 110 k
mailcap noarch 2.1.48-3.el8 baseos 39 k
mod_http2 x86_64 1.15.7-8.module_el8.9.0+3660+29a7abf6.3 appstream 154 k
Installing weak dependencies:
apr-util-bdb x86_64 1.6.1-9.el8 appstream 24 k
apr-util-openssl x86_64 1.6.1-9.el8 appstream 26 k
Enabling module streams:
httpd 2.4
Transaction Summary
==============================================================================================================================================================================================================================================
Install 10 Packages
—-
—-
Installed:
almalinux-logos-httpd-84.5-1.el8.noarch apr-1.6.3-12.el8.x86_64 apr-util-1.6.1-9.el8.x86_64 apr-util-bdb-1.6.1-9.el8.x86_64
apr-util-openssl-1.6.1-9.el8.x86_64 httpd-2.4.37-62.module_el8.9.0+3646+acd210d0.x86_64 httpd-filesystem-2.4.37-62.module_el8.9.0+3646+acd210d0.noarch httpd-tools-2.4.37-62.module_el8.9.0+3646+acd210d0.x86_64
mailcap-2.1.48-3.el8.noarch mod_http2-1.15.7-8.module_el8.9.0+3660+29a7abf6.3.x86_64
CompleteAfter installing the Apache server, start the Apache service and set it to start on system reboot:
sudo systemctl start httpd
sudo systemctl enable httpd
Next, run the following command to check the Apache service status:
sudo systemctl status httpdThen, edit the default index.html file on the first backend server (Apache_Web_Server_1):
nano /usr/share/httpd/noindex/index.htmlDelete all lines and add the line below:
Welcome Apache Web Server 1After that, modify the index.html file on the second backend server (Apache_Web_Server_2).
nano /usr/share/httpd/noindex/index.htmlErase all lines and insert the line shown here:
Welcome Apache Web Server 2Open your web browser and enter the HAProxy server IP address (for example, http://192.168.76.19). You will see your first backed server (Apache_Web_Server_1). Here is the output:

Then, reload the browser to see your second backend server (Apache_Web_Server_2). Here is the output:
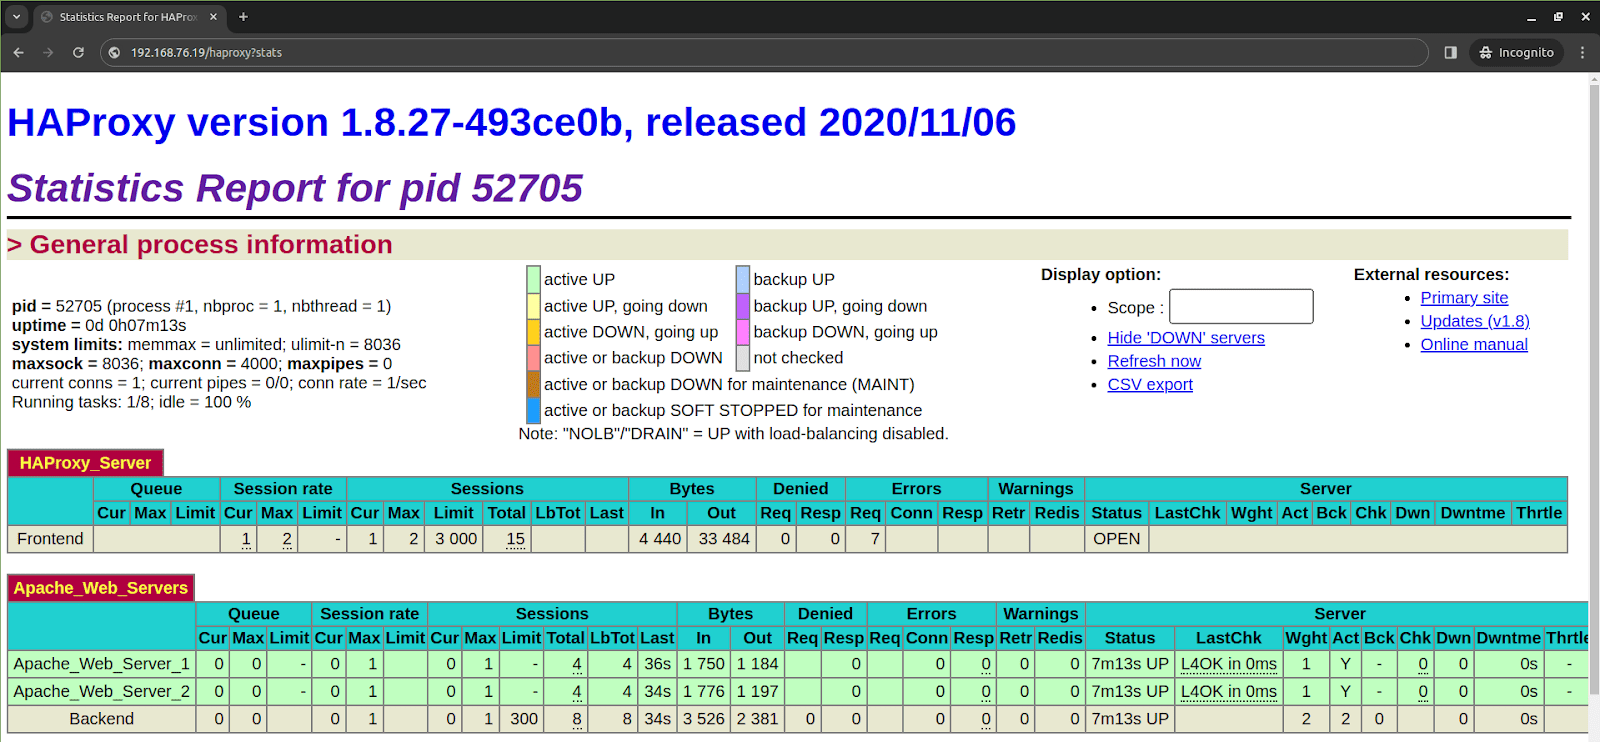
Step #7. Access the HAProxy stats page
You could view the HAProxy stats page by going to http://your_server_ip/haproxy?stats (for example, http://192.168.76.19/haproxy?stats) in a web browser if you included the stats URI /haproxy?stats line in the configuration file. Replace your_server_ip with your HAProxy server IP address.
Here is the output:
How to update HAProxy
To update HAProxy, run the following command:
sudo dnf update haproxyHow to uninstall or remove HAProxy
To uninstall or remove HAProxy, run the following command:
sudo dnf remove haproxyThis command will remove the HAProxy package from your AlmaLinux system. Additionally, you may want to delete the configuration files if you no longer need them:
sudo rm /etc/haproxy/haproxy.cfgHere is the output:
[root@HAproxy ~]# sudo dnf remove haproxy
Dependencies resolved.
==============================================================================================================================================================================================================================================
 Package                                                 Architecture                                           Version                                                      Repository                                                  Size
==============================================================================================================================================================================================================================================
Removing:
 haproxy                                                 x86_64                                                 1.8.27-5.el8                                                 @appstream                                                 4.2 M

Transaction Summary
==============================================================================================================================================================================================================================================
Remove  1 Package

Freed space: 4.2 M
Is this ok [y/N]: y
Running transaction check
Transaction check succeeded.
Running transaction test
Transaction test succeeded.
Running transaction
  Preparing        :                                                                                                                                                                                                                      1/1
  Running scriptlet: haproxy-1.8.27-5.el8.x86_64                                                                                                                                                                                          1/1
  Erasing          : haproxy-1.8.27-5.el8.x86_64                                                                                                                                                                                          1/1
warning: /etc/haproxy/haproxy.cfg saved as /etc/haproxy/haproxy.cfg.rpmsave

  Running scriptlet: haproxy-1.8.27-5.el8.x86_64                                                                                                                                                                                          1/1
  Verifying        : haproxy-1.8.27-5.el8.x86_64                                                                                                                                                                                          1/1

Removed:
  haproxy-1.8.27-5.el8.x86_64

Complete!
Wrapping up this HAProxy installation and configuration guide
Running HAProxy on AlmaLinux as part of your hosting architecture offers a powerful solution for optimizing the performance and reliability of web applications. By seamlessly distributing incoming traffic across multiple servers, HAProxy enhances resource utilization, improves response times, and provides resilience against traffic spikes and hardware failures.
Furthermore, Liquid Web's clustered hosting service, which also leverages HAProxy and the AlmaLinux OS, enables advanced load balancing and failover capabilities for web applications. This solution distributes traffic across multiple servers for efficient resource utilization and faster response times. Our dedicated support team provides 24/7 assistance, ensuring a seamless implementation and ideal hosting experience for our clients and their websites.
Related Articles:


About the Author: Mohammed Noufal
Mohammed Noufal is a B.Tech graduate with a decade of experience in server administration and web hosting. He is a father to two daughters and finds fulfillment in their growth. In his free time, he enjoys blogging, sharing experiences, and listening to music. With a strong technical background, family commitment, and creative outlets, he represents a well-rounded life journey.


Our Sales and Support teams are available 24 hours by phone or e-mail to assist.
Latest Articles
In-place CentOS 7 upgrades
Read ArticleHow to use kill commands in Linux
Read ArticleChange cPanel password from WebHost Manager (WHM)
Read ArticleChange cPanel password from WebHost Manager (WHM)
Read ArticleChange the root password in WebHost Manager (WHM)
Read Article