


How to Install Bpytop Resource Monitoring Tool on AlmaLinux
This article will explain the Bpytop Resource Monitoring Tool, and how to install Bpytop using various methods.
What is the Bpytop Resource Monitoring Tool?
Bpytop is a Python-based resource monitoring tool that is free and open source. It offers real-time monitoring of system resources, such as disc, network, processes, and CPU. It is also quite similar to other monitoring programs like top, htop, and bashtop. Linux, macOS, and FreeBSD are just a few operating systems that Bpytop may install because it is cross-platform. It also has a simple and user-friendly online interface, keyboard and mouse compatibility, multiple filter support, and many more features.
Tutorial Requirements
- Operating system and version: AlmaLinux OS 8.
- Root access to your Linux system or via the sudo command.
Bpytop Installation
In this section, you may learn how to install Bpytop Resource Monitoring Tool in four ways.
- Using Yum Package Manager
- Using PIP Package Manager
- Using Snap Package Manager
- Using dnf
Installing Bpytop Using Yum Package Manager
You can install the Bpytop resource monitoring tool using the Yum package manager by following the below steps.
Step 1: Install Python 3
You must install python3 by executing the following command.
]# sudo yum install python3Step 2: Enable EPEL Repository
You must enable the EPEL repository before you can install Bpytop. You can do this by executing the following command to install the epel-release package.
]# sudo yum install epel-releaseStep 3: Install Bpytop
To install the Bpytop resource monitoring tool, execute the following command.
]# sudo yum install bpytopHere is the output.
[root@admin-noufal ~]# sudo yum install bpytop
Extra Packages for Enterprise Linux 8 - x86_64                                                                                            43 MB/s |  14 MB     00:00
Last metadata expiration check: 0:00:04 ago on Fri 21 Apr 2023 02:55:37 AM UTC.
Dependencies resolved.
=========================================================================================================================================================================
 Package                                    Architecture                       Version                                       Repository                             Size
=========================================================================================================================================================================
Installing:
 bpytop                                     noarch                             1:1.0.54-3.el8                                epel                                   71 k
Installing dependencies:
 python3-psutil                             x86_64                             5.4.3-11.el8                                  appstream                             372 k

Transaction Summary
=========================================================================================================================================================================
Install  2 Packages

Total download size: 443 k
Installed size: 2.2 M
Is this ok [y/N]: y
Downloading Packages:
(1/2): bpytop-1.0.54-3.el8.noarch.rpm                                                                                                    1.2 MB/s |  71 kB     00:00
(2/2): python3-psutil-5.4.3-11.el8.x86_64.rpm                                                                                            900 kB/s | 372 kB     00:00
-------------------------------------------------------------------------------------------------------------------------------------------------------------------------
Total                                                                                                                                    449 kB/s | 443 kB     00:00
Extra Packages for Enterprise Linux 8 - x86_64                                                                                           1.6 MB/s | 1.6 kB     00:00
Importing GPG key 0x2F86D6A1:
 Userid     : "Fedora EPEL (8) <epel@fedoraproject.org>"
 Fingerprint: 94E2 79EB 8D8F 25B2 1810 ADF1 21EA 45AB 2F86 D6A1
 From       : /etc/pki/rpm-gpg/RPM-GPG-KEY-EPEL-8
Is this ok [y/N]: y
Key imported successfully
Running transaction check
Transaction check succeeded.
Running transaction test
Transaction test succeeded.
Running transaction
  Preparing        :                                                                                                                                                 1/1
  Installing       : python3-psutil-5.4.3-11.el8.x86_64                                                                                                              1/2
  Installing       : bpytop-1:1.0.54-3.el8.noarch                                                                                                                    2/2
  Running scriptlet: bpytop-1:1.0.54-3.el8.noarch                                                                                                                    2/2
  Verifying        : python3-psutil-5.4.3-11.el8.x86_64                                                                                                              1/2
  Verifying        : bpytop-1:1.0.54-3.el8.noarch                                                                                                                    2/2

Installed:
  bpytop-1:1.0.54-3.el8.noarch                                                     python3-psutil-5.4.3-11.el8.x86_64

Complete!
Step 4: Verify Bpytop Installation
Execute the following command to confirm the installation of Bpytop.
]# bpytop -vThe output below displaying the versions of Bpytop and Psutil verifies that Bpytop was successfully installed.
[root@admin-noufal ~]# bpytop -v
bpytop version: 1.0.54
psutil version: 5.9.5
Installing Bpytop Using PIP Package Manager
You can install the Bpytop resource monitoring tool using the PIP package manager by following the below steps. Before installing Bpytop, you must install python3, gcc, python3-devel and psutil packages.
Step 1: Install python3, gcc, and python3-devel Packages
You can Install python3, gcc, and python3-devel packages by executing the following command.
]# sudo yum install python3 gcc python3-develStep 2: Install the psutil Package
Install the psutil package by executing the following command.
]# sudo pip3 install psutilStep 3: Install Bpytop Using PIP
To install the Bpytop resource monitoring tool, execute the following command.
]# sudo pip3 install bpytopHere is the output.
[root@admin-noufal ~]# sudo pip3 install bpytop
Collecting bpytop
  Downloading https://files.pythonhosted.org/packages/9b/d5/e7abbdf81ef666f4dcf1181ca12769fca4424905b6f8b24de4fe54c0fe86/bpytop-1.0.54-py3-none-any.whl (73kB)
    100% |████████████████████████████████| 81kB 5.6MB/s
Collecting psutil<6.0.0,>=5.7.0 (from bpytop)
  Downloading https://files.pythonhosted.org/packages/d6/0f/96b7309212a926c1448366e9ce69b081ea79d63265bde33f11cc9cfc2c07/psutil-5.9.5.tar.gz (493kB)
    100% |████████████████████████████████| 501kB 2.7MB/s
Installing collected packages: psutil, bpytop
  Running setup.py install for psutil ... done
Successfully installed bpytop-1.0.54 psutil-5.9.5
Step 4: Verify Bpytop Installation
To verify that Bpytop has been installed, execute the following command.
]# bpytop -vHere is the output.
[root@admin-noufal ~]# bpytop -v
bpytop version: 1.0.54
psutil version: 5.9.5
Installing Bpytop Using Snap Package Manager
You can install the Bpytop resource monitoring tool using the Snap package manager by following the below steps.
Step 1: Install Python 3
You can install python3 by executing the following command.
]# sudo yum install python3Step 2: Enable EPEL Repository
Before installing Bpytop, the EPEL repository needs to be enabled. You can do this by executing the following command to install the epel-release package.
]# sudo yum install epel-releaseStep 3: Install the snapd Package and Enable the Snap Communication Socket
Install the snapd package and enable the Snap communication socket by executing the following commands.
]# sudo yum install snapd
]# sudo systemctl enable --now snapd.socket
Step 4: Create a Symbolic Link
You can execute the following command to create a symbolic link.
]# sudo ln -s /var/lib/snapd/snap /snapStep 5: Install Bpytop Using Snap
To install the Bpytop resource monitoring tool using Snap, execute the following command.
]# sudo snap install bpytopHere is the output.
[root@admin-noufal ~]# sudo snap install bpytop
2023-04-21T03:10:55Z INFO Waiting for automatic snapd restart...
bpytop 1.0.68 from James Tigert (kz6fittycent) installed
Step 6: Verify the Bpytop Installation
The Bpytop installation can be verified by executing the following command.
]# bpytop -vHere is the output.
[root@admin-noufal ~]# bpytop -v
bpytop version: 1.0.54
psutil version: 5.9.5
Installing Bpytop Using dnf
You can install the Bpytop resource monitoring tool using dnf by following the below steps.
Step 1: Update the Yum Database
Update the yum database with dnf by executing the following command.
]# sudo dnf makecache --refreshHere is the output.
[root@admin-noufal ~]# sudo dnf makecache --refresh
AlmaLinux 8 - BaseOS                                                                                                                     8.7 MB/s | 6.3 MB     00:00
AlmaLinux 8 - AppStream                                                                                                                   15 MB/s |  12 MB     00:00
AlmaLinux 8 - Extras                                                                                                                      30 kB/s |  19 kB     00:00
Metadata cache created.
Step 2: Enable EPEL Repository
You will need to enable the EPEL repository before you install Bpytop. To install the epel-release package, execute the following command.
]# sudo yum install epel-releaseStep 3: Install Bpytop Using dnf
You can install the Bpytop resource monitoring tool using Snap by executing the following command.
]# sudo dnf install bpytopHere is the output.
[root@admin-noufal ~]# sudo dnf install bpytop
Extra Packages for Enterprise Linux 8 - x86_64                                                          20 MB/s |  14 MB     00:00
Last metadata expiration check: 0:00:04 ago on Fri 21 Apr 2023 10:21:17 AM UTC.
Dependencies resolved.
=======================================================================================================================================
 Package                         Architecture        Version                                              Repository              Size
=======================================================================================================================================
Installing:
 bpytop                          noarch              1:1.0.54-3.el8                                       epel                    71 k
Installing dependencies:
 python3-pip                     noarch              9.0.3-22.el8                                         appstream               19 k
 python3-psutil                  x86_64              5.4.3-11.el8                                         appstream              372 k
 python3-setuptools              noarch              39.2.0-6.el8                                         baseos                 162 k
 python36                        x86_64              3.6.8-38.module_el8.5.0+2569+5c5719bc                appstream               18 k
Enabling module streams:
 python36                                            3.6

Transaction Summary
=======================================================================================================================================
Install  5 Packages
Step 3: Verify the Bpytop Installation
To confirm the installation of Bpytop, execute the following command.
]# bpytop -vHere is the output.
[root@admin-noufal ~]# bpytop -v
bpytop version: 1.0.54
psutil version: 5.9.5
Launch Bpytop
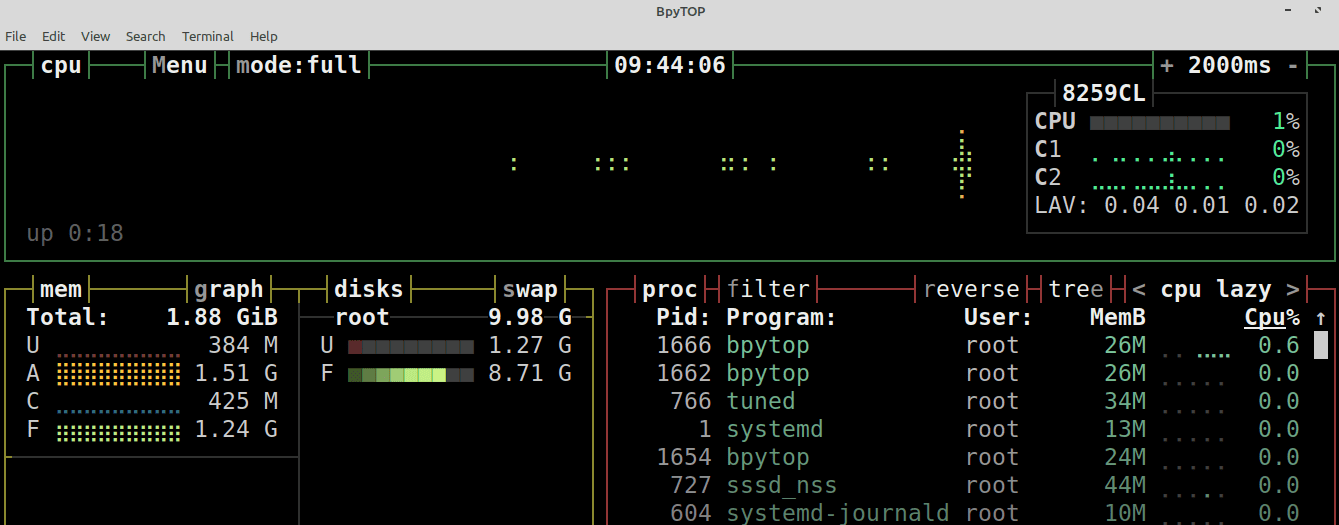
Step 1: Launch Bpytop
Launch the Bpytop command-line interface by executing the following command.
]# bpytopHere is the output.

Other Common Commands
Change Color
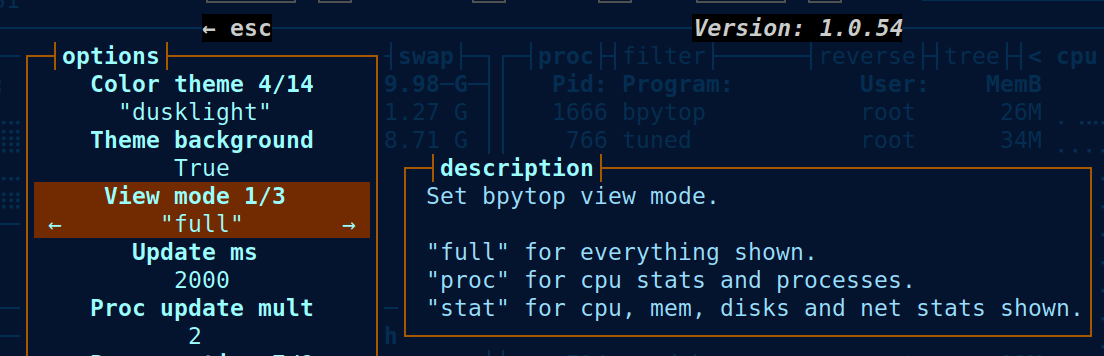
Bpytop's default color theme is slightly darker. However, you can modify it by pressing the ESC key and selecting OPTIONS.
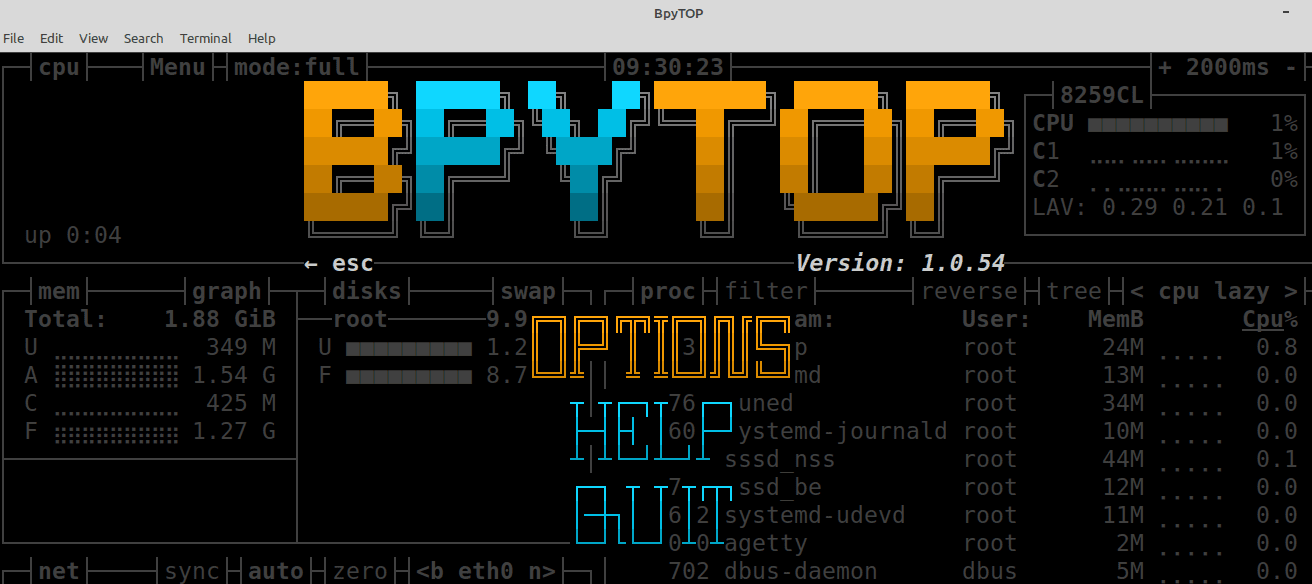
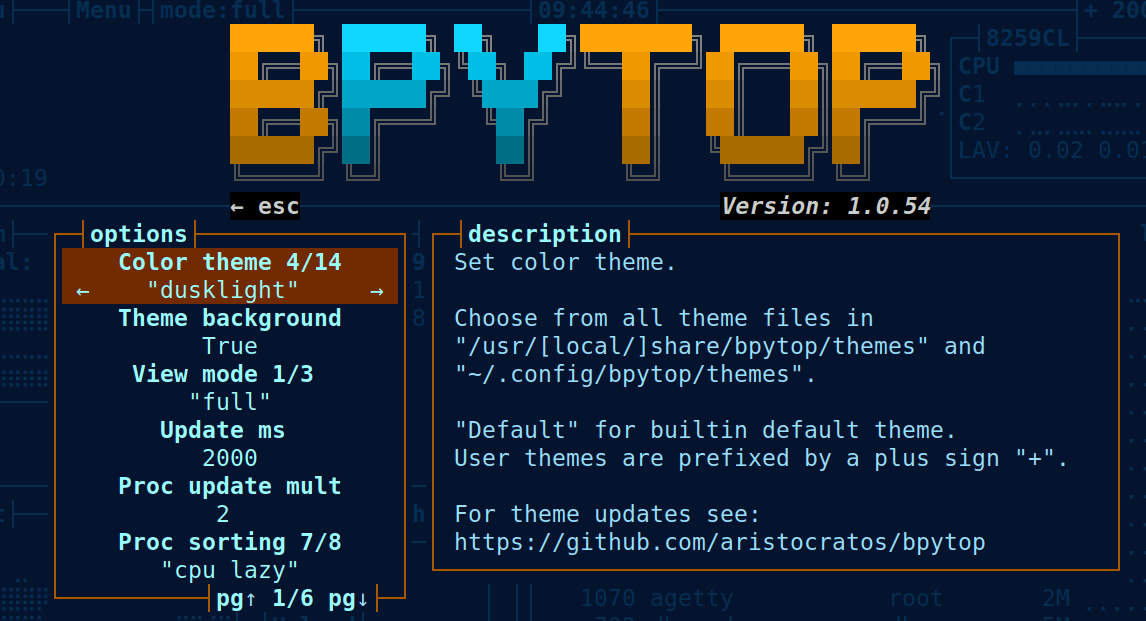
Choose from 14 different color themes on this page.
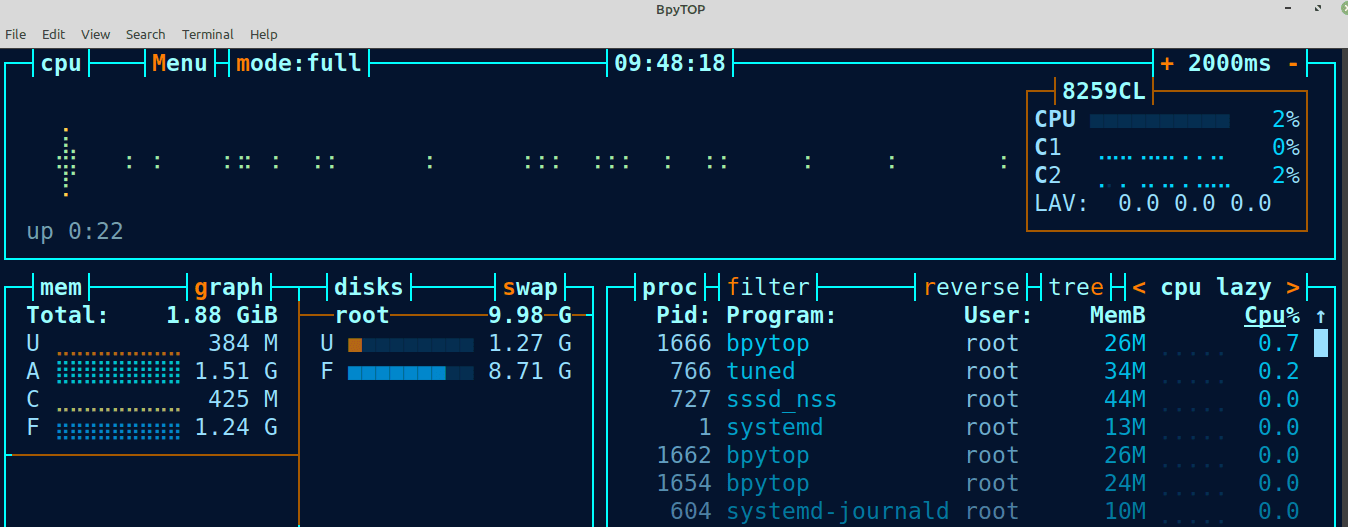
For example, if you want to change the color theme from Default to Dusklight, click on the right arrow to change the theme and click ESC to reflect the changes.
Here is the output.
Change View
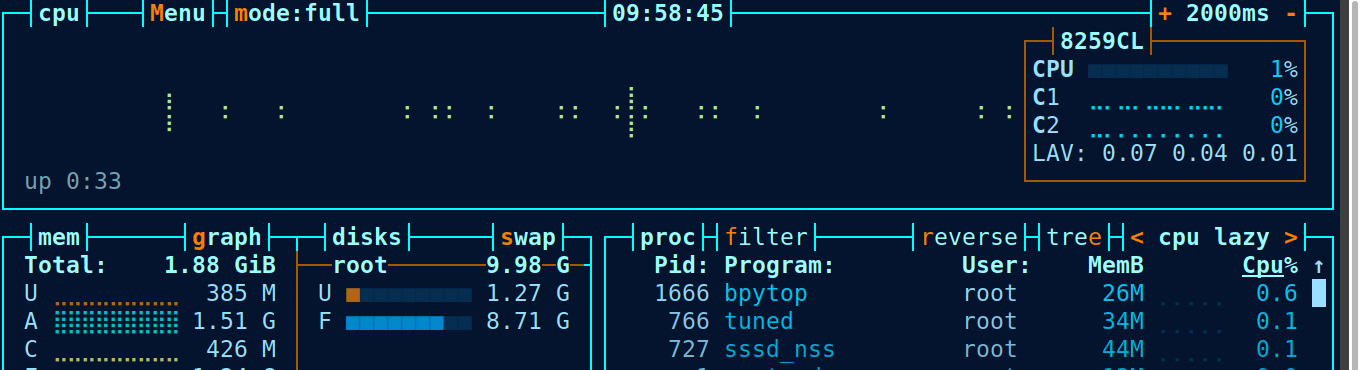
There are three modes available. You may also change the view by going to Menu > View mode.
You can also change the View mode to Full mode by executing the following command.
bpytop -fHere is the output.
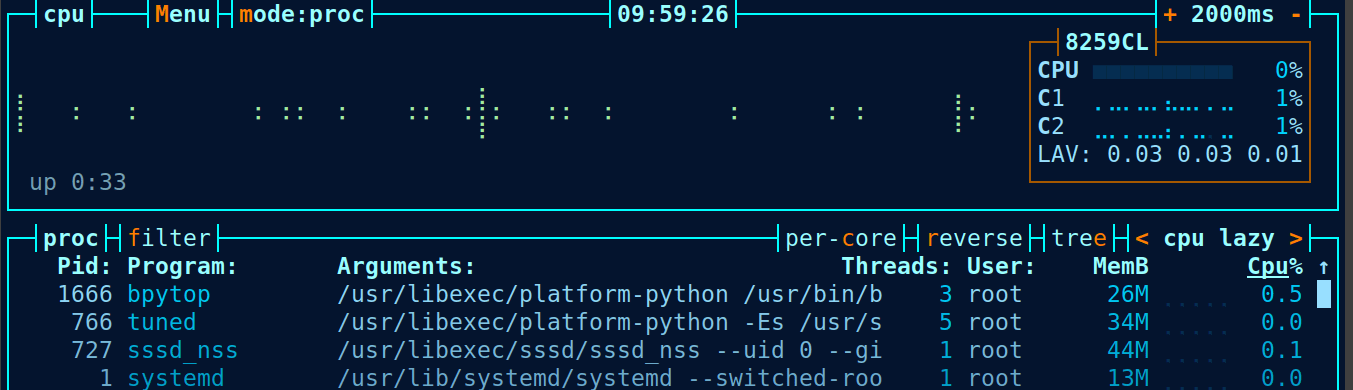
You can execute the following command to change View mode to Proc mode.
bpytop -pHere is the output.
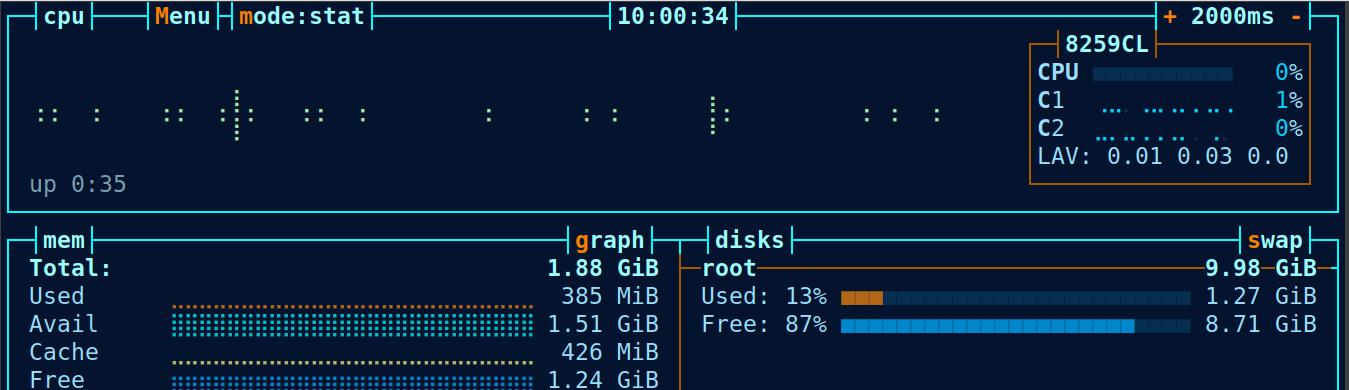
You can execute the following command to change View mode to Stat mode.
bpytop -sHere is the output.
Final Thoughts
This article explains how to install the Bpytop Resource Monitoring Tool on AlmaLinux. Bpytop provides a command-line interface for real-time monitoring of system resources such as disc, network, process, and CPU. Bpytop can be installed on various platforms, including Linux, macOS, and FreeBSD.
Related Articles:


About the Author: Mohammed Noufal
Mohammed Noufal is a B.Tech graduate with a decade of experience in server administration and web hosting. He is a father to two daughters and finds fulfillment in their growth. In his free time, he enjoys blogging, sharing experiences, and listening to music. With a strong technical background, family commitment, and creative outlets, he represents a well-rounded life journey.


Our Sales and Support teams are available 24 hours by phone or e-mail to assist.
Latest Articles
Email security best practices for using SPF, DKIM, and DMARC
Read ArticleLinux dos2unix command syntax — removing hidden Windows characters from files
Read ArticleHow to use kill commands in Linux
Read ArticleChange cPanel password from WebHost Manager (WHM)
Read ArticleChange cPanel password from WebHost Manager (WHM)
Read Article