


How to Install PyCharm on Linux (AlmaLinux)
The integrated development environment (IDE) for the Python programming language is called PyCharm. Python developers utilize it as one of the most well-liked and prevalent IDEs. PyCharm offers a variety of tools and capabilities to help developers write, test, and debug Python code more efficiently. JetBrains created PyCharm and the IDE gets great reviews within the Python development community.
When building Python-based websites with web application frameworks like Django and Flask, PyCharm is especially helpful. This article will demonstrate how to install PyCharm on Linux — specifically the AlmaLinux distribution of Linux. Links for installing PyCharm on the Ubuntu distribution of Linux and Windows are found near the end of this article.
Steps for Installing PyCharm on Linux (AlmaLinux)
Prerequisites
- Operating System and Version: The AlmaLinux OS 8 distribution of Linux.
- Privileged Access in the Linux System: The sudo command — or as root for your AlmaLinux system.
- System Minimum Requirements: At least 4 GB RAM and 5GB of storage.
To learn how to install PyCharm on AlmaLinux, review the steps provided below. Prior to performing the installation, you must decide on using the PyCharm Professional Edition (free) vs. the PyCharm Community Edition (paid with free trial). Remember that support for the following frameworks is only provided with the professional edition:
- React and React Native
- Angular
- Node.js
- Next.js
- Vue.js
- Django
- Flask
- FastAPI
- Jupyter Notebook
Step #1: Updating Your AlmaLinux System
Before you begin, updating your AlmaLinux system's package list is an excellent way to ensure you deal with the most up-to-date information. Open a terminal and type the following command:
sudo dnf updateStep #2: Installing Snap on AlmaLinux
On AlmaLinux, Snap is not natively supported:
"A snap is a bundle of an app and its dependencies that works without modification across Linux distributions."
"Snapd is the background service that manages and maintains your snaps, automatically."
~ Canonical Snapcraft
Snap is most commonly associated with Ubuntu and systems based on Ubuntu or the Ubuntu package management system. However, if you wish to utilize Snap on AlmaLinux, you may need to activate and set up Snap support explicitly.
Remember that using Snap on a non-Ubuntu-based distribution may not be as simple, and not all snaps may be available or perform thoroughly. To install Snap on AlmaLinux, follow the steps below.
Step #2a: Enabling EPEL (Extra Packages for Enterprise Linux)
The Snapd package is only available through EPEL. You can enable EPEL using the following command:
sudo dnf install epel-releaseStep #2b: Installing Snapd
You can use the following command to install snapd, the Snap package manager:
sudo dnf install snapdHere is the output:
~]# sudo dnf install snapd
Extra Packages for Enterprise Linux 8 - x86_64                                                                                                                                                                 26 MB/s |  16 MB     00:00
Last metadata expiration check: 0:00:08 ago on Sun 10 Sep 2023 12:40:30 PM UTC.
Dependencies resolved.
==============================================================================================================================================================================================================================================
 Package                                                                 Architecture                                      Version                                                    Repository                                         Size
==============================================================================================================================================================================================================================================
Installing:
 snapd                                                                   x86_64                                            2.58.3-1.el8                                               epel                                               17 M
Installing dependencies:
 bash-completion                                                         noarch                                            1:2.7-5.el8                                                baseos                                            273 k
 libpkgconf                                                              x86_64                                            1.4.2-1.el8                                                baseos                                             35 k
 pkgconf                                                                 x86_64                                            1.4.2-1.el8                                                baseos                                             38 k
 pkgconf-m4                                                              noarch                                            1.4.2-1.el8                                                baseos                                             17 k
 pkgconf-pkg-config                                                      x86_64                                            1.4.2-1.el8                                                baseos                                             15 k
 policycoreutils-python-utils                                            noarch                                            2.9-24.el8                                                 baseos                                            253 k
 snap-confine                                                            x86_64                                            2.58.3-1.el8                                               epel                                              3.5 M
 snapd-selinux                                                           noarch                                            2.58.3-1.el8                                               epel                                              553 k

Transaction Summary
==============================================================================================================================================================================================================================================
Install  9 Packages

—-
—-

Installed:
  bash-completion-1:2.7-5.el8.noarch    libpkgconf-1.4.2-1.el8.x86_64    pkgconf-1.4.2-1.el8.x86_64           pkgconf-m4-1.4.2-1.el8.noarch    pkgconf-pkg-config-1.4.2-1.el8.x86_64    policycoreutils-python-utils-2.9-24.el8.noarch
  snap-confine-2.58.3-1.el8.x86_64      snapd-2.58.3-1.el8.x86_64        snapd-selinux-2.58.3-1.el8.noarch

Complete!
Step #2c: Enabling and Starting the Snapd Service
Use the following commands to enable and start the Snapd service after installation:
sudo systemctl enable --now snapd.socket
sudo systemctl start --now snapd.socket
Here is the output:
~]# sudo systemctl enable --now snapd.socket
Created symlink /etc/systemd/system/sockets.target.wants/snapd.socket → /usr/lib/systemd/system/snapd.socket.
[root@ip-172-31-19-5 ~]# sudo systemctl start --now snapd.socket
Use the following command to ensure the snapd service is running:
sudo systemctl status snapd.socketHere is the output:
~]# sudo systemctl status snapd.socket
● snapd.socket - Socket activation for snappy daemon
   Loaded: loaded (/usr/lib/systemd/system/snapd.socket; enabled; vendor preset: disabled)
   Active: active (listening) since Sun 2023-09-10 12:43:49 UTC; 1min 31s ago
   Listen: /run/snapd.socket (Stream)
           /run/snapd-snap.socket (Stream)
    Tasks: 0 (limit: 11968)
   Memory: 4.0K
   CGroup: /system.slice/snapd.socket
Step #2d: Creating a Symbolic Link
To enable classic snap support, add a symbolic link between /var/lib/snapd/snap and /snap:
sudo ln -s /var/lib/snapd/snap /snapThen, be sure to check and confirm the version of snap you enabled using the appropriate command.
Step #3: How to Install PyCharm
Step #3a: Installing PyCharm on AlmaLinux Using Snap
PyCharm is available as a self-contained snap package. Because snaps are automatically updated, your PyCharm installation will always be up to date.
Follow these next steps provided to install PyCharm on AlmaLinux using Snap.
Using Snap: Installing PyCharm
PyCharm is made available through two channels — the Stable Channel and Edge Channel. The Stable Channel only contains stable versions.
Stable Channel
To install the most recent stable release of PyCharm, use the following commands.
To install the PyCharm Community Edition, use this command:
sudo snap install pycharm-community --classicHere is the output:
~]# sudo snap install pycharm-community --classic
2023-09-10T12:47:19Z INFO Waiting for automatic snapd restart...
pycharm-community 2023.2.1 from jetbrains✓ installed
To install the PyCharm Professional Edition, use this command:
sudo snap install pycharm-professional --classicHere is the output:
 ~]# sudo snap install pycharm-professional --classic
2023-09-10T12:57:49Z INFO Waiting for automatic snapd restart...
pycharm-professional 2023.2.1 from jetbrains✓ installed
The --classic option is essential because the PyCharm snap, like any other conventionally packed application, requires full access to the system.
Edge Channel
The Edge Channel contains Early Access Program (EAP) builds. Use the following commands to install PyCharm's most recent EAP build.
To install the PyCharm Community Edition (the most recent EAP build), use this command:
sudo snap install pycharm-community --classic --edgeHere is the output:
~]# sudo snap install pycharm-community --classic --edge
pycharm-community (edge) 2023.2.1 from jetbrains✓ installed
To install the PyCharm Professional Edition (the most recent EAP build), use this command:
sudo snap install pycharm-professional --classic --edgeHere is the output:
~]# sudo snap install pycharm-professional --classic --edge
pycharm-professional (edge) 2023.2.1 from jetbrains✓ installed
Using Snap: Launching PyCharm
After the installation, you can launch PyCharm from the terminal using the following commands.
PyCharm Community Edition
For launching the PyCharm Community Edition, use this command:
pycharm-communityPyCharm Professional Edition
For launching the PyCharm Professional Edition, use this command:
pycharm-professionalYou will be prompted to make initial configuration choices when PyCharm launches. To set up your development environment, follow the on-screen instructions.
Step #3b: Installing PyCharm on AlmaLinux Using Tar Archive
Take the steps below to install PyCharm on AlmaLinux using the tar archive.
Using Tar: Downloading PyCharm
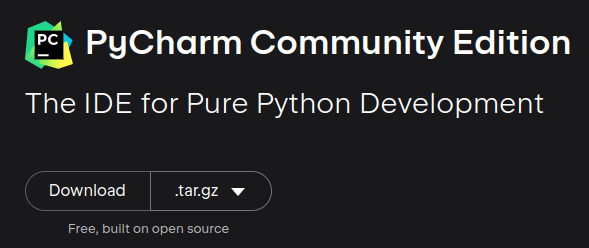
Go to the PyCharm Download page (Linux tab) and choose PyCharm Community Edition or PyCharm Professional Edition based on your requirements:
Using Tar: Tracking the Edition of PyCharm You Have Installed
You'll need to keep track of updates and manually download and install newer versions for the edition you have installed as needed:

Using Tar: Downloading the Tarball
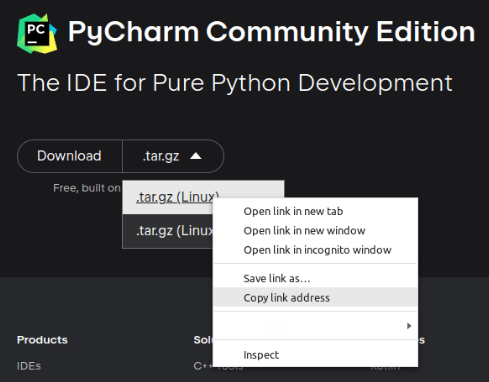
You can download the tarball (.tar.gz) version of PyCharm Community Edition or PyCharm Professional. We're going to download PyCharm Community Edition for use in this article.
To download the tar.gz version of PyCharm Community Edition, click on the dropdown on the right side of Download. Then, right-click on .tar.gz (Linux) menu entry and click on the Copy Link Address menu option:
Use the following command to download the PyCharm Community Edition tar.gz version to your AlmaLinux system:
wget https://download.jetbrains.com/python/pycharm-community-2023.2.1.tar.gzHere is the output:
~]# wget https://download.jetbrains.com/python/pycharm-community-2023.2.1.tar.gz
--2023-09-10 13:01:17--  https://download.jetbrains.com/python/pycharm-community-2023.2.1.tar.gz
Resolving download.jetbrains.com (download.jetbrains.com)... 52.17.28.245, 54.217.205.139, 2a05:d018:13b2:dd02:aa65:4dff:35f0:d66, ...
Connecting to download.jetbrains.com (download.jetbrains.com)|52.17.28.245|:443... connected.
HTTP request sent, awaiting response... 302 Moved Temporarily
Location: https://download-cdn.jetbrains.com/python/pycharm-community-2023.2.1.tar.gz [following]
--2023-09-10 13:01:17--  https://download-cdn.jetbrains.com/python/pycharm-community-2023.2.1.tar.gz
Resolving download-cdn.jetbrains.com (download-cdn.jetbrains.com)... 3.160.22.93, 3.160.22.37, 3.160.22.84, ...
Connecting to download-cdn.jetbrains.com (download-cdn.jetbrains.com)|3.160.22.93|:443... connected.
HTTP request sent, awaiting response... 200 OK
Length: 588203470 (561M) [binary/octet-stream]
Saving to: 'pycharm-community-2023.2.1.tar.gz'

pycharm-community-2023.2.1.tar.gz                           100%[=========================================================================================================================================>] 560.95M   235MB/s    in 2.4s

2023-09-10 13:01:20 (235 MB/s) - 'pycharm-community-2023.2.1.tar.gz' saved [588203470/588203470]
Using Tar: Extracting the Tarball
Use the following command to extract the downloaded tarball by navigating to the directory where it is located:
sudo tar -xzf pycharm-community-2023.2.1.tar.gzUsing Tar: Moving the PyCharm Extracted Directory
Move the extracted directory to a location where you want to install PyCharm. You can use the /opt directory as a common location:
sudo mv pycharm-community-2023.2.1 /opt/pycharmUsing Tar: Creating a Symlink
Create a symbolic link to the pycharm.sh script to make it accessible from the terminal:
sudo ln -s /opt/pycharm/bin/pycharm.sh /usr/local/bin/pycharmStep #4: Accessing PyCharm on AlmaLinux
You can start PyCharm from the terminal by using the pycharm command:
pycharmPyCharm will prompt you to import settings or configure a new installation at the initial launch. Follow the on-screen instructions to set up your preferences and begin using PyCharm. Congratulations on learning how to install PyCharm on AlmaLinux!
How to Install PyCharm on Linux (Ubuntu) and Windows
To install PyCharm on Ubuntu or Windows, refer to the following articles:
How to Uninstall PyCharm on Linux (AlmaLinux)
Use the following command to uninstall PyCharm if you installed it as a snap package.
Uninstalling PyCharm
PyCharm Community Edition
To uninstall the PyCharm Community Edition, use this command:
sudo snap remove pycharm-communityPyCharm Professional Edition
To uninstall the PyCharm Professional Edition, use this command:
sudo snap remove pycharm-professionalUse the following steps to uninstall PyCharm if you installed it using tar archive.
Removing the PyCharm Installation Directory
You can remove the PyCharm installation directory using the following command:
sudo rm -r /opt/pycharmRemoving the PyCharm Configuration ("Config") Files
PyCharm stores its configuration files in your user's home directory under ~/.config/JetBrains. You can remove this directory to uninstall PyCharm settings completely:
sudo rm -r ~/.config/JetBrains/PyCharm<version>Removing the Symlink
You can remove the symlink using the following command;
sudo rm /usr/local/bin/pycharmIt's a good practice to clean up any residual configuration files or dependencies that might be left behind. You can use the following commands to clean residual configuration files or dependencies:
sudo dnf autoremove
sudo dnf clean
Closing Thoughts
This article demonstrates how to install PyCharm on AlmaLinux. We covered installing it as a snap package and downloading the tarball from PyCharm area of the JetBrains website. If you're seeking managed hosting services for expanding businesses and want to use PyCharm on an AlmaLinux server, you might want to look at using Liquid Web hosting.
Using one of a plethora of server options offered by Liquid Web to host your PyCharm development environment on AlmaLinux can provide numerous benefits such as Managed Services, High Reliability, Security, Scalability, 24/7 Support, Performance, and more.
Related Articles:


About the Author: Mohammed Noufal
Mohammed Noufal is a B.Tech graduate with a decade of experience in server administration and web hosting. He is a father to two daughters and finds fulfillment in their growth. In his free time, he enjoys blogging, sharing experiences, and listening to music. With a strong technical background, family commitment, and creative outlets, he represents a well-rounded life journey.


Our Sales and Support teams are available 24 hours by phone or e-mail to assist.
Latest Articles
Email security best practices for using SPF, DKIM, and DMARC
Read ArticleLinux dos2unix command syntax — removing hidden Windows characters from files
Read ArticleHow to use kill commands in Linux
Read ArticleChange cPanel password from WebHost Manager (WHM)
Read ArticleChange cPanel password from WebHost Manager (WHM)
Read Article