How to Install Apache Tomcat on Linux (AlmaLinux)
Apache Tomcat is a free, open-source, lightweight, powerful, and extensively used Java EE-compliant web server (where EE stands for Enterprise Edition) and servlet container hosting Java-enabled web applications. It is a Java Servlet, JavaServer Pages, Java Expression Language, and Java WebSocket implementation. Tomcat is platform-independent, requiring only the installation of Java in several Linux distributions and operating systems (OSs), such as AlmaLinux, Debian, Ubuntu, and CentOS.
This article lets you understand how to install Apache Tomcat on Linux (AlmaLinux).
Steps to Install Apache Tomcat on Linux (AlmaLinux)
Prerequisites
- Operating System and Version: AlmaLinux OS 8.
- Access: Privileged access to your AlmaLinux system using the sudo command or as root.
- System Minimum Requirements: 1 GB RAM and 500 MB of Disk space.
Step #1: Update Your AlmaLinux System
Let's get started with our instructions for how to install Apache Tomcat on Linux (AlmaLinux). It's a good idea to update your system's package list before installing Apache Tomcat to ensure you have the most up-to-date information on available packages. You can update your AlmaLinux system by executing the following command:
sudo dnf updateStep #2: Install Java
Java is required to run Apache Tomcat. You can install OpenJDK (Open Java Development Kit) by executing the following command:
sudo dnf install java-11-openjdkOnce the Java installation is complete, execute the following command to check the Java version:
java --versionHere is the output:
~]# java --version
openjdk 11.0.20 2023-07-18 LTS
OpenJDK Runtime Environment (Red_Hat-11.0.20.0.8-1) (build 11.0.20+8-LTS)
OpenJDK 64-Bit Server VM (Red_Hat-11.0.20.0.8-1) (build 11.0.20+8-LTS, mixed mode, sharing)
Step #3: Create a Tomcat Service Account
You can run Apache Tomcat as root, but this creates a significant security risk. As a result, you have to create a new user who will manage the Tomcat service and whose home directory is /opt/tomcat. Installing Apache Tomcat in this directory will prevent anyone from logging in because it was built with a /bin/false shell.
To create a new user for Tomcat, execute the following command:
sudo useradd -m -U -d /opt/tomcat -s /bin/false tomcatStep #4: Install Apache Tomcat on AlmaLinux
In this tutorial, we'll download Apache Tomcat 9. On the Apache website, you can get the Apache Tomcat. Execute the following command to get the Apache Tomcat archive file from the official download server:
wget https://dlcdn.apache.org/tomcat/tomcat-9/v9.0.80/bin/apache-tomcat-9.0.80.tar.gzHere is the output:
~]# wget https://dlcdn.apache.org/tomcat/tomcat-9/v9.0.80/bin/apache-tomcat-9.0.80.tar.gz
--2023-09-14 05:11:46--  https://dlcdn.apache.org/tomcat/tomcat-9/v9.0.80/bin/apache-tomcat-9.0.80.tar.gz
Resolving dlcdn.apache.org (dlcdn.apache.org)... 151.101.2.132, 2a04:4e42::644
Connecting to dlcdn.apache.org (dlcdn.apache.org)|151.101.2.132|:443... connected.
HTTP request sent, awaiting response... 200 OK
Length: 11692853 (11M) [application/x-gzip]
Saving to: 'apache-tomcat-9.0.80.tar.gz'

apache-tomcat-9.0.80.tar.gz                                 100%[=========================================================================================================================================>]  11.15M  --.-KB/s    in 0.09s

2023-09-14 05:11:46 (122 MB/s) - 'apache-tomcat-9.0.80.tar.gz' saved [11692853/11692853]
Create the directory that will store the contents of the Apache Tomcat 9:
sudo mkdir /opt/tomcatOnce the Apache Tomcat download is complete, extract the tar file and copy it to the /opt/tomcat directory you created:
sudo tar xzf apache-tomcat-9.*.tar.gz -C /opt/tomcat/ --strip-components=1The --strip-components option removes a specified number of leading directory components from the file paths within the archive as they are extracted. In this case, --strip-components=1 indicates that one leading directory component should be removed.
Next, set the necessary permissions. You can execute the command below to grant the Tomcat user and group permission:
sudo chown -R tomcat: /opt/tomcatThen, execute the following command to make the shell scripts in Tomcat's bin directory executable:
sudo sh -c 'chmod +x /opt/tomcat/bin/*.sh'Step #5: Create Apache Tomcat Systemd Service
We must write a starting script to manage Tomcat as a systemd service. Let's create a file named tomcat.service:
sudo nano /etc/systemd/system/tomcat.serviceAdd the following line:
[Unit]
Description=Tomcat webs servlet container
After=network.target

[Service]
Type=forking

User=tomcat
Group=tomcat

Environment="JAVA_HOME=/usr/lib/jvm/jre"
Environment="JAVA_OPTS=-Djava.awt.headless=true -Djava.security.egd=file:/dev/./urandom"

Environment="CATALINA_BASE=/opt/tomcat"
Environment="CATALINA_HOME=/opt/tomcat"
Environment="CATALINA_PID=/opt/tomcat/temp/tomcat.pid"
Environment="CATALINA_OPTS=-Xms512M -Xmx1024M -server -XX:+UseParallelGC"

ExecStart=/opt/tomcat/bin/startup.sh
ExecStop=/opt/tomcat/bin/shutdown.sh

[Install]
WantedBy=multi-user.target
Press Ctrl+X, enter Y, and then press Enter to save the changes. Then reload systemctl to confirm that the system recognizes the new changes:
sudo systemctl daemon-reloadTo start and enable the Apache Tomcat service, execute the following commands:
sudo systemctl start tomcat
sudo systemctl enable --now tomcat
To check the Apache Tomcat service status, execute the following command:
sudo systemctl status tomcatHere is the output:
~]# sudo systemctl status tomcat
● tomcat.service - Tomcat webs servlet container
   Loaded: loaded (/etc/systemd/system/tomcat.service; enabled; vendor preset: disabled)
   Active: active (running) since Thu 2023-09-14 05:23:28 UTC; 15s ago
 Main PID: 46321 (java)
    Tasks: 29 (limit: 11968)
   Memory: 158.7M
   CGroup: /system.slice/tomcat.service
           └─46321 /usr/lib/jvm/jre/bin/java -Djava.util.logging.config.file=/opt/tomcat/conf/logging.properties -Djava.util.logging.manager=org.apache.juli.ClassLoaderLogManager -Djava.awt.headless=true -Djava.security.egd=file:/dev/./u>
Step #6: Configure Firewall
The firewall setup is an important aspect of learning ow to install Apache Tomcat. To access the Apache Tomcat web interface outside the local host, open port 8080 (Apache Tomcat’s default port) in AlmaLinux's firewall. You can open port 8080 by executing the following command:
sudo firewall-cmd --zone=public --permanent --add-port=8080/tcpHere is the output:
~]# sudo firewall-cmd --zone=public --permanent --add-port=8080/tcp
success
To reflect the changes, you can reload the firewall by executing the following command:
sudo firewall-cmd --reload Here is the output:
~]# sudo firewall-cmd --reload
success
Alternatively, you can execute the following commands to open HTTP and HTTPS ports;
sudo firewall-cmd --permanent --add-service=http
sudo firewall-cmd --permanent --add-service=https
sudo firewall-cmd --reload
Here is the output:
Here is the output:
]# sudo firewall-cmd --permanent --add-service=http
success
~]# sudo firewall-cmd --permanent --add-service=https
success
~]# sudo firewall-cmd --reload
success
Step #7: Configure Apache Tomcat Application Manager
You will only have access to the Tomcat default page by default. You must configure the admin and administrator user accounts to access admin and other parts such as Server Status, App Manager, and Host Manager. The two manager apps referenced in the next sections must be configured per our requirements.
We must update the Tomcat User XML file, /opt/tomcat/conf/tomcat-users.xml, to create the users and set their roles. Don’t forget to take the backup of the current file. You can execute the following command to take the backup:
sudo cp /opt/tomcat/conf/{tomcat-users.xml,tomcat-users.xml.bak} Open the Tomcat User XML file, /opt/tomcat/conf/tomcat-users.xml, using any text editor:
sudo nano /opt/tomcat/conf/tomcat-users.xmlAdd the following details;
<role rolename="admin"/>
<role rolename="admin-gui"/>
<role rolename="manager"/>
<role rolename="manager-gui"/>
<user username="tomcat-admin" password="strongpassword" roles="admin,admin-gui,manager,manager-gui"/>
Make sure to modify the username and password to your preference.
Press Ctrl+X, enter Y, and then press Enter to save the changes.
Then, comment out the following block of text in the Manager Context XML file (/opt/tomcat/webapps/manager/META-INF/context.xml) and Host Manager Context XML file (/opt/tomcat/webapps/host-manager/META-INF/context.xml):
<Valve className="org.apache.catalina.valves.RemoteAddrValve" allow="127\.\d+\.\d+\.\d+|::1|0:0:0:0:0:0:0:1" />To comment out the text block, you can add <!-- at the beginning and --> at the end of it.
Here is the output:
<!-- <Valve className="org.apache.catalina.valves.RemoteAddrValve" allow="127\.\d+\.\d+\.\d+|::1|0:0:0:0:0:0:0:1" /> -->Commenting Out a Text Block in the Manager XML File - Tomcat Web Application Manager App
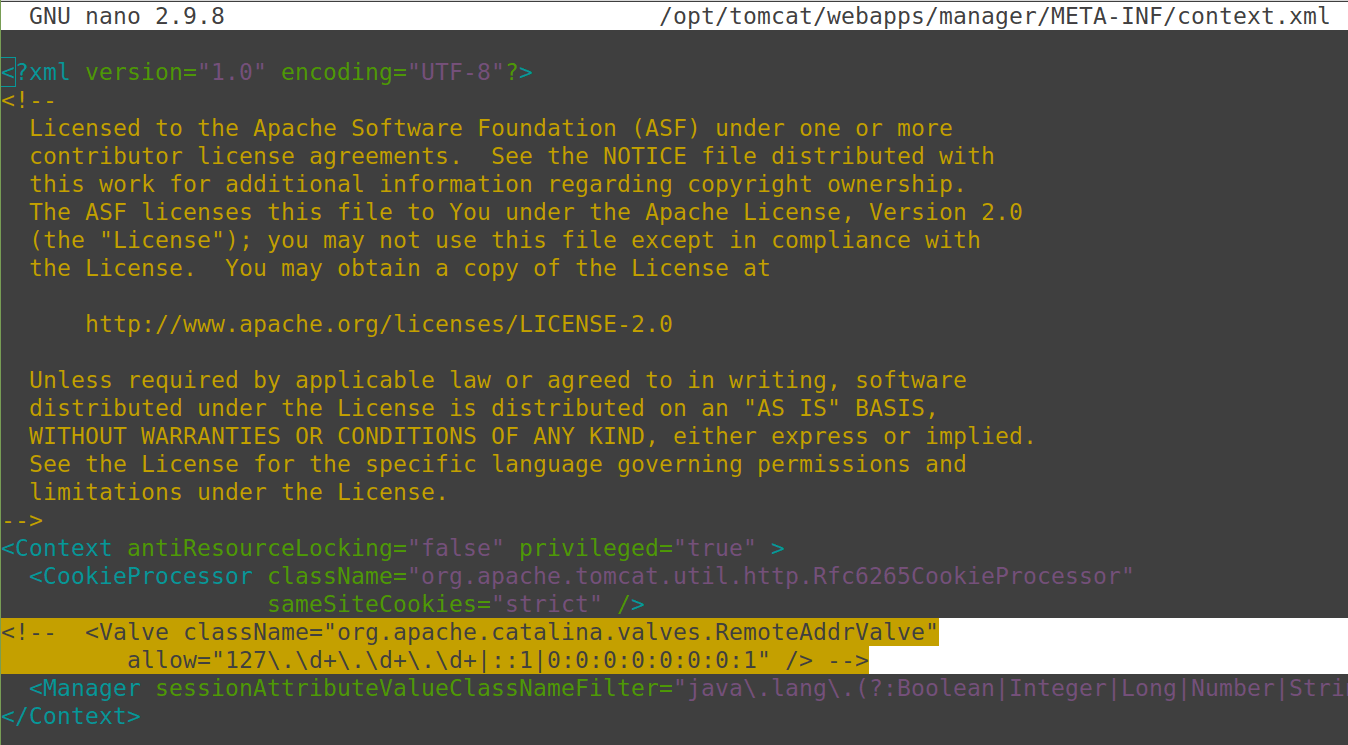
Commenting Out a Text Block in the Host Manager XML File - Tomcat Virtual Host Manager App

Press Ctrl+X, enter Y, and then press Enter to save the changes.
How to Install Apache Tomcat with Remote Access Settings Configured
If you want to connect to the Manager and Host Manager apps remotely, specify the IP addresses of the remote servers from which you access Apache Tomcat in the /opt/tomcat/webapps/manager/META-INF/context.xml and /opt/tomcat/webapps/host-manager/META-INF/context.xml files.
Here is the output:
<Valve className="org.apache.catalina.valves.RemoteAddrValve" allow="127\.\d+\.\d+\.\d+|::1|0:0:0:0:0:0:0:1|xxx.xxx.xxx.xxx"Setting Up Remote Access in the Manager XML File - Tomcat Web Application Manager App
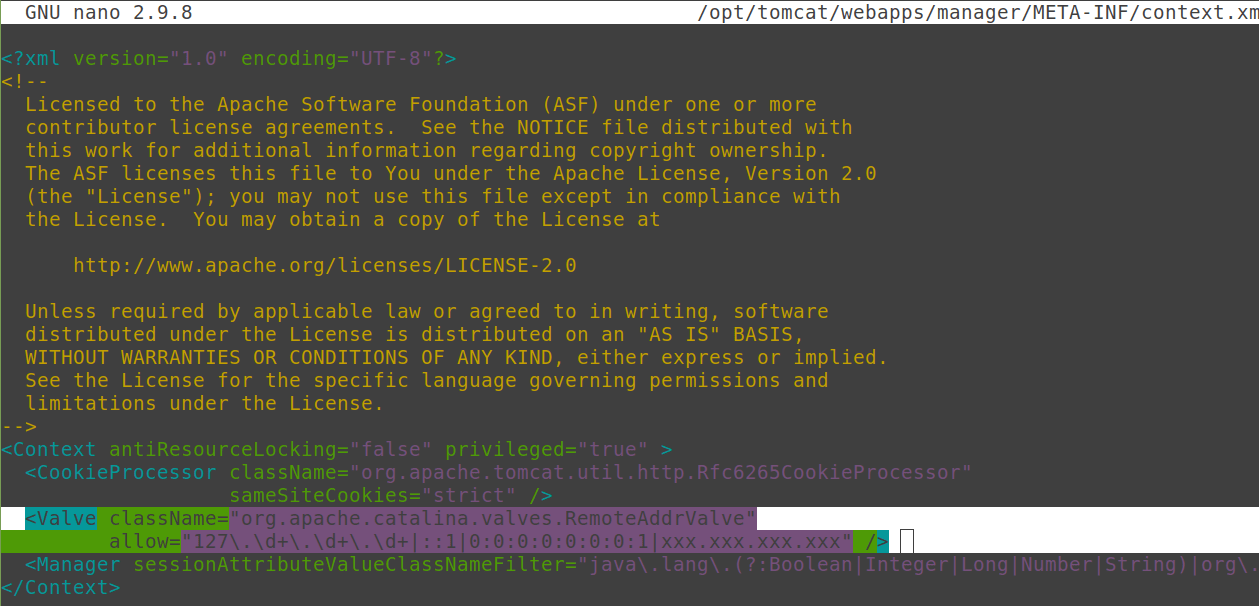
Setting Up Remote Access in the Host Manager XML File - Tomcat Virtual Host Manager App
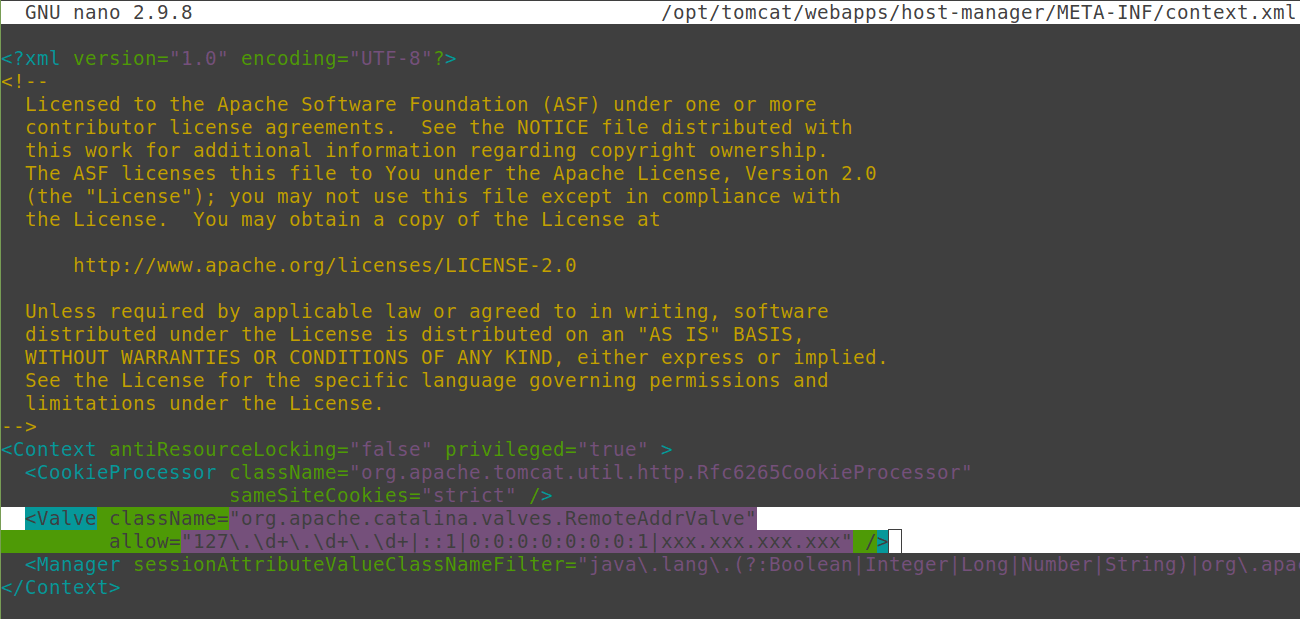
Replace xxx.xxx.xxx.xxx with your IP address. Press Ctrl+X, enter Y, and then press Enter to save the changes.
After making changes, save the configuration file and close it. Then, restart the Apache Tomcat service to reflect the changes:
sudo systemctl restart tomcat Step #8: Accessing Apache Tomcat Web Interface
After learning how to install Apache Tomcat, you will then want to access its web interface. Open your web browser and visit http://your-server-ip-address:8080 after the successful installation. If the page looks similar to the one in the image below, Tomcat was set up correctly:
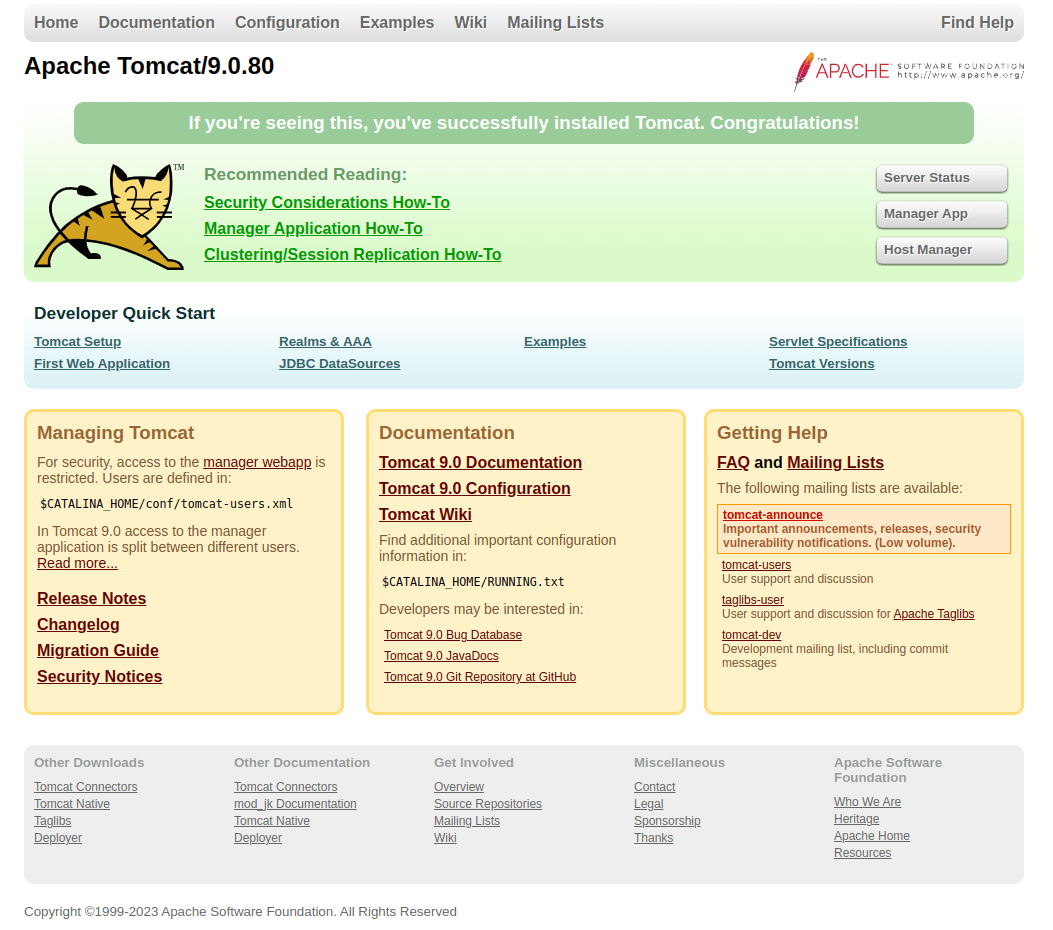
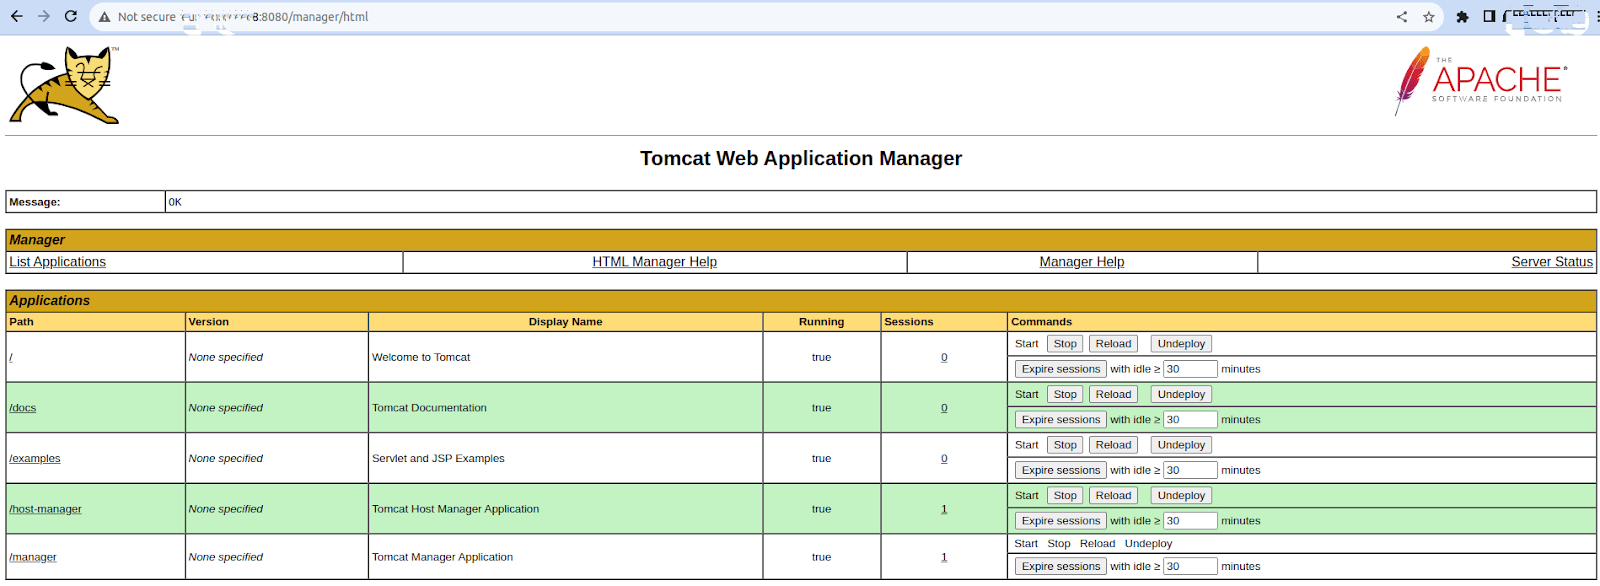
Manager App - Tomcat Web Application Manager
Click the Manager App button to open the Tomcat Web Application Manager. As indicated below, you will be prompted for your login credentials and password:

On this screen you will supply your password and username. Once they have been put in the fields shown, click the Sign In button:
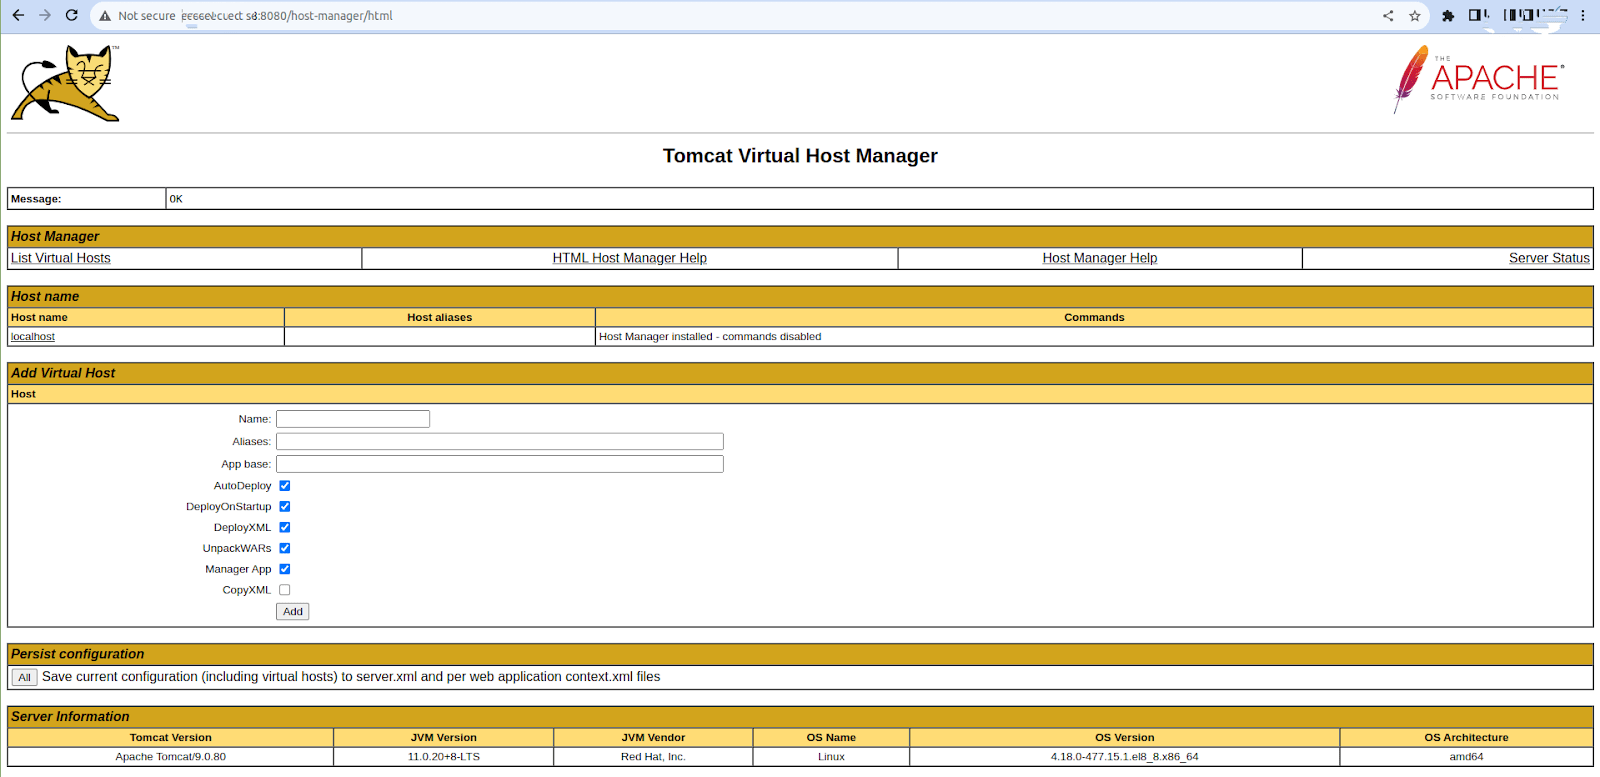
Host Manager App - Tomcat Virtual Host Manager
Click the Host Manager button to open the Tomcat Virtual Host Manager. As indicated below, you will be prompted for your username and password:

Click the Sign In button after entry of the two values requested.
How to Uninstall Apache Tomcat on Linux (AlmaLinux)
To uninstall Apache Tomcat on AlmaLinux, you can follow these steps:
Step #1: Stop Apache Tomcat
First, you need to stop the Tomcat service if it's currently running. Open a terminal and execute the following command to stop the Apache Tomcat service:
sudo systemctl stop tomcatStep #2: Remove the Tomcat Service
You should disable and remove the Tomcat service from the system's startup processes. You can execute the following commands to do the same;
sudo systemctl disable tomcat
sudo rm /etc/systemd/system/tomcat.service
Then, reload systemctl to confirm that the system recognizes the new changes:
sudo systemctl daemon-reload Step #3: Remove Tomcat User and Group
If you want to remove the user and group created for Tomcat during installation, execute the following commands:
sudo userdel -r tomcat
sudo groupdel tomcat
The -r flag with userdel removes the user's home directory.
Step #4: Delete the Tomcat Installation Directory
By default, Apache Tomcat is often installed in the /opt directory. If you installed Tomcat in a different location, replace /opt with your Tomcat installation path. You can remove the Apache Tomcat directory by executing the following command:
sudo rm -r /opt/tomcat/Step #5: Remove Configuration Files
You can delete the Tomcat-related directories to remove the configuration files and logs:
sudo rm -r /etc/tomcat
sudo rm -r /var/log/tomcat
If you installed Tomcat using a package manager dnf, you can remove it with the package manager:
sudo dnf remove tomcat Step #6: Clean Up
You can execute the following command to remove the residual configuration files and packages:
sudo dnf clean allIt is a best practice to know for system admins to know corresponding uninstall steps that go hand-in-hand with knowing how to install Apache Tomcat. Therefore, we hope you found this section useful.
Closing Thoughts
This article demonstrates how to install Apache Tomcat on AlmaLinux. In conclusion, selecting Liquid Web as your hosting provider for installing Apache Tomcat on AlmaLinux is a decision that corresponds with dependability, performance, and peace of mind. We've reviewed the essential procedures and considerations for building a functional Tomcat environment on your AlmaLinux server.
At Liquid Web offer a wide variety of managed hosting plans that are compatible with AlmaLinux and are well-suited for hosting Apache Tomcat. These plans are intended to meet various business requirements, ranging from small-scale projects to large enterprises. We want to assist you elevate your website's visibility and performance. And, we have the hosting platforms, add-ons, and tools to get you there.
Related Articles:

About the Author: Mohammed Noufal
Mohammed Noufal is a B.Tech graduate with a decade of experience in server administration and web hosting. He is a father to two daughters and finds fulfillment in their growth. In his free time, he enjoys blogging, sharing experiences, and listening to music. With a strong technical background, family commitment, and creative outlets, he represents a well-rounded life journey.
Our Sales and Support teams are available 24 hours by phone or e-mail to assist.
Latest Articles
Email security best practices for using SPF, DKIM, and DMARC
Read ArticleLinux dos2unix command syntax — removing hidden Windows characters from files
Read ArticleHow to use kill commands in Linux
Read ArticleChange cPanel password from WebHost Manager (WHM)
Read ArticleChange cPanel password from WebHost Manager (WHM)
Read Article


