


Configuring and Troubleshooting WHMCS Crons
Over the years WHMCS has made some changes to where it stores certain directories, specifically directories outside of public_html. The goal of this is to increase overall security by moving sensitive files to a more protected location. While this change does help to improve WHMCS security, it also adds a few steps of complexity.
This article is meant to help simplify this complexity, or at least provide a reference configuration that you can use to troubleshoot cron issues, or gain a better understanding of WHMCS crons in general. I used WHMCS 7.3 for this article, but the general concept and instructions should apply for any 7.0 version of WHMCS.
General Troubleshooting Steps
Regardless of whether you’re troubleshooting a new install of WHMCS, existing install, or a post migration site, there area few steps you can take to make troubleshooting easier.
- Check configuration files, ensure that cron directories are valid, and match up between config files (cron config.php and whmcs configuration.php)
- Check directory and file permissions. These directories must be owned by the cpanel user, and have at least 750 permissions.
- Check crontab and ensure that the crons are actually created / running.
If WHMCS crons / automated tasks are not running, odds are that one of the 3 items above is the source of the issue.
WHMCS Cron Related Configuration Files
There are two main configuration files which contain cron related settings for WHMCS. Make sure these two files are using the proper directories, ideally ones that match up with each other. If you detect differences in the paths, odds are that’s where the issue is.
The two directories where WHMCS cron configuration files are stored are:
- /home/$user/whmcsdata/crons/config.php
- /home/$user/public_html/configuration.php
Note:
Once you’ve confirmed that both configuration files are correct, you’ll want to make sure that there’s an actual cron configured to run for the user. See the instructions below on modifying the configuration file for your crons in WHMCS.
WHMCS Cron configuration file – config.php
There’s a noteworthy configuration file located under the crons directory called “config.php”. There’s one variable specified here “$whmcspath”, that should point to the directory where WHMCS is installed. If you are migrating an existing WHMCS site, be sure to modify this file to point to the new whmcs install location (if cpanel user / location changed).
You can view the WHMCS cron config file by running this command (replace $user with actual cpanel user)
cat /home/$user/whmcsdata/crons/config.php
There should be one setting in this file, which should point to the WHMCS install directory
$whmcspath = '/home/$user/public_html/';
WHMCS General configuration file – configuration.php
In addition to the cron config file, there’s one more configuration file to cover – the main WHMCS configuration.php. Run the command below to view this file.
Note:
cat /home/$user/public_html/$whmcs_dir/configuration.php
You should see a “$crons_dir” variable in this file.
$crons_dir = '/home/$user/whmcsdata/crons/';
cPanel Cron Setup
Once you’ve confirmed that the cron directory paths are correct, and set in both config files, we will want to make sure there’s a cron set up for that user. If no cron is set up for the user, WHMCS will notify you that the cron status is not ok.
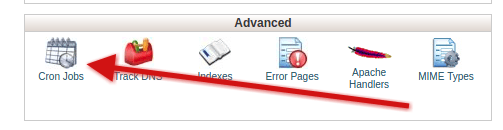
- To set up a cron, log into cPanel.
- Scroll to the cron jobs section. This can be found under the “advanced” section inside of cPanel.
- Click on the icon to enter the Cron Jobs control panel.

Adding a new cron
Before you add a new cron, look at the existing entries, if there’s already some for WHMCS, verify that the command is using the proper path to cron.php.
If you do not see any crons in place, you will want to create a new one that looks like the screenshot below. Replace “$user” with the actual cpanel user.
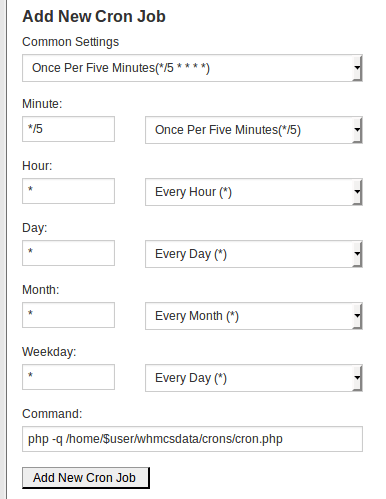
Once you click “add new cron job” you should be all set. If you set the cron to run every 5 minutes, take a quick break, then log into the WHMCS admin area to check on the status.
Verifying WHMCS Automation Status
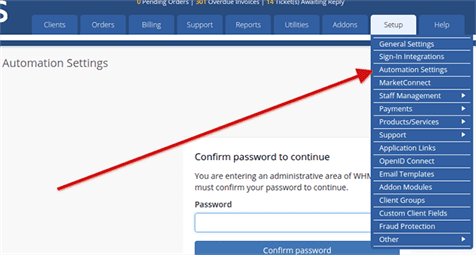
- To check the last time WHMCS ran a cron, log into the WHMCS admin area, hover your mouse over the Setup tab. A drop-down menu will appear, select Automation Settings.
- At the very top of the automation settings page you will see a red or green box with a Cron status. If the box is green it means you’re all set!
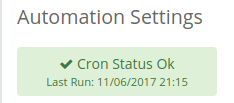
- If the box is red, then I suggest reviewing this article and checking the 3 main areas outlined at the start of this article.
Softaculous One Click Installer
WHMCS Data Directory
When you install WHMCS via Softaculous there will be a Data Directory section near the top of the page.
The WHMCS data directory stores the following:
- Attachments
- Downloads
- Templates_c
- Crons
By default the field is populated with “whmcsdata”, which will be created in the user’s home directory (/home/$user/whmcsdata/).
Feel free to modify the name if you want, just make sure you create this directory under the user’s home directory!

Related Articles:


About the Author: Helpful Humans of Liquid Web


Our Sales and Support teams are available 24 hours by phone or e-mail to assist.
Latest Articles
In-place CentOS 7 upgrades
Read ArticleHow to use kill commands in Linux
Read ArticleChange cPanel password from WebHost Manager (WHM)
Read ArticleChange cPanel password from WebHost Manager (WHM)
Read ArticleChange the root password in WebHost Manager (WHM)
Read Article