


How to Install OQGRAPH for MariaDB 10.0 on Fedora 20
MariaDB is a drop-in replacement for MySQL. It is easy to install, offers many speed and performance improvements, and is easy to integrate into most MySQL deployments. Answers for compatibility questions can be found at MariaDB versus MySQL – Compatibility. MariaDB offers more storage engines than MySQL, including Cassandra (NoSQL), XtraDB (drop-in replacement for InnoDB), and OQGRAPH.
- These instructions are intended for installing the Open Query Graph engine (OQGRAPH) for MariaDB 10.0 on Fedora 20.
- I’ll be working from a Liquid Web Self Managed Fedora 20 server, and I’ll be logged in as root.
- Your server should already have MariaDB 10.0 installed. If you’re working from MariaDB 5.5 visit our tutorial on How to Upgrade MariaDB 5.5 to MariaDB 10.0 on Fedora 20
First, you’ll follow a simple best practice: ensuring the list of available packages is up to date before installing anything new:
yum -y update
Now find which repo you should use with the MariaDB repository generator. We’re going to add the CentOS 6 (64 bit) MariaDB 10.0 repository.
For a refresher on editing files with vim see: New User Tutorial: Overview of the Vim Text Editor
vim /etc/yum.repos.d/MariaDB10.repo
# MariaDB 10.0 CentOS repository list – created 2014-10-10 17:33 UTC
# http://mariadb.org/mariadb/repositories/
[mariadb]
name = MariaDB
baseurl = http://yum.mariadb.org/10.0/fedora20-amd64/
gpgkey=https://yum.mariadb.org/RPM-GPG-KEY-MariaDB
gpgcheck=1
Then exit and save the file with the command :wq .
yum clean all
At this point, installing the Open Query Graph engine (OQGRAPH) is as simple as running just one command:
yum -y install MariaDB-oqgraph-engine
Login to the MySQL server from the command line with the following command:
mysql -u root -p
In this case, I’ve specified the user root with the -u flag and then used the -p flag so MySQL prompts for a password. Enter your current password to complete the login.
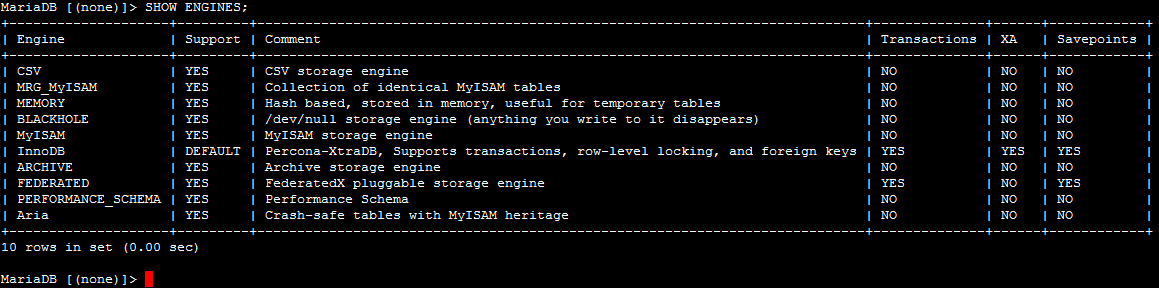
From the MySQL command line issue the following command:
SHOW ENGINES;
You should receive a result similar to:
Now, finish installing the storage engine:
INSTALL SONAME 'ha_oqgraph';
Which should return:
Query OK, 0 rows affected (0.00 sec)
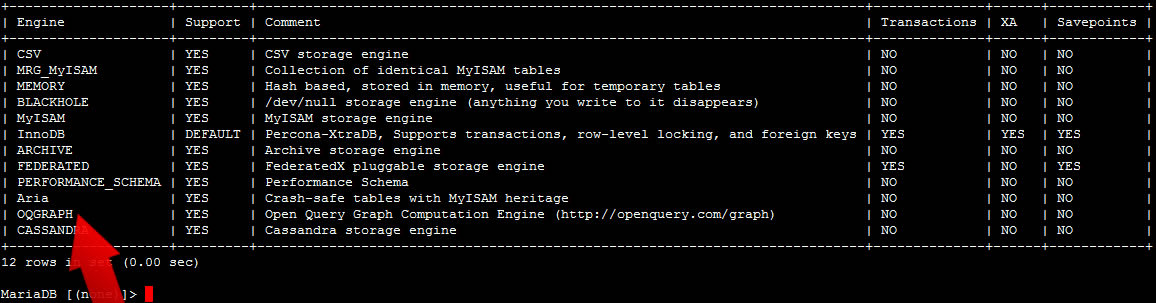
Now let’s verify that the storage engine is installed. Run the following command and look for OQGRAPH in the Engine column:
SHOW ENGINES;
You should receive a result similar to:
Related Articles:


About the Author: J. Mays
As a previous contributor, JMays shares his insight with our Knowledge Base center. In our Knowledge Base, you'll be able to find how-to articles on Ubuntu, CentOS, Fedora and much more!


Our Sales and Support teams are available 24 hours by phone or e-mail to assist.
Latest Articles
In-place CentOS 7 upgrades
Read ArticleHow to use kill commands in Linux
Read ArticleChange cPanel password from WebHost Manager (WHM)
Read ArticleChange cPanel password from WebHost Manager (WHM)
Read ArticleChange the root password in WebHost Manager (WHM)
Read Article