
 Nickolas Newell
 In our previous article on Selenium, we touched on the tools that the software provides for testing web applications. In this article, we will review the installation of these tools and some basic tests that can be run using the following tools.
- Selenium IDE
- Selenium Grid
- Selenium WebDriver
We will go through each of the Selenium tools in the order that is listed below. So let’s begin by installing Selenium IDE. After this, we will cover the basic usage of each of the tools.
Requirements
Server Specifications:
- CPU Cores: 2
- RAM: 2 GB
- OS: Ubuntu 18.04 fresh install with GUI
Selenium IDE
Requirements: Since Selenium IDE is a Chrome/Firefox browser extension, it does not have any special dependencies besides what the browser itself needs. It can be used on any OS that supports installation of those browsers.
Firefox Installation
Step 1. First, we click on the link here to install the Selenium browser plugin. Once installed, your browser should look like this.

Step 2. After that, click the Add to Firefox button and the screen below will be seen.

Step 3. Click add. If all went well, the extension should be installed and ready to use.
Step 4. Upon the first boot of the extension, we are prompted with the following screen.

We will continue this process noted above in the following section.
Chrome CLI Installation
Chrome Installation on Ubuntu 18.04 can be accomplished using the following commands via the command line.
Step 1: Get the package for the latest stable version:
root@linux:~$ wget https://dl.google.com/linux/direct/google-chrome-stable_current_amd64.deb

--2019-12-28 21:07:45--  https://dl.google.com/linux/direct/google-chrome-stable_current_amd64.deb
Resolving dl.google.com (dl.google.com)... 216.58.211.14, 2a00:1450:400f:80d::200e
Connecting to dl.google.com (dl.google.com)|216.58.211.14|:443... connected.
HTTP request sent, awaiting response... 200 OK
Length: 62181264 (59M) [application/x-debian-package]
Saving to: 'google-chrome-stable_current_amd64.deb'

google-chrome-stable_current_amd64.deb             100%[=============================================>]  59.30M  2.86MB/s    in 21s

2019-12-28 21:08:07 (2.78 MB/s) - 'google-chrome-stable_current_amd64.deb' saved [62181264/62181264]
Step 2: Install it with the following command:
root@linux:~$ sudo dpkg -i google-chrome-stable_current_amd64.deb
Selecting previously unselected package google-chrome-stable.
(Reading database ... 129294 files and directories currently installed.)
Preparing to unpack google-chrome-stable_current_amd64.deb ...
Unpacking google-chrome-stable (79.0.3945.88-1) ...
Setting up google-chrome-stable (79.0.3945.88-1) ...
update-alternatives: using /usr/bin/google-chrome-stable to provide /usr/bin/x-www-browser (x-www-browser) in auto mode
update-alternatives: using /usr/bin/google-chrome-stable to provide /usr/bin/gnome-www-browser (gnome-www-browser) in auto mode
update-alternatives: using /usr/bin/google-chrome-stable to provide /usr/bin/google-chrome (google-chrome) in auto mode
Processing triggers for gnome-menus (3.13.3-11ubuntu1.1) ...
Processing triggers for desktop-file-utils (0.23-1ubuntu3.18.04.2) ...
Processing triggers for mime-support (3.60ubuntu1) ...
Processing triggers for man-db (2.8.3-2ubuntu0.1) ...
If everything went well you should see Chrome in Show Applications.

Install Selenium IDE on Chrome
The installation of the extension in Chrome is the same as in Firefox. The Selenium extension for Chrome can be found there (and here is the Selenium Firefox extension).
Step 1: Click on the Add to Chrome button.

Step 2. Click Add extension.
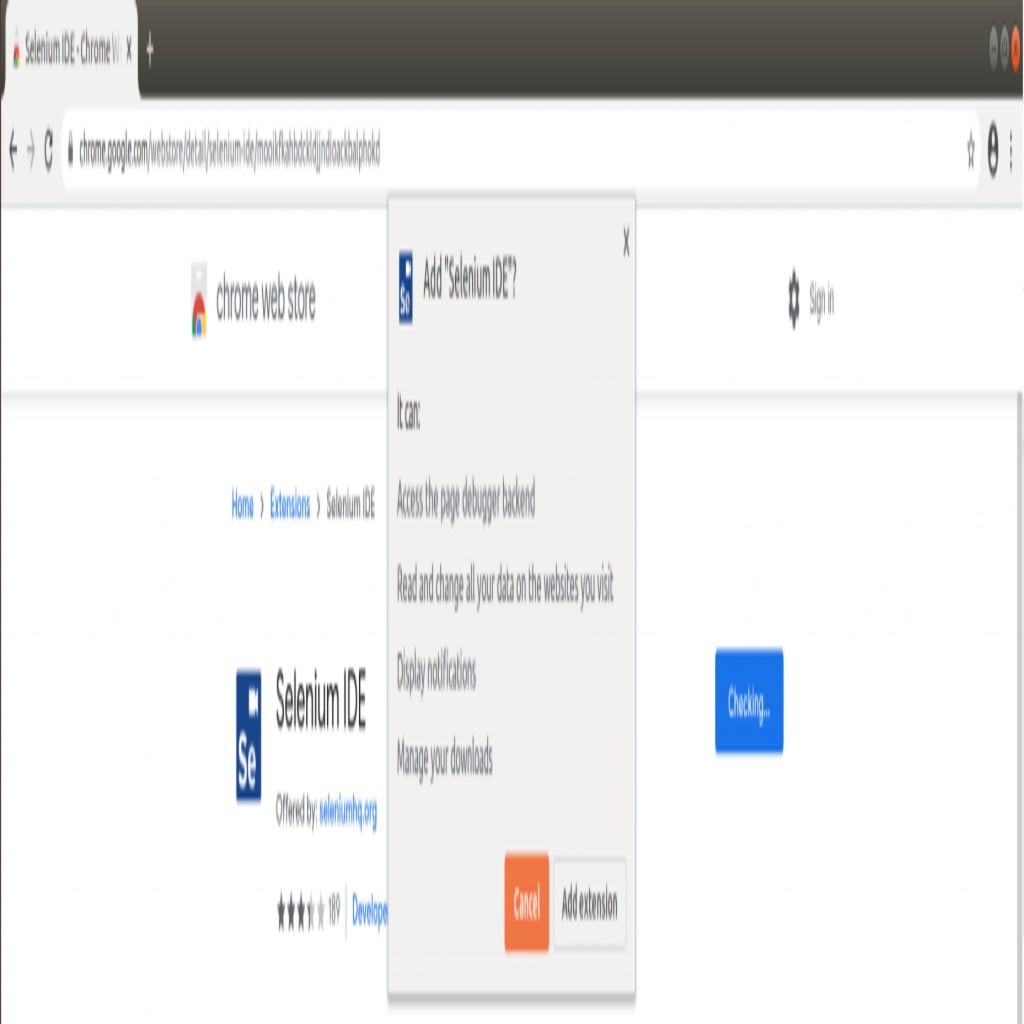
That should be it! If all went well and no errors were shown, the extension should now be available in Chrome.
Selenium IDE usage
We will be using the extension on Firefox to demonstrate further tasks.
Step 1. First, we need to create a project. We will click on the “Create a new project” to begin.
Step 2. Once we create a new project, we will need to give it a name. We will be using SeleniumLW as our project name.

Step 3. After we assign our project a name, click OK, and the Project page will be shown.

On the upper right-hand corner, there should be a REC button. When we press Record, the following screen will popup. (We will be running tests on https://liquidweb.com as a test).
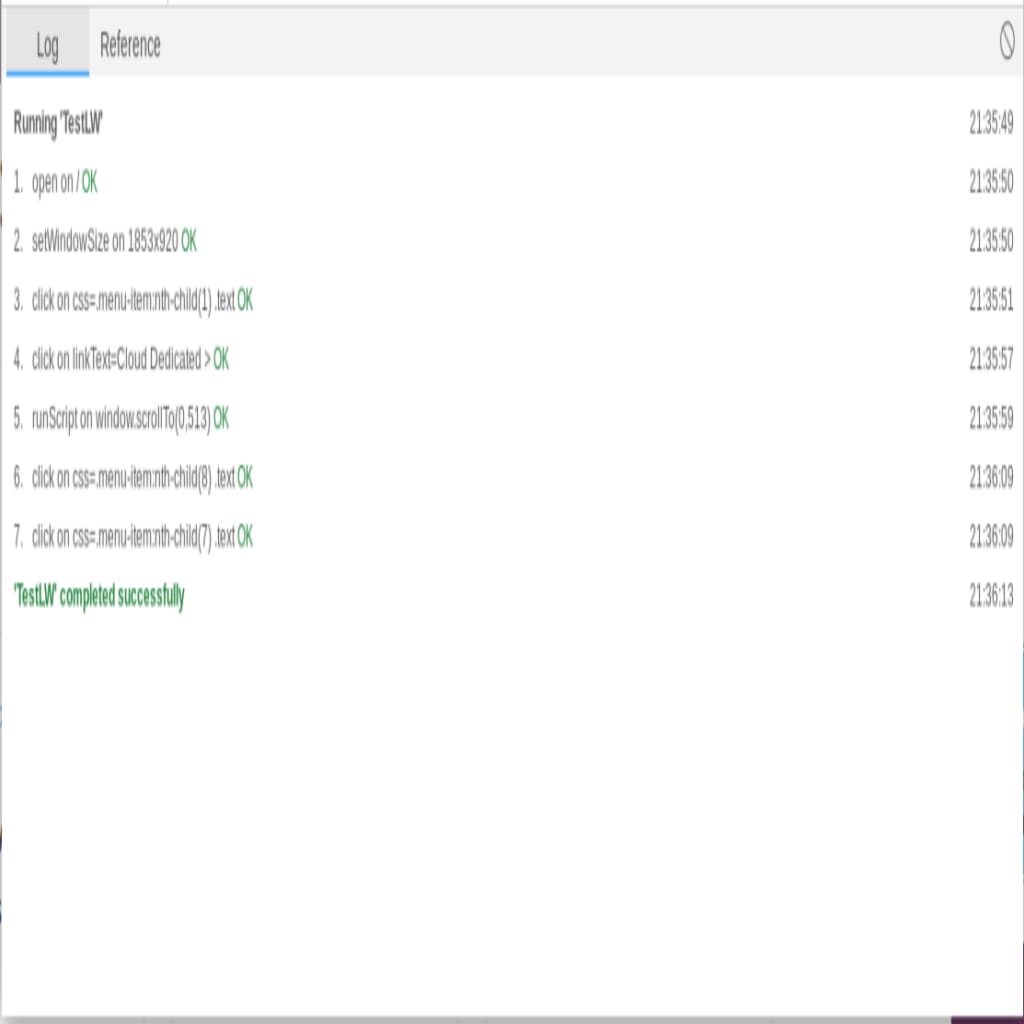
Step 5. Once we press Start recording, it will open the link in a new window, and any action taken on the site will be recorded and listed like so on the following screen.

Step 6. Below that screen is the location in which we can see various information being pulled from the command that was run during the test. After we stop recording, we can run the test which will replicate all of the tasks on the site which we did earlier. It will then log if there were any issues seen within the Log section of the extension.
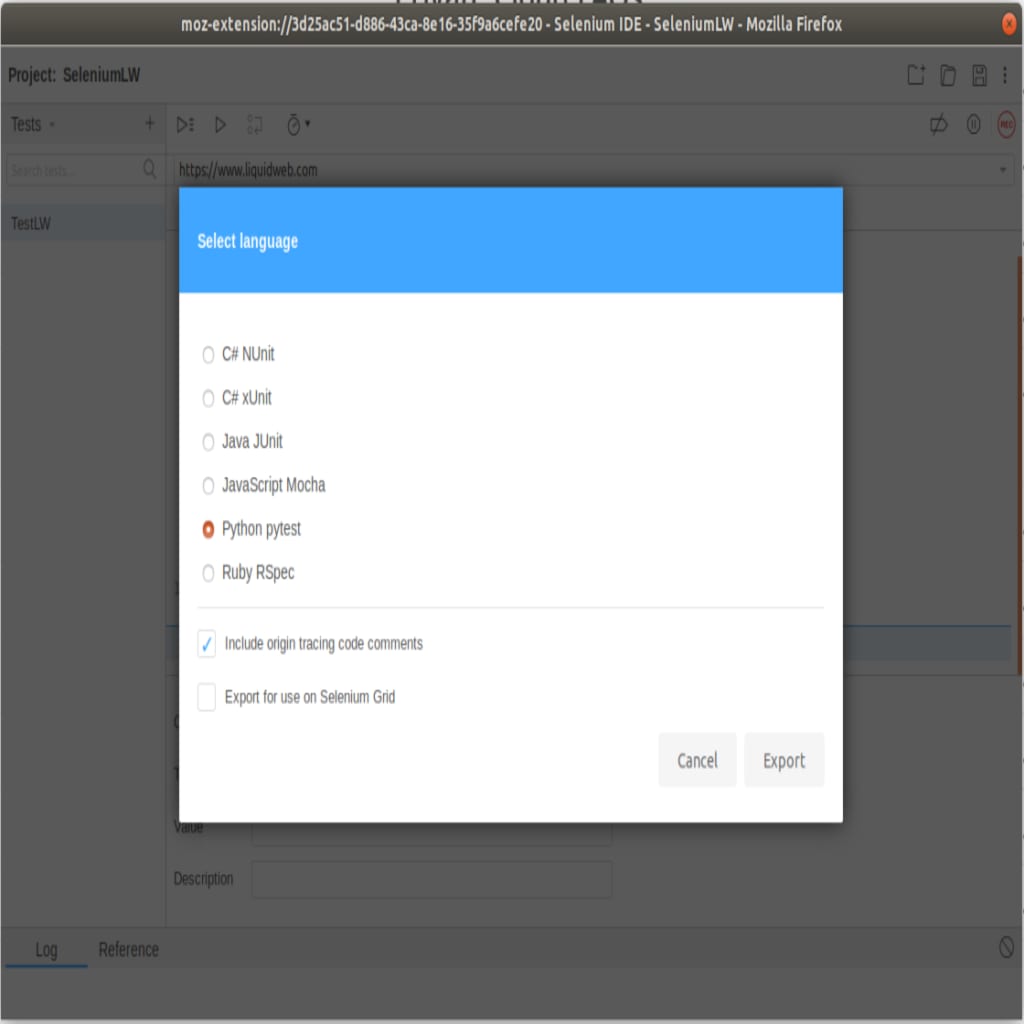
Step 7. The next tab is called Reference. On this page, we can see a description of each command that was recorded during the test. Selenium IDE is not only used for visual tests but also used to create prototypes of the test. This is because it has the ability to export those tests to the WebDriver app. Once the tests are saved, we can export the tests by right clicking and selecting the Export option. The export can be accomplished on a per-command or per-project basis. This will lead us to some of the other options that we can use during the Export option.
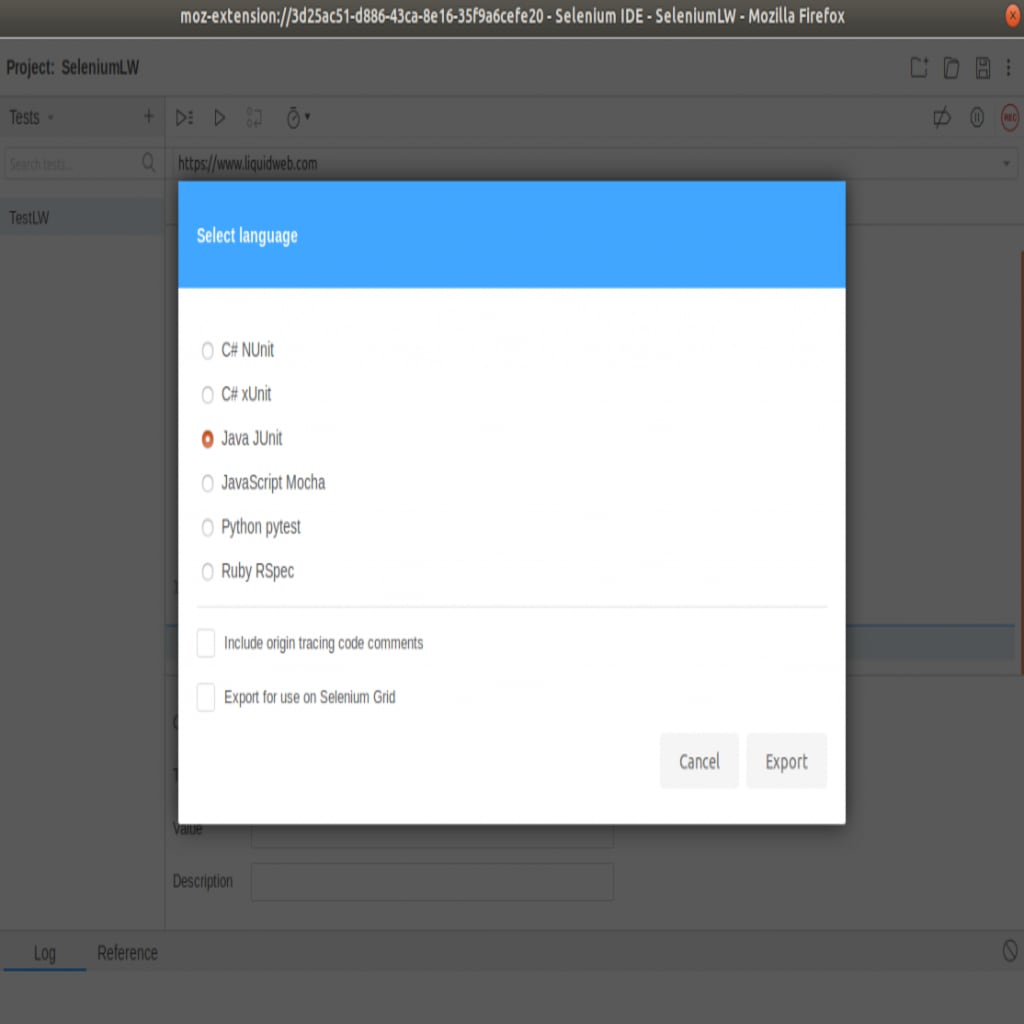
Step 8. Next, we will export the output to Python (or any language which is more familiar to you). Once the output is saved, the Python test output in WebDriver would look something like this:
# Generated by Selenium IDE
import pytest
import time
import json
from selenium import webdriver
from selenium.webdriver.common.by import By
from selenium.webdriver.common.action_chains import ActionChains
from selenium.webdriver.support import expected_conditions
from selenium.webdriver.support.wait import WebDriverWait
from selenium.webdriver.common.keys import Keys
from selenium.webdriver.common.desired_capabilities import DesiredCapabilities

class TestTestLW():
  def setup_method(self, method):
    self.driver = webdriver.Firefox()
    self.vars = {}

  def teardown_method(self, method):
    self.driver.quit()

  def test_testLW(self):
    # Test name: TestLW
    # Step # | name | target | value | comment
    # 1 | open | / |  |
    self.driver.get("https://www.liquidweb.com/")
    # 2 | setWindowSize | 1853x920 |  |
    self.driver.set_window_size(1853, 920)
    # 3 | click | css=.menu-item-has-children:nth-child(1) > a |  |
    self.driver.find_element(By.CSS_SELECTOR, ".menu-item-has-children:nth-child(1) > a").click()
    # 4 | click | css=.sub-nav-wrap:nth-child(1) .menu-item:nth-child(5) span |  |
    self.driver.find_element(By.CSS_SELECTOR, ".sub-nav-wrap:nth-child(1) .menu-item:nth-child(5) span").click()
    # 5 | runScript | window.scrollTo(0,191) |  |
    self.driver.execute_script("window.scrollTo(0,191)")
    # 6 | runScript | window.scrollTo(0,399) |  |
    self.driver.execute_script("window.scrollTo(0,399)")
    # 7 | runScript | window.scrollTo(0,741) |  |
    self.driver.execute_script("window.scrollTo(0,741)")
    # 8 | runScript | window.scrollTo(0,1311) |  |
    self.driver.execute_script("window.scrollTo(0,1311)")
    # 9 | runScript | window.scrollTo(0,1968) |  |
    self.driver.execute_script("window.scrollTo(0,1968)")
    # 10 | click | css=#fl-accordion-5c2d26f14835f-tab-4\9 > .fl-accordion-button-label |  |
    self.driver.find_element(By.CSS_SELECTOR, "#fl-accordion-5c2d26f14835f-tab-4\\9 > .fl-accordion-button-label").click()
As mentioned in our previous article, the Selenium IDE is superb in various situations, but it does lack some options and configurations which is why it’s used primarily for prototyping.
Installing Selenium Grid
Selenium Grid enables us to run tests on multiple browsers and environments at the same time. This reduces the time needed for testing dramatically.
Install the dependencies
Step 1. First, we will install software-properties-common to ease the addition of further repositories.
root@linux:~$ sudo apt-get install software-properties-common
Reading package lists... Done
Building dependency tree
Reading state information... Done
software-properties-common is already the newest version (0.96.24.32.11).
0 upgraded, 0 newly installed, 0 to remove and 0 not upgraded.
Step 2. Next, let’s update our repositories using the command:
root@linux:~$ sudo apt-get update
Hit:1 http://ppa.launchpad.net/webupd8team/java/ubuntu bionic InRelease
Hit:2 http://archive.ubuntu.com/ubuntu bionic InRelease
Hit:3 http://archive.ubuntu.com/ubuntu bionic-updates InRelease
Hit:4 http://archive.ubuntu.com/ubuntu bionic-backports InRelease
Hit:5 http://security.ubuntu.com/ubuntu bionic-security InRelease
Ign:6 http://dl.google.com/linux/chrome/deb stable InRelease
Hit:7 http://dl.google.com/linux/chrome/deb stable Release
Reading package lists... Done
Step 3. Next, we will install Java JDK 8 using the following command:
sudo apt install default-jre
root@linux:~$ sudo apt install default-jre
Reading package lists... Done
Building dependency tree
Reading state information... Done
The following additional packages will be installed:
  ca-certificates-java default-jre-headless fonts-dejavu-extra java-common libatk-wrapper-java libatk-wrapper-java-jni libgif7 openjdk-11-jre openjdk-11-jre-headless
Suggested packages:
  fonts-ipafont-gothic fonts-ipafont-mincho fonts-wqy-microhei | fonts-wqy-zenhei
The following NEW packages will be installed:
  ca-certificates-java default-jre default-jre-headless fonts-dejavu-extra java-common libatk-wrapper-java libatk-wrapper-java-jni libgif7 openjdk-11-jre openjdk-11-jre-headless
0 upgraded, 10 newly installed, 0 to remove and 223 not upgraded.
Need to get 39.6 MB of archives.
After this operation, 179 MB of additional disk space will be used.
Do you want to continue? [Y/n] y
…
…
…
…
Setting up default-jre (2:1.11-68ubuntu1~18.04.1) ...
Processing triggers for libc-bin (2.27-3ubuntu1) ...
Processing triggers for man-db (2.8.3-2ubuntu0.1) ...
Processing triggers for gnome-menus (3.13.3-11ubuntu1.1) ...
Processing triggers for ca-certificates (20180409) ...
Updating certificates in /etc/ssl/certs...
0 added, 0 removed; done.
Running hooks in /etc/ca-certificates/update.d...

done.
done.
Processing triggers for hicolor-icon-theme (0.17-2) ...
Processing triggers for fontconfig (2.12.6-0ubuntu2) ...
Processing triggers for mime-support (3.60ubuntu1) ...
Processing triggers for desktop-file-utils (0.23-1ubuntu3.18.04.2) …
root@linux:~$
Step 4. If all went well, and no errors occurred, we can check the Java version with the following command.
root@linux:~$ java -version
openjdk version "11.0.5" 2019-10-15
OpenJDK Runtime Environment (build 11.0.5+10-post-Ubuntu-0ubuntu1.118.04)
OpenJDK 64-Bit Server VM (build 11.0.5+10-post-Ubuntu-0ubuntu1.118.04, mixed mode, sharing)
Install Selenium Grid
Step 5. Next, we will download the Selenium release jar file.
root@linux:~$ wget http://selenium-release.storage.googleapis.com/3.10/selenium-server-standalone-3.10.0.jar
--2019-12-28 22:51:56--  http://selenium-release.storage.googleapis.com/3.10/selenium-server-standalone-3.10.0.jar
Resolving selenium-release.storage.googleapis.com (selenium-release.storage.googleapis.com)... 172.217.22.176, 2a00:1450:400f:80b::2010
Connecting to selenium-release.storage.googleapis.com (selenium-release.storage.googleapis.com)|172.217.22.176|:80... connected.
HTTP request sent, awaiting response... 200 OK
Length: 23427664 (22M) [application/java-archive]
Saving to: 'selenium-server-standalone-3.10.0.jar'

selenium-server-standalone-3.10.0.jar              100%[===========================================>]  22.34M  3.94MB/s    in 5.5s

2019-12-28 22:52:02 (4.03 MB/s) - 'selenium-server-standalone-3.10.0.jar' saved [23427664/23427664]
Start Selenium Grid
Step 6. Now we can start Selenium using the java command.
root@linux:~$ java -jar selenium-server-standalone-3.10.0.jar -role hub
22:54:44.323 INFO [GridLauncherV3.launch] - Selenium build info: version: '3.10.0', revision: '176b4a9'
22:54:44.377 INFO [GridLauncherV3$2.launch] - Launching Selenium Grid hub on port 4444
2019-12-28 22:54:45.881:INFO::main: Logging initialized @2350ms to org.seleniumhq.jetty9.util.log.StdErrLog
22:54:46.200 INFO [Hub.start] - Selenium Grid hub is up and running
22:54:46.204 INFO [Hub.start] - Nodes should register to http://10.0.2.15:4444/grid/register/
22:54:46.205 INFO [Hub.start] - Clients should connect to http://10.0.2.15:4444/wd/hub
Step 7. Now that we have started the hub, we can configure the nodes in each of their respective machines. To accomplish this, we will create a file called config.json with the following settings.
{
  "capabilities":
  [
    {
      "browserName": "firefox",
      "marionette": true,
      "maxInstances": 5,
      "seleniumProtocol": "WebDriver",
      "version": "58.0.2"
    }
  ],
  "proxy": "org.openqa.grid.selenium.proxy.DefaultRemoteProxy",
  "maxSession": 5,
  "port": 5555,
  "register": true,
  "registerCycle": 5000,
  "hub": "http://10.0.2.15:4444",
  "nodeStatusCheckTimeout": 5000,
  "nodePolling": 5000,
  "role": "node",
  "unregisterIfStillDownAfter": 60000,
  "downPollingLimit": 2,
  "debug": false,
  "servlets" : [],
  "withoutServlets": [],
  "custom": {}
}
Step 8. Now we can start the nodes by typing the following command:
root@linux:~$ java -jar selenium-server-standalone-3.10.0.jar -role node -nodeConfig config.json
23:05:21.922 INFO [GridLauncherV3.launch] - Selenium build info: version: '3.10.0', revision: '176b4a9'
23:05:21.935 INFO [GridLauncherV3$3.launch] - Launching a Selenium Grid node on port 5555
2019-12-28 23:05:22.387:INFO::main: Logging initialized @1264ms to org.seleniumhq.jetty9.util.log.StdErrLog
23:05:22.728 INFO [SeleniumServer.boot] - Selenium Server is up and running on port 5555
23:05:22.729 INFO [GridLauncherV3$3.launch] - Selenium Grid node is up and ready to register to the hub
23:05:22.747 INFO [SelfRegisteringRemote$1.run] - Starting auto registration thread. Will try to register every 5000 ms.
23:05:22.767 INFO [SelfRegisteringRemote.registerToHub] - Registering the node to the hub: http://10.0.2.15:4444/grid/register
23:05:23.853 INFO [SelfRegisteringRemote.registerToHub] - Updating the node configuration from the hub
23:05:24.012 INFO [SelfRegisteringRemote.registerToHub] - The node is registered to the hub and ready to use
Since we have configured both the hub and the nodes, we should be able to see them via the following link: http://10.0.2.15:4444/grid/console

For further reading, you can review many of the other Selenium Grid options that can be configured.
Installing the Selenium WebDriver (ChromeDriver)
Step 1. Since we already have installed the selenium-server-standalone framework, there is no need to repeat those steps again. We simply need to install a new driver for Chrome. First, we need to install a few dependencies.
root@linux:~$ sudo apt-get install -y unzip xvfb libxi6 libgconf-2-4
Reading package lists... Done
Building dependency tree
Reading state information... Done
libxi6 is already the newest version (2:1.7.9-1).
unzip is already the newest version (6.0-21ubuntu1).
The following additional packages will be installed:
  gconf-service gconf-service-backend gconf2-common
The following NEW packages will be installed:
  gconf-service gconf-service-backend gconf2-common libgconf-2-4 xvfb
0 upgraded, 5 newly installed, 0 to remove and 223 not upgraded.
Need to get 1,628 kB of archives.
After this operation, 10.3 MB of additional disk space will be used.
Get:1 http://archive.ubuntu.com/ubuntu bionic/universe amd64 gconf2-common all 3.2.6-4ubuntu1 [700 kB]
Get:2 http://archive.ubuntu.com/ubuntu bionic/universe amd64 libgconf-2-4 amd64 3.2.6-4ubuntu1 [84.8 kB]
Get:3 http://archive.ubuntu.com/ubuntu bionic/universe amd64 gconf-service-backend amd64 3.2.6-4ubuntu1 [58.1 kB]
Get:4 http://archive.ubuntu.com/ubuntu bionic/universe amd64 gconf-service amd64 3.2.6-4ubuntu1 [2,036 B]
Get:5 http://archive.ubuntu.com/ubuntu bionic-updates/universe amd64 xvfb amd64 2:1.19.6-1ubuntu4.3 [783 kB]
Fetched 1,628 kB in 2s (981 kB/s)
Selecting previously unselected package gconf2-common.
(Reading database ... 129820 files and directories currently installed.)
Preparing to unpack .../gconf2-common_3.2.6-4ubuntu1_all.deb ...
Unpacking gconf2-common (3.2.6-4ubuntu1) ...
Selecting previously unselected package libgconf-2-4:amd64.
Preparing to unpack .../libgconf-2-4_3.2.6-4ubuntu1_amd64.deb ...
Unpacking libgconf-2-4:amd64 (3.2.6-4ubuntu1) ...
Selecting previously unselected package gconf-service-backend.
Preparing to unpack .../gconf-service-backend_3.2.6-4ubuntu1_amd64.deb ...
Unpacking gconf-service-backend (3.2.6-4ubuntu1) ...
Selecting previously unselected package gconf-service.
Preparing to unpack .../gconf-service_3.2.6-4ubuntu1_amd64.deb ...
Unpacking gconf-service (3.2.6-4ubuntu1) ...
Selecting previously unselected package xvfb.
Preparing to unpack .../xvfb_2%3a1.19.6-1ubuntu4.3_amd64.deb ...
Unpacking xvfb (2:1.19.6-1ubuntu4.3) ...
Setting up gconf2-common (3.2.6-4ubuntu1) ...

Creating config file /etc/gconf/2/path with new version
Setting up xvfb (2:1.19.6-1ubuntu4.3) ...
Setting up libgconf-2-4:amd64 (3.2.6-4ubuntu1) ...
Setting up gconf-service-backend (3.2.6-4ubuntu1) ...
Setting up gconf-service (3.2.6-4ubuntu1) ...
Processing triggers for libc-bin (2.27-3ubuntu1) ...
Processing triggers for man-db (2.8.3-2ubuntu0.1) ...
Step 2. Download the ChromeDriver
root@linux:~$ wget https://chromedriver.storage.googleapis.com/2.41/chromedriver_linux64.zip
--2019-12-28 23:24:32--  https://chromedriver.storage.googleapis.com/2.41/chromedriver_linux64.zip
Resolving chromedriver.storage.googleapis.com (chromedriver.storage.googleapis.com)... 216.58.211.144, 2a00:1450:400f:80c::2010
Connecting to chromedriver.storage.googleapis.com (chromedriver.storage.googleapis.com)|216.58.211.144|:443... connected.
HTTP request sent, awaiting response... 200 OK
Length: 3944714 (3.8M) [application/zip]
Saving to: 'chromedriver_linux64.zip'

chromedriver_linux64.zip                           100%[===========================================>]   3.76M  3.69MB/s    in 1.0s

2019-12-28 23:24:34 (3.69 MB/s) - 'chromedriver_linux64.zip' saved [3944714/3944714]
Step 3. Next, we unzip the downloaded ChromeDriver file.
root@linux:~$ unzip chromedriver_linux64.zip
Archive:  chromedriver_linux64.zip
  inflating: chromedriver
Step 4. We will run the following commands in succession to ready the ChromeDriver for use. Let’s move the unzipped chromedriver file to the /usr/bin/ folder. Then, we ensure the root user owns it. Following that, we use the chmod command to add the execute permissions flag and lastly, we verify the version.
root@linux:~$ sudo mv chromedriver /usr/bin/chromedriver
root@linux:~$ sudo chown root:root /usr/bin/chromedriver
root@linux:~$ sudo chmod +x /usr/bin/chromedriver
root@linux:~$ chromedriver --version
ChromeDriver 2.41.578700 (2f1ed5f9343c13f73144538f15c00b370eda6706)
Step 5. Next, we run ChromeDriver via the Selenium server using this command.
root@linux:~$ xvfb-run java -Dwebdriver.chrome.driver=/usr/bin/chromedriver -jar selenium-server-standalone-3.10.0.jar
23:32:09.057 INFO [GridLauncherV3.launch] - Selenium build info: version: '3.10.0', revision: '176b4a9'
23:32:09.062 INFO [GridLauncherV3$1.launch] - Launching a standalone Selenium Server on port 4444
2019-12-28 23:32:10.051:INFO::main: Logging initialized @1951ms to org.seleniumhq.jetty9.util.log.StdErrLog
23:32:10.687 INFO [SeleniumServer.boot] - Selenium Server is up and running on port 4444
Basically, WebDriver is just the reference for the web browser, so we have shown how to install the Selenium with ChromeDriver and also with FirefoxDrive in our initial setup of the grid.
Selenium RC
Selenium Remote Control (RC) has been deprecated in favor of Selenium WebDriver. In most cases, testers primarily utilize Selenium Grid and WebDriver now for faster results. As such, we will not be covering this part of Selenium in this tutorial.
In Conclusion
Selenium is a robust set of testing tools combined within a single suite. Testers who have used it are largely more productive than running tests manually across a wide swath of environments. Additionally, Selenium is extremely helpful if testing a large number of web applications on different browsers within multiple systems.
Like what you see?
Open a chat or ticket with us to speak with one of our Knowledgeable Hosting Solutions advisors to learn how you can take advantage of this technology today!