

Have you ever been trapped in a compatibility nightmare, where an application runs smoothly on one machine but crashes on another? This common issue has plagued the IT world for decades, leading to endless hours of troubleshooting and fine-tuning.
Fortunately, there is a solution to this problem now. You can deploy software that simply works across different environments without the headache by using containerization – a groundbreaking approach that redefines the future of IT deployments.
This guide is your compass to navigating the world of containerization. It’ll delve deep into what it is, the mechanics of how it works, dissect its advantages, confront its challenges, and introduce you to the titans of container technology (Docker and Kubernetes).
Key points
- Containerization is a process that packages an application with its dependencies into a container that can run on any operating system. It overcomes the need for different versions of software for different operating systems, making applications more flexible.
- Containerization isolates user-level applications in containers, whereas virtualization creates complete virtual machines with both an OS and applications. Containers are more lightweight and efficient compared to virtual machines.
- Popular containerization technologies are:
- Kubernetes: Open source container orchestration tool for managing containerized applications.
- Linux: The preferred operating system for running containers due to its built-in support and flexibility.
- Docker: A platform for building, deploying, and managing containerized applications, known for its Docker Images and Docker Hub registry service.
What is containerization?
Typically, running an application on any computer system requires that the version of the app is specifically built for the host Operating System (OS). For instance, a software package designed for Windows needs a different version to run on MacOS or Linux.
However, this is not the case with containerization.
Containerization is like a box. It’s a way to bundle up your application needs – such as the code, runtime, system tools, libraries, and settings – into a lightweight package or container, making it easy to move around and run on different computers or servers. It ensures that your application will work the same way wherever it goes.
This groundbreaking approach simplifies software deployment and ensures consistency and efficiency. Developers can build and test containers locally, knowing that the application will behave the same way when deployed to any other environment, be it a different developer’s workstation, a test environment, or a production server.
How is containerization different from virtualization?
Both virtualization and containerization are technologies that have revolutionized software deployment and management, but they operate under different principles and serve unique purposes.
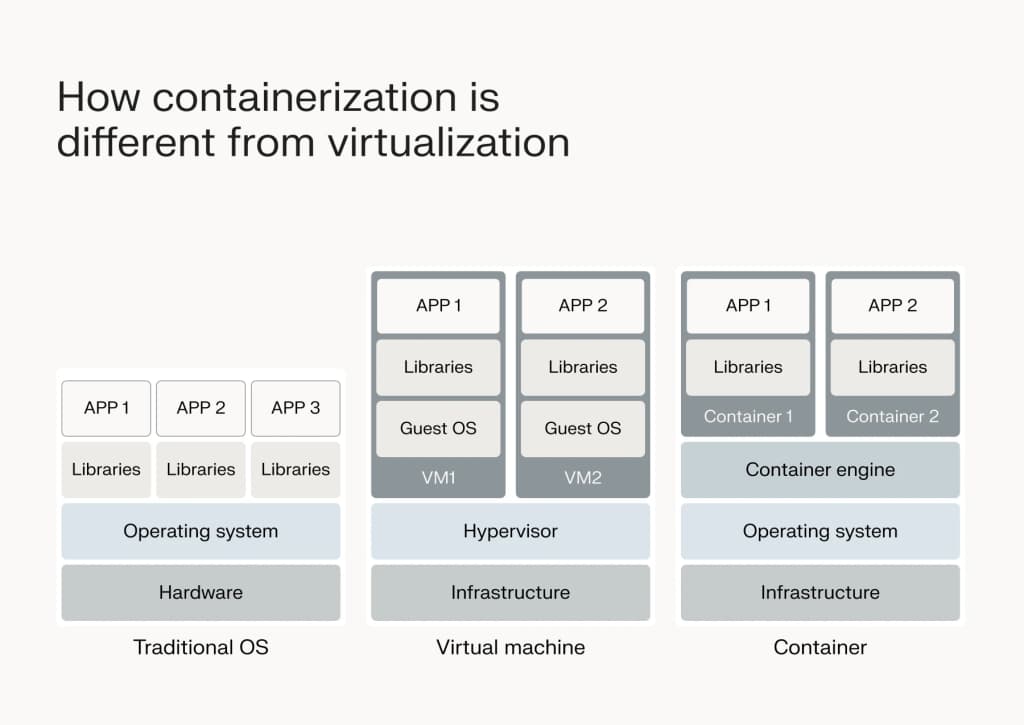
“Virtualization lets you create multiple virtual versions of your computer on one physical machine. Each of these virtual computers or Virtual Machines (VMs) acts like a real one, with its own operating system, apps, and settings, but they all share the same physical hardware. This helps you use your computer’s resources more efficiently and run different types of software or operating systems on the same machine.”
– Ken Wallace, VMware Product Manager at Liquid Web
Now, how does containerization differ from virtualization? The key difference lies in what each technology abstracts and encapsulates. While virtualization creates a complete virtual machine – including an OS and user-level applications – containerization focuses solely on the latter.
Containers encapsulate only the application and its dependencies, not an entire OS. This makes them significantly lighter and more efficient than VMs. Instead of simulating hardware, containerization allows applications to run in isolated environments on the same OS kernel.
Here’s a closer look at the differences.
| Virtualization | Containerization |
| Allows you to run multiple virtual machines (VMs) on a single physical server. Each VM operates as if it were a separate physical computer with its own CPU, memory, storage, and operating system. | A lightweight form of virtualization that allows you to package applications and their dependencies into self-contained units (containers). These containers share the same underlying operating system kernel, but they are isolated from each other, ensuring that one container’s dependencies or configuration cannot affect another container. |
| Hypervisors, such as VMware vSphere, Microsoft Hyper-V, or KVM, manage the virtualization process. They create and manage the VMs, allocating resources to each as needed. | Docker is one of the most popular containerization platforms, but there are others like Podman, containerd, and LXC. You can also use Kubernetes, which is a container orchestration platform used to automate the deployment, scaling, and management of containerized applications. |
| Typically used to maximize hardware utilization, improve server efficiency, and enable easier migration and scalability of applications. | Highly portable and can run consistently across different environments, from development to production. |
| Since each VM has its own complete OS, it offers strong isolation between different applications or environments running on the same physical server. | Offers faster startup times and better resource utilization compared to traditional virtualization because containers do not require a full OS; they only include the necessary libraries and dependencies to run the application. |
As you can see, both containerization and virtualization offer paths to making IT systems and software broadly compatible across different environments. However, they approach this task from different ends. Containerization provides a lightweight, efficient way to ensure application consistency and portability, while virtualization offers a more comprehensive approach to running multiple, completely isolated operating systems on a single physical server.
What are the benefits of containerization?
Improved efficiency
“Containerization makes it easier to run many different programs on a computer without each one needing its own setup.”
– Ryan MacDonald, Chief Technology Officer at Liquid Web
Normally, when you run something like a website or an app, it’s like giving it its own little computer to work on. But with containers, they all share the same basic tools, so they’re much faster and don’t use as much computer power.
This means you can start up and use programs quickly without waiting for a whole computer to boot up every time. It also means your computer can handle more programs at once without slowing down. This efficiency translates into faster development cycles, enabling organizations to push updates and innovations at a quicker pace.
Consistent and reproducible environments
Containers encapsulate not just the application, but its entire runtime environment. This ensures that the application will run in a consistent and reproducible manner, regardless of where the container is deployed.
Whether it’s moving from a developer’s laptop to a test environment, or from staging to production, containers eliminate the dreaded “it works on my machine” problem. This consistency simplifies the deployment process and significantly reduces the overhead associated with configuring environments for new applications.
Scalability and portability
Containers allow for easy scaling of applications by spinning up additional instances as needed without the overhead of starting full virtual machines. This scalability goes hand-in-hand with portability; since containers include everything an application needs to run, they can be moved seamlessly across different host systems that support containerization technology.
This flexibility enables organizations to leverage various environments, from on-premises data centers to public clouds, enhancing their operational agility.
Microservices architecture
Containerization naturally complements the microservices architecture, where applications are built as a collection of loosely coupled services. Microservices can be deployed and managed independently within their containers, allowing for more granular updates and scaling. This independence not only accelerates development and deployment cycles but also enhances the resilience of the overall application, as issues in one service can be isolated and addressed without impacting others.
Fault tolerance
Thanks to the isolation provided by containers, applications are less likely to be affected by issues in other containers or the underlying operating system. This isolation improves the fault tolerance of the infrastructure, as a problem in one container can be contained and resolved without disrupting the operation of others. This characteristic is crucial for maintaining the availability and reliability of applications, especially in complex, distributed systems.
Cost savings
The ability to run applications on any operating system without the need for creating different software packages reduces the time and resources required for development and testing. The efficiency and reduced resource consumption associated with containerized applications can lower infrastructure costs, making it a financially savvy choice for organizations of all sizes.
Potential drawbacks of containerization
While containerization is transforming the IT landscape with numerous benefits, implementing it involves navigating potential drawbacks.
Data persistence
A fundamental characteristic of containers is their short-term nature. This means that data stored in a container can be lost when the container is stopped or restarted. For applications that require data persistence, this poses a significant challenge.
However, this can be addressed through techniques like Docker volumes and bind mounts, which allow data to be stored outside the container’s filesystem and persist beyond the container’s lifecycle. Implementing these solutions requires careful planning and management but ensures that critical data remains intact and accessible, even as containers come and go.
Security issues
While the isolation provided by containers offers a layer of protection, virtual machines are more robust. Containers share the host OS’s kernel, making them less isolated from each other. This shared environment raises certain security concerns, such as the potential for malicious containers to affect others on the same host.
Some best practices for enhancing security in a containerized environment include:
- Following the principle of least privilege: Run containers and containerized applications with the minimal permissions necessary to function.
- Using secure container images: Opt for official or verified images and scan them for vulnerabilities.
- Regularly updating and patching: Keep container runtimes, libraries, and dependencies up to date to mitigate vulnerabilities.
- Network segmentation and policies: Implement network policies to control the traffic between containers, limiting potential attack vectors.
Complexity
Introducing containerization adds a layer of complexity to IT operations. Teams may need to learn new tools and technologies, adapt existing processes, and manage additional security considerations. The dynamic and distributed nature of containerized environments can also complicate monitoring and management.
However, leveraging services from providers like Liquid Web can help mitigate this complexity by providing integrated solutions for container management, monitoring, security, and orchestration. These tools are designed to simplify containerized deployments, making them more accessible and manageable for teams of all sizes.
Despite these potential drawbacks, with a proper implementation strategy, the challenges of containerization can be effectively mitigated.
How does containerization work?
Containerization works by bundling an application and its dependencies into a self-contained unit known as a container. This container is isolated from the host system and contains everything needed to run the application, including code, runtime, system tools, libraries, and settings.
Here’s a breakdown of how it works:
- Creating a container image: To begin, developers create a container image, which is like a blueprint for the container. This image includes all the necessary files and configurations required to run the application. It’s akin to packaging the application and its environment into a single file.
- Deploying the container image: Once the container image is ready, it can be deployed to run the application. This deployment involves running the container image on a container runtime, such as Docker or containerd. The runtime is responsible for managing and executing containers on the host system.
- Running the containerized application: When a containerized application is launched, the container runtime creates an instance of the container based on the image. This instance is isolated from other containers and the host system, ensuring that the application runs consistently regardless of the underlying environment.
- Connecting container layers: Container images are composed of multiple layers, each representing a different aspect of the application’s environment. These layers include the base operating system, dependencies, and the application itself. When a container is run, these layers are combined to create a unified environment for the application to execute.
If you want to know more, Liquid Web has an in-depth guide on how containerization works.
Container images and the OCI standard
At the heart of containerization is the concept of the container image. This image is essentially a self-sufficient package containing all the necessary components to run an application, including the code, runtime, system tools, libraries, and settings.
These images are built based on the Open Container Initiative (OCI) specifications, an open source project that defines standard formats for container images and runtimes. The OCI provides a blueprint that ensures compatibility and consistency across different containerization technologies, making it easier for developers to create and deploy containerized applications.
Infrastructure and operating system requirements
Although containers encapsulate software packages, they still rely on the underlying hardware and an OS to run. The physical server or computing environment, which can be either bare-metal or virtualized, serves as the infrastructure supporting the containers.
While containers can run on various operating systems, Linux is a particularly popular choice due to its native support for containerization technologies. However, containerization is designed to be OS-agnostic, allowing applications to run across any platform that supports the containerization framework being used.
The role of the container engine
Bridging the gap between the container image and the operating system is the container engine. This critical component is responsible for installing the container image onto the OS and creating the container.
The container engine acts as an intermediary, managing the lifecycle of containers from creation to deletion. It ensures that containers are correctly isolated from each other, allocates resources, and maintains the necessary environment for the application to run as intended.
Application and dependencies
Within each container is the application itself, along with any dependencies it requires to function. This includes libraries and other external resources the application needs. By packaging the application with its dependencies, containerization ensures that the software runs consistently regardless of where it is deployed.
Container orchestration and microservices
Container orchestration is an essential tool for complex applications or environments where multiple containers are used. Orchestration platforms, such as Kubernetes, automate the deployment, management, scaling, and networking of containers.
This automation simplifies the handling of containers, especially in microservices architectures where applications are broken down into smaller, independent services. Containerization naturally supports microservices by allowing these services to be deployed, updated, and scaled independently, enhancing agility and reducing downtime.
Popular containerization technologies
Kubernetes

Kubernetes, often abbreviated as K8s, is the de facto standard for container orchestration. Originating from Google’s internal Borg system, Kubernetes was released as an open source project to help automate the deployment, scaling, and operation of containerized applications.
Kubernetes provides a platform for automating and managing containerized applications across multiple hosts, offering high levels of scalability and efficiency. It simplifies the complex task of managing containers by grouping them into pods for easy management and scaling.
Among its key features and benefits are:
- Automatic bin packing, which optimally places containers based on their resource requirements and constraints, maximizing utilization and minimizing waste.
- Service discovery and load balancing, automatically assigning IP addresses to containers and distributing network traffic to ensure high availability.
- Automated rollouts and rollbacks, facilitating the deployment of new versions of applications while monitoring their health to prevent failures.
For detailed instructions on how to install and use Kubernetes, the Liquid Web guide provides invaluable insights and step-by-step tutorials.
Linux and containers
While Linux itself is not a containerization technology, its importance in the container ecosystem cannot be overstated. Linux’s open source nature, flexibility, and strong community support make it the preferred operating system for running containers.
The Linux kernel includes features such as namespaces and cgroups, which provide the isolation and resource management needed for containers to run securely and efficiently.
Container technologies, including Docker, leverage these Linux kernel features to isolate containers from each other and the host system, ensuring a secure and stable environment for containerized applications.
Docker

Docker is a cornerstone of modern containerization, providing a platform for developers to build, deploy, and manage containerized applications with ease. As an open source project, Docker popularized containerization by simplifying the creation of containers with its Docker Images and Dockerfiles, allowing for rapid development and deployment cycles.
Key features and benefits of Docker include:
- Docker images and Dockerfiles: These allow for the efficient creation and management of container images, defining the environment and instructions needed to run applications within containers.
- Rapid application deployment: Docker’s containerization approach significantly reduces the time and complexity involved in deploying applications across different environments.
- Portability and scalability: Containers can be easily moved between different environments and scaled up or down to meet demand, enhancing the flexibility of application deployment.
- The Docker Hub: This serves as a cloud-based registry service, facilitating the sharing and distribution of container images among developers and teams. This ecosystem supports a collaborative development environment and accelerates the adoption of containerized applications.
Enhance your software deployment with containerization
Containerization isn’t just a trend; it’s a pivotal shift towards more versatile, efficient, and flexible application development and deployment processes. By allowing applications to be deployed across different operating systems without modification, containerization ensures your applications are not just versatile but also resilient and adaptable to various environments.
If you’re looking to take your application development and deployment to the next level, exploring containerization and other IT solutions is a step in the right direction. Liquid Web offers a range of services and expertise to guide you through the maze of modern IT solutions, ensuring you find the perfect fit for your needs.
Don’t let the complexities of software deployment slow you down. Contact Liquid Web today and get the help you want for all your containerization needs.