
 David Singer
 In this article, we discuss how to clone a git repo on CentOS. We also learn the differences between Git and GitHub, what version control means, what a repo is and how to clone a repository.
What is Git?
Git is a stable, mature, and robust versioning control system or VCS. Git allows developers to store, update, and share software contained in a personal repository. As changes are made, git lets the new software updates overwrite the old code with new data while storing the old data for future use if needed. It also allows multiple developers to work on the same project, applying various changes to different sections of the code, which increases productivity. This is why Git is noted as an example of a “distributed version control system“.
What is a Git Repo?
A Git project is called a “repo or repository“. These repos contain the complete collection of files and folders related to a project. It also contains a revision history for each file in the repo.
Additionally, the repo catalogs or captures each change, which is called a commit. These commits are also called snapshots and persist as a “linked-list relationship“. These commits (or snapshots) can also be developed into a new evolution of the software called a branch. Because Git is a distributed version control system, a self-contained repository can be cloned and shared by anyone who maintains a copy of the repository. It can also access the entire codebase and its history! Most developers use the command line to access the git repository, which also allows for multiple functions such as:
- interaction with the history
- cloning
- creating branches
- committing changes
- merging new code
- comparing version changes across sections of code and more.
What’s the difference between Git and GitHub?
Git is the versioning control tool, and GitHub is the repository that stores and tracks the changes in the software.
Why is Git useful?
As software is updated with new code additions, git tracks those changes that take place and adds the adjustments into a new, updated version of the code. As each new commit is made, the version numbers of the software updates as well to indicate the revisions have been made. Developers use specific git commands to add, modify, and adjust those code upgrades into the new version. This allows for better tracking and provides the ability to revert changes if something goes wrong.
How do we install Git?
The easiest way to install git is to use your default Linux distribution package management system.
For Debian/Ubuntu we use:
root@host [~]# apt update
root@host [~]# apt install git
For Redhat/CentOS we use
root@host [~]# yum -y update
root@host [~]# yum install git
For a Windows Server, we use the Windows executable from the git website. On a Windows server, there are additional GUI tools available, as well. You can download the software from the link above. Run the executable to install it.
Lastly, MacOS also has a version of git available to use. To install git on a Mac, type in a git command (like “git -version”) in a terminal window, and you will be prompted to install it. When you get this prompt, accept the install prompt, and follow the instructions in your terminal.
Setting up Git on CentOS
Now that we have git installed, we need to configure it so that it links to a repository. We start by running the command:
root@host [~]# git config Next, we add our name and email address as git applies this information to each commit we make. We can add this information by entering the following info:
root@host [~]# git config --global user.name "User Name"
root@host [~]# git config --global user.email "[email protected]"
We can view the configuration information by typing in:
root@host [~]# git config --list
root@host [~]# git config --list
user.name=dsinger
[email protected]
That’s it! Git is now installed and ready to use.
Setting the Project Folder
Next, let’s select a local folder that we will use as our local repository. For this example, we will be using the /root/project/ folder. Let’s change directories (cd) into that folder now.
root@host [~]# cd project
root@host [~/project]#
Next, we run the “git init” command to select and utilize that directory for our new git repo:
root@host [~/project]# git init
Initialized empty Git repository in /root/project/.git/
root@host [~/project]#
We can now see inside the .git folder that was just created:
root@host [~/project]# ll
total 12K
drwxr-xr-x 3 root root 4.0K Oct 28 20:41 ./
drwxr-xr-x. 44 root root 4.0K Oct 28 20:39 ../
drwxr-xr-x 6 root root 4.0K Oct 28 20:41 .git/
root@host [~/project]#
Within the .git folder, we see the following file structure has been setup:
root@host [~/project]# cd .git/
root@host [~/project/.git]# ll
total 36K
drwxr-xr-x 6 root root 4.0K Oct 28 20:41 ./
drwxr-xr-x 3 root root 4.0K Oct 28 20:41 ../
-rw-r--r-- 1 root root 92 Oct 28 20:41 config
-rw-r--r-- 1 root root 73 Oct 28 20:41 description
-rw-r--r-- 1 root root 23 Oct 28 20:41 HEAD
drwxr-xr-x 2 root root 4.0K Oct 28 20:41 hooks/
drwxr-xr-x 2 root root 4.0K Oct 28 20:41 info/
drwxr-xr-x 4 root root 4.0K Oct 28 20:41 objects/
drwxr-xr-x 4 root root 4.0K Oct 28 20:41 refs/
root@host [~/project/.git]#
Git Commands
git init
Running the “git init” command inside the folder above, activated and began monitoring that folder, linking it with to a new GitHub repository. The init command also adds a .git subfolder within that directory that hosts the repo’s data structure under that. This info is required for the versioning control. Using the init command, we can now begin to set up a local working directory as a git repository.
root@host [~]# git initHow do I clone a repository?
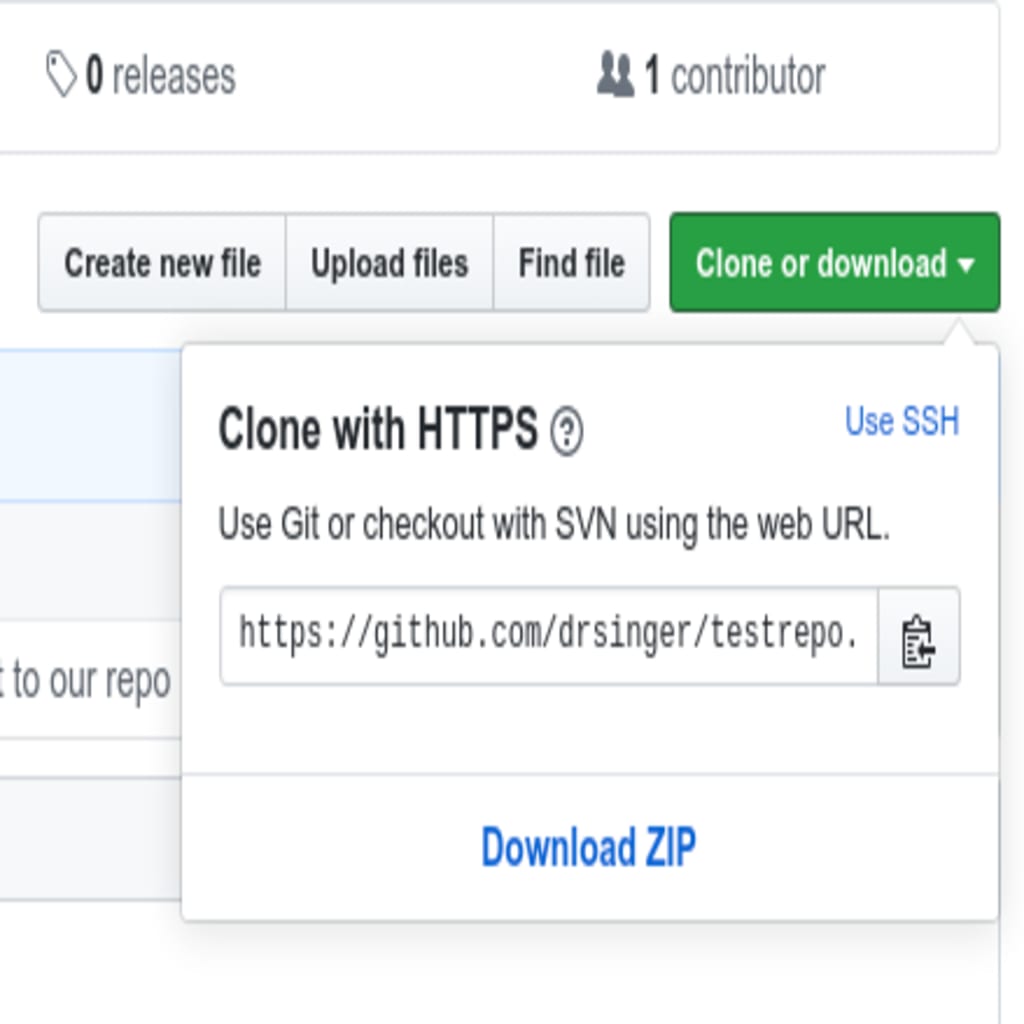
We can now copy an existing git repository hosted remotely on the GitHub servers. The first option we have is to simply click the Clone or download button and copy the link using the clipboard option to the right of the link and paste it into a wget command to pull it down to a folder on the server or click the Download ZIP link.
root@host [~/project/testrepo]# wget https://github.com/drsinger/testrepo.gitTo clone a repository without authenticating to GitHub on the command line, you can use GitHub Desktop to clone instead.
If you want to use SSH to pull down a repo, you must set up SSHKeys.
To pull a copy of an existing repo, we will use the command “git clone” with the URL of the repo or server location.
First, let’s add a file to our git repo on GitHub. Click on the “Create new file” button.

Next, we add some information to the new file.

After we have added some data to the new file, we then click on the “Commit new file” button.

This will add the file into the repo and drop us back to the main repo screen, which now shows the “file.txt” file as being part of the repo.

Now, let’s get our clone on! Click on the “Clone or download” button. This action opens a dropdown, which contains two ways to transfer our repo. We can use https or SSH.

Next, we copy the https://github.com/drsinger/testrepo.git link and paste it into our local command line terminal. Now hit enter.
root@host [~/project]# git clone https://github.com/drsinger/testrepo.git
Cloning into 'testrepo'...
remote: Enumerating objects: 6, done.
remote: Counting objects: 100% (6/6), done.
remote: Compressing objects: 100% (5/5), done.
remote: Total 6 (delta 0), reused 0 (delta 0), pack-reused 0
Unpacking objects: 100% (6/6), done.
root@host [~/project]#
That’s it! Git has pulled the “testrepo” to our local server.
root@host [~/project]# ll
total 16K
drwxr-xr-x 4 root root 4.0K Oct 30 05:58 ./
drwxr-xr-x. 44 root root 4.0K Oct 30 02:15 ../
drwxr-xr-x 6 root root 4.0K Oct 30 05:48 .git/
drwxr-xr-x 3 root root 4.0K Oct 30 05:58 testrepo/
root@host [~/project]#
Now we can add files locally and then push them up to our GitHub repo. If another developer is working on the same project pushes a change up to the master repo, you can now pull that modified data back down to incorporate the changes into your local folder.
Commit New Info to the Repo
Now, let’s use a few more simple git commands to add/update our repo with new data using the file.txt we created above. First, we’ll add some additional text to our file.txt file.
root@host [~/project/testrepo]# cat file.txt
This is a test file.
We will clone this repo to a server.

root@host [~/project/testrepo]# cat >> file.txt
this is a new commit.
We are adding more data to an existing file and will then stage it, then commit it to our testrepo on github.

root@host [~/project/testrepo]# cat file.txt
This is a test file.
We will clone this repo to a server.
this is a new commit.
We are adding more data to an existing file and will then stage it, then commit it to our testrepo on github.
git add
As you can see, we started off with just two lines of text, we then used the “cat >> file.txt” command to append a little more data to the existing file. Next, we use the “git add file.txt” command to stage a change locally.
root@host [~/project/testrepo]# git add file.txt
root@host [~/project/testrepo]# (there will not be any specific CLI output when we run that command)
When making changes to a repo, it is required to stage and take a snapshot of the changes so they can be included in the project’s history. The add command performs staging, which is the first part of a two-step process of committing a change. Any changes that are staged locally will become a part of the repo’s next snapshot and a new addition to the project’s history.
git commit
So, let’s finalize our change. As soon as we hit enter, a new editor window will now open asking us to add a comment as a commit message for the change.
root@host [~/project/testrepo]# git commitClick the insert key on your keyboard to start editing the commit.
  1
  2 # Please enter the commit message for your changes. Lines starting
  3 # with '#' will be ignored, and an empty message aborts the commit.
  4 #
  5 # On branch master
  6 # Your branch is up to date with 'origin/master'.
  7 #
  8 # Changes to be committed:
  9 #       modified:   file.txt
 10 #
~
"~/project/testrepo/.git/COMMIT_EDITMSG"  10L,  261C   1,0-1     All
Now, I’ll type in my commit comment on line 1. If you are coding, this would be where you describe your changes. (Please don’t just use “Update to line xxx”. Be descriptive in your code comments!!!)
  1 I have added a short amount of text to demonstrate a commit to our repo
  2 # Please enter the commit message for your changes. Lines starting
  3 # with '#' will be ignored, and an empty message aborts the commit.
  4 #
  5 # On branch master
  6 # Your branch is up to date with 'origin/master'.
  7 #
  8 # Changes to be committed:
  9 #       modified:   file.txt
 10 #

-- INSERT --
When finished adding the commit message, click on the escape key (Esc) to exit the editor, and then use the “:wq” command to end the edit. We then see the following report:
root@host [~/project/testrepo]# git commit
[master 9efda19] I have added a short amount of text to demonstrate a commit to our repo
 1 file changed, 2 insertions(+)
root@host [~/project/testrepo]#
git push
The next step is to “push” our local info up to GitHub. We’ll run the “git push” command to accomplish this. Because this is our first push, our username and password will be required to add it to the GitHub repo.
root@host [~/project/testrepo]# git push

(gnome-ssh-askpass:55417): Gtk-WARNING **: 14:25:25.456: cannot open display:
error: unable to read askpass response from '/usr/libexec/openssh/gnome-ssh-askpass'
Username for 'https://github.com':  [email protected]

(gnome-ssh-askpass:55578): Gtk-WARNING **: 14:27:31.406: cannot open display:
error: unable to read askpass response from '/usr/libexec/openssh/gnome-ssh-askpass'

Password for 'https://[email protected]@github.com':
Enumerating objects: 5, done.
Counting objects: 100% (5/5), done.
Delta compression using up to 4 threads
Compressing objects: 100% (3/3), done.
Writing objects: 100% (3/3), 433 bytes | 433.00 KiB/s, done.
Total 3 (delta 0), reused 0 (delta 0)

To https://github.com/drsinger/testrepo.git
   27d4315..9efda19  master -> master

root@host [~/project/testrepo]#
Now, let’s take a look at GitHub.

Poof! Update made!
Final Thoughts
We’ve only scratched the tip of the iceberg here since there are lots of other features and options available for using Git and GitHub. People use this to keep track of car repairs, note recipes and hundreds of other uses. There’s even a GitHub that tracks changes to the U.S. Constitution! There are so many uses for this tool that can benefit you not only in the technology space but also in everyday life. What uses can you think of?
For more information, here are a few links to continue learning about Git
Join Us Today!
Want to know more about how tools like this and others can have a positive impact on your business model? Reach out to us right now to learn how you can take advantage of the newest tech on the market!
Open a chat or ticket with us to speak with one of our knowledgeable Solutions Team or an experienced Hosting Advisors today!