
Digital transformation is a must for businesses today, and you need every advantage you can get. Using VMware’s virtualization technology offers you the advantage you need online.
By creating virtualized environments for your workloads and applications, VMware reduces the burden on your company to own and manage your IT infrastructure on-premises. Plus, VMware’s virtual disks give your business the agility to deploy tech resources at scale with fast provisioning.
That said, regardless of the types of virtual disks you’re using, virtual machines have limited disk space. At some point, you must increase the size of your VMware virtual disk to keep growing and avoid performance issues.
What are the specific steps for expanding your VMware disk space? Are there prerequisites and requirements you need to meet? How do you address issues you may encounter along the way?
We’ll walk you through increasing disk size in VMware step by step.
Here’s what we’ll cover:
- VMware Virtual Machines: An Overview
- Importance of Increasing Virtual Machine Disk Size
- Prerequisites for Increasing VMware Virtual Machine Disk Size
- How To Add More Disk Space to VMware Virtual Machine (Step by Step)
- Common Problems When Increasing VMware Disk Size
- Final Thoughts: How To Increase VMware Disk Size
VMware virtual machines: An overview
VMware is a virtualization and cloud computing software provider. By using VMware, you add a virtualization layer on top of your physical servers through a hypervisor software program.
Virtualization is the process of creating virtual instances of computing resources by creating virtual machines (VMs).
You can think of a virtual machine as creating a computer within a computer, with an operating system of its own, as well as dedicated usage allocations for components like memory, storage, network adapters, and the processor.
When you create a virtual machine, you’re replicating a physical computer’s capabilities in a software-based environment.
The beauty of virtualization is that you’re renting only a slice of a physical server while making a program think it has complete control of an entire server.
That way, you can run multiple applications or workloads on a single physical server without them interfering with each other.
In other words, virtual machines enable you to run several independent computers, sharing the resources of one powerful machine. This not only simplifies the management of your servers but also reduces operational costs associated with power consumption, maintenance, and hardware procurement.
Virtualization software like VMware also offers management tools that centralize the control and administration of your virtualized environments. This enables you to allocate resources where they’re needed quickly.
With each VM operating as one independent system, you can manage and run multiple workloads without straining your IT infrastructure.
Importance of increasing virtual machine disk size
Like any computer, VMs have limits and must be upgraded occasionally, including disk space. For your business to achieve sustainable growth and stay competitive, you must increase the size of your VMware virtual disk.
Think of virtual disks as the virtualized counterparts of your IT infrastructure’s physical hard drives (hard disks). Just as a hard disk serves as the storage backbone for a physical server, virtual disks play a similar role in the virtualized environment.
Enhanced performance
More disk space means higher processing power and storage capacity. Giving your virtual disks more room to process tasks and store information gives your workloads the leverage they need to operate at their best. The extra space can come in handy for tasks that require a lot of power, like filling online orders during massive demand spikes from events like Black Friday.
Improved scalability
On top of improved performance, expanding the size of your virtual disks gives your business the resources and agility it needs to grow as needed. Virtualized environments enable you to deploy multiple VMs on a single piece of physical hardware, so no resources are left idle.
Cost efficiency
By increasing the disk size of your VM, you can mitigate the need for frequent hardware upgrades and provisioning. Why keep investing in new physical servers when you can scale your virtualized environment by increasing the size of your virtual disks to take advantage of existing hardware?
This approach helps keep capital expenditures down to a manageable level, which in turn enables you to achieve economies of scale. This makes your IT infrastructure more cost-effective over time.
Reduced downtime and financial losses
Planning for Increasing disk space with VMware during scheduled maintenance windows minimizes or eliminates extra downtime. Plus, increasing virtual disk space prevents the server from reaching its limit, making the system more stable. With more stability, your uptime increases, reducing the risks of financial losses due to system crashes, repair costs, and missed opportunities due to system crashes.
Ability to run experiments
Every business needs room to experiment to take the innovative leaps necessary to stay competitive in a shifting market. However, experiments may fail, causing data loss, corruption, or service delays.
Expanding the size of your virtual disks gives you the extra free space you need to run experiments without risk. You can clone a VM and run diverse setups without compromising the stability of your live website or losing sensitive and important data due to failure.
Enhanced data security and integrity
Increasing your disk space gives you more room to implement data protection and security measures like regular automated backups, redundancy protocols, and encryption.
With ample disk space in your virtual machines, you can implement backup schedules and disaster recovery tests without worrying about storage limitations. You can also use that additional space for redundancy protocols to safeguard critical information against corruption and data loss.
Prerequisites for increasing VMware virtual machine disk size
To increase the size of your VMware disk, you need to meet specific requirements and prerequisites.

Check current disk space
First, do you actually need to increase your virtual disk space at all?
One indicator of needing to increase disk size in VMware is if your nodes are about to reach full capacity. The specific steps to checking your current disk space depend on the virtualization software you’re using. The most common are VMware vSphere and ESX or ESXi.
Determine how much additional disk space you need
Once you’ve figured out how much disk space you have, you can determine how much additional disk space you need.
The additional disk space you need depends on the following factors:
- Application and data storage requirements: The disk space you need to run workloads depends on the number of files, databases, and other resources that need to be stored.
- Future growth needs: You must anticipate and prepare for future growth so you don’t miss out on any opportunities to scale your business. For example, if you’re using ESXi 8.0, it’s always good practice to have a minimum of 12 GB of RAM to run VMs in a production environment.
- Redundancy and backup needs: You need server redundancy to protect your infrastructure from data loss. When adding extra space to your virtual disk, thoroughly assess the needs and requirements of your redundancy strategies.
Check compatibility and system requirements
Before increasing your virtual disk space, you need to meet the following requirements.
- Upgrade to VMware Player 3. You can download this version for free via VMware Downloads.
- If you’re using ESX, make sure you have sufficient permissions first.
Remove the virtual disk’s snapshots
Excessive snapshots take up space and confuse your setup. They can also cause snags that prevent the virtual disk from integrating with the base disk, which prevents the system from recognizing the new disk size.
Remove those snapshots so that the allocation of disk resources is streamlined.
Back up your virtual machine
Expanding your VMware’s virtual disks to new sizes may cause unforeseen complications with other processes, potentially causing software errors or hardware failure. Back up your VM to avoid potential data loss in case of errors during expansion.
Turn off your virtual machine
Attempting to increase the size of a virtual disk while your VM is active may destabilize the system (the same way you wouldn’t adjust your car’s engine while it’s running).
Turning off your virtual machine ensures a stable environment for expanding your disk space. If you must increase disk size in VMware while it is running, you must install VMware Tools first.
How to add more disk space to a VMware virtual machine step by step
The method for increasing the size of a VMware disk will vary based on your work environment.
Method 1: Increase VM disk size in VMware workstation
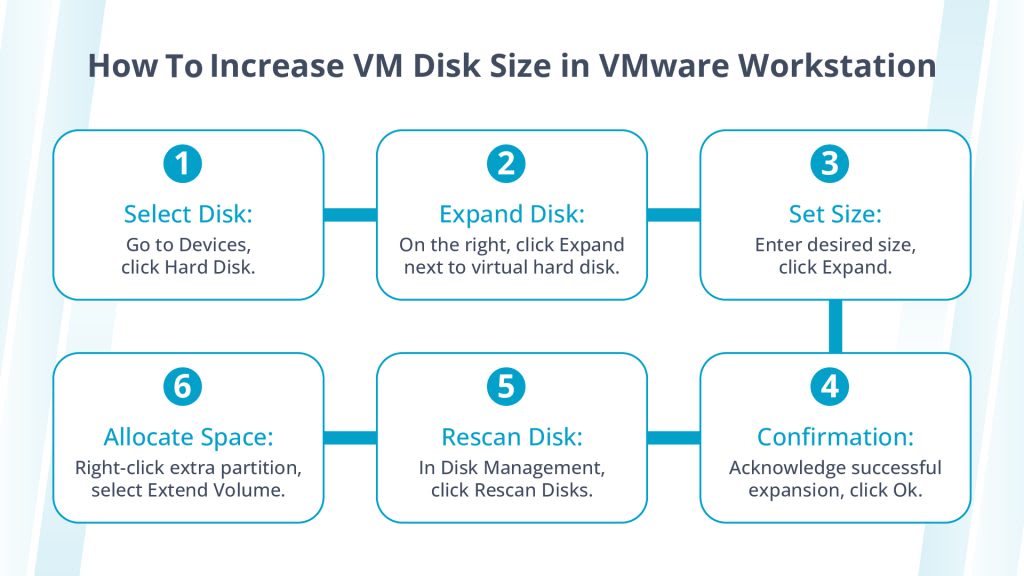
Step 1: Choose the hard disk you wish to expand by selecting Hard Disk under Devices.
Step 2: Select Expand next to the virtual hard disk on the right-hand side.
Step 3: Enter your preferred maximum size for the virtual disk and select Expand again.
Step 4: You’ll get a notification that the virtual disk expanded successfully. Select OK to continue.
Step 5: Rescan the disk by selecting Rescan Disks under Disk Management.
Step 6: Assign the additional disk space under Disk Management by right-clicking the extra partition and selecting Extend Volume.
Method 2: Increase VM disk size in Workstation, Player, ACE Manager, Server, or GSX
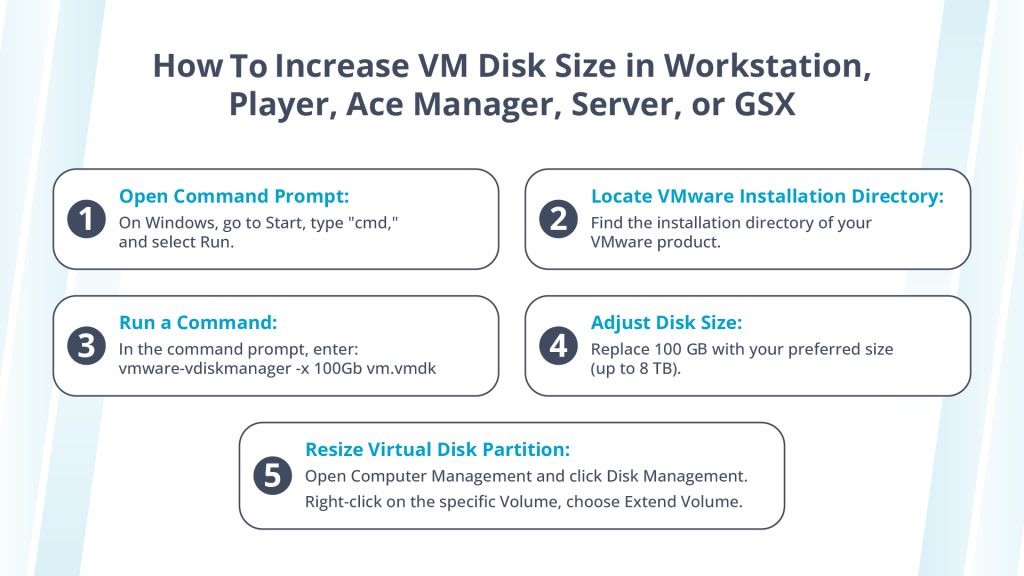
Step 1: Open a command prompt. The steps to do this depend on the operating system your VM is using. If you’re using a Windows virtual machine, for example, go to Start, type cmd into the command line before pressing Enter, and then select Run.
The steps to open the command prompt for the most common operating systems are at:
- Windows
- Linux
- Mac
Step 2: Find the installation directory of the VMware product you’re using. Again, the steps depend on the operating system your VMs are running. For example, Windows 7 would be different than in Ubuntu.
Step 3: In the command prompt, enter vmware-vdiskmanager -x 100Gb vm.vmdk
Step 4: The current size will show as 100 GB. Replace it with your preferred virtual disk size. Typically, a virtual hard disk can handle up to 8 TB in size, but it could be lower depending on the version of your hardware and its controller type.
Step 5: Increase the size of the virtual disk partition. This is needed so the operating system is made aware of the change. Under Computer Management, select Disk Management. Then, right-click on the specific disk volume you want to extend and choose Extend Volume.
- For Workstation 7 onwards and Player 3.x onwards — You can increase the VM disk size from the GUI by selecting the specific virtual machine from the inventory in your VMware environment. Go to Edit Virtual Machine Settings > Utilities > Expand. Input your desired disk size in the provided field. Once the virtual disk is expanded, reboot the guest operating system to make it aware of the size change.
- For ESX 3.5 or later versions — Launch the VI Client and establish a connection to either VirtualCenter or the ESX host. Once connected, locate the virtual machine you wish to modify and right-click on it. Then select Edit Settings and navigate to the Virtual Disk option. Increase the size of the disk as desired. Finally, reboot the guest operating system so it’s aware of the change in disk size.
Common problems when increasing VMware disk size
Virtualization technology is complex, and you may encounter issues when increasing the disk size of your VMs even if you’ve followed all of the steps above to the letter. Here are solutions to some of the most common problems.
The option to expand volume size is grayed out
Usually, this happens if hidden snapshots are still attached to the VM. As a result, the option to expand the volume size is grayed out even if you think you already deleted all the snapshots.
In this case, it’s because the disks where the deleted snapshots were associated didn’t integrate into the base disk, which means you have redundant VMDK files.
To fix this issue, you need to perform snapshot consolidation. This eliminates redundancy, allowing you to proceed with the expansion process.
Step 1: Shut down the virtual machine.
Step 2: Open the vSphere Client and select the VM in the inventory.
Step 3: Select the Snapshot tab in the right-hand pane.
Step 4: Select all the snapshots associated with the VM.
Step 5: Select Consolidate from the toolbar.
Step 6: Select Yes to confirm the action.
The virtual machine doesn’t recognize the new disk size after resizing
After attempting to expand the disk size of a virtual machine, the added space may not be immediately available to the virtual machine. You need to use a disk management tool to expand the partition size on the virtual hard disk.
If that doesn’t make the virtual machine recognize the new disk size, rescanning the virtual disks may help.
Step 1: Power off the virtual machine.
Step 2: In the vSphere Client, select the virtual machine in the inventory.
Step 3: Select the Disk Management tab in the right-hand pane.
Step 4: Right-click on the virtual hard disk and select Rescan Disks.
If the VM still doesn’t recognize the new disk size after the rescan, try restarting it again.
Disk operation failed: Msg.Fileio.Lock
This error typically happens when your attempts to increase VMware disk size interfere with another process.
As the error message suggests, the virtual disk is locked. To resolve the issue, you need to identify the program preventing you from making changes to the virtual disk and terminate it.
Step 1: Identify the lock — To determine the process that’s causing the lock, clear all expected locks on the disks. If the VM doesn’t turn on, proceed to the next step.
Step 2: Unmount the hard disk — Select the X next to Hard Disk to unmount the hard disk from the VM. Be careful not to click Delete files from the datastore to avoid data loss.
Step 3: Consolidate disks — Sometimes, the lock happens because the VM is fragmented. Performing disk consolidation may resolve the issue.
Step 4: Look for disk locks — If the virtual disk is still active, it’s possible that an ESXi host has locked it. By releasing the lock, you can proceed with expanding the virtual disk.
Final thoughts: How to increase the size of a VMware disk
In the era of cloud computing, the business that can leverage its key resources to optimize operations and support business goals will have a distinct advantage. Making sure your VMs have sufficient disk space is one effective way to gain that advantage.
In a business environment where data is a cornerstone of success, having a resilient and scalable virtualized infrastructure is not just an advantage but a necessity. This is why you need a dedicated private cloud to thrive in the IT industry.
As you consider how to increase the size of VMware disks, Liquid Web can simplify the process and provide the necessary resources to support your business goals. Liquid Web offers managed private cloud hosting services so you can access the tools and support needed to optimize operations and place your VMware infrastructure in a better position for scalability.
Related Resources
Why Your Business Should Choose VMware
How to Use VMware to Set Up a Virtual Machine
Business Benefits of Virtual Data Centers Using VMware
How to achieve high availability with data center redundancy
Demystifying backup servers: A complete guide
How to protect your IT infrastructure: A guide to server disaster recovery