
 Dean Conally
 VMware is one of the most used virtualization tools in the world. Whether you are using it on the private vs public cloud, there is no denying that VMware is an important tool for businesses.
This guide will show you how to create a virtual machine (VM) through VMware Workstation 16. If you have an older version of the software, the process is the same so set up your virtual machine.
How to Create a Virtual Machine Using VMware Workstation
Step 1
Launch the VMware workstation app on your desktop and click the Create a New Virtual Machine button.

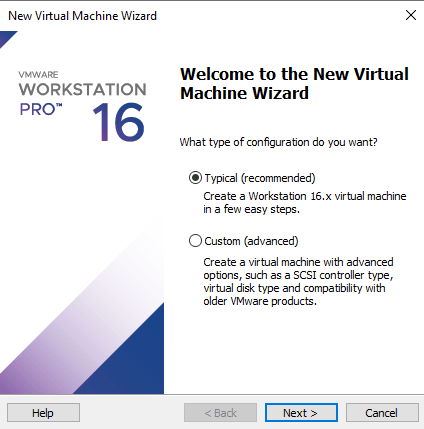
Step 2
Once clicked, a new pop-up window will appear. Select Typical (recommended) and click on the Next button to perform the recommended configuration.
Step 3
Next, choose the operating system on which your virtual machine will run. A new window for the installation of the guest operating system will appear. Choose Installer disc image file (iso): and click the Browse… button.

Step 4
VMware workstation will automatically open a directory where disc images of operating systems are stored. We chose the linux disc image file for this tutorial, but you can choose whatever you prefer. After selecting your file, click the Open button.

Step 5
After selecting your disc image file, the installer will indicate it could not detect an operating system. That is okay! Our operating system will be specified in the next step, so ignore that message and click the Next button.

Step 6
Now we will choose an operating system from the long list of available options. For this tutorial, we selected:
- Guest operating system: Linux
- Version: CentOS 7 64-bit

[su_box title=”Note:” style=”glass” box_color=”#3ac6eb” radius=”20″]
- If you have a Windows disc image, select Microsoft Windows.
- If you want to install VMware ESXi, then select VMware ESX.
- Select Other if you have another operating system like Solaris.
[/su_box]
Step 7
Once you have selected your Guest operating system and Version, click the Next button.

Step 8
Now we will name our VM and choose its location. Choose whatever name you want for your virtual machine. The default location is your Documents folder. We saved our VM to a folder called Virtual Machines. Click the Next button.

Step 9
Next, specify the disk space capacity for your virtual machine. The space you allocate for your VM is up to you. We went with the recommended 20GB as we are using CentOS 7.
Select whether you want to store your virtual disk as a single file or split into multiple files. One file will have everything in one place, but multiple files will make it easier to move if necessary.
Click Next once you have made your selections.

Step 10
A final pop-up window indicates your virtual machine is ready to be created. It provides a breakdown of your chosen settings but make sure to double-check everything is correct. If something is wrong, click the Back button and make your changes. If everything is correct, click Finish.

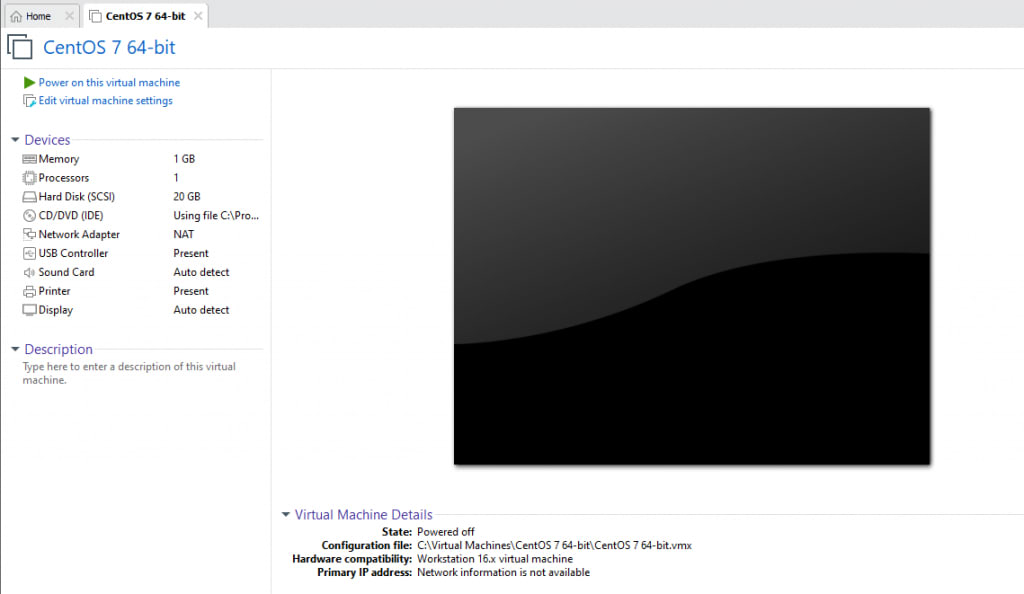
Your Virtual Machine is Created
Congratulations! Your successfully created virtual machine will be available in the VMware Workstation dashboard.
Conclusion
Creating a virtual machine using VMware Workstation is a simple process. VMware Workstation is the perfect solution to run several instances using different operating systems within one workstation.
Liquid Web’s VMware Private Cloud is perfect for your business needs, providing cloud performance on fast and secure enterprise infrastructure. Reach out today for help on selecting the best plan for your business!