

Businesses, no matter their size, are relying more and more on technology to meet their operational needs, seeking a reliable and efficient hosting environment to accommodate their websites and applications in a flexible, scalable, and cost-effective manner. This is why virtual private servers (VPS) are becoming increasingly popular as a hosting solution.
However, setting up and configuring a VPS can be a daunting task, especially if you’re new to the world of server management and web hosting. Even though setting up a VPS is pivotal to achieving optimal speed, performance, and security for your site or app, the complexities of configuring it can quickly overwhelm even the most tech-savvy individuals.
But don’t worry. Whether you’re a small business owner looking to host your website, a developer in need of a testing environment, or an entrepreneur planning to launch a new application, this comprehensive guide will take you through six simple steps to configure your virtual private server like a pro, no matter the operating systems you’re using.
By the end of this article, you’ll be empowered to take control of your VPS, unleash its full potential, and reap its benefits for your business needs and goals.
Key Points
- Virtual Private Servers (VPS) offer dedicated resources within a shared physical server, providing better performance, security, and control than traditional shared hosting.
- Setting up a VPS involves six key steps: choosing a provider, creating a virtual machine instance, connecting via SSH, updating package managers, configuring a firewall, and testing/adding services.
- Security is crucial when configuring a VPS – use SSH keys for authentication and properly configure your firewall to protect against unauthorized access.
- Different operating systems (Windows or Linux) require different setup procedures and commands, with Linux being more cost-effective but requiring command-line knowledge.
- When selecting a VPS provider, consider factors beyond price: uptime guarantees, support quality, scalability options, and included features like backups and migrations.
What is a VPS, and how do you use it?
Traditionally, websites were hosted on physical servers, each hosting multiple websites simultaneously. This shared hosting setup had its limitations, where the performance of one website could be affected by the traffic and activities of others on the same server.
A VPS takes the concept of shared hosting and adds a layer of virtualization, granting you a dedicated portion of a physical server for your projects. Your dedicated virtual space operates independently from and unaffected by others, ensuring better performance, enhanced security, and increased control over your website.
Learn more: A complete beginner’s guide to virtual private servers →
Considering this advantage, it’s no wonder that the VPS market size is set to experience a growth rate (CAGR) of 13.8% from 2023-2028, reaching a market value of $9.0 Billion USD by 2028.
But how exactly does you use a VPS?
When you opt for a VPS hosting plan, the hosting provider employs cloud virtualization software to partition a physical server into multiple virtual servers. Each virtual server is isolated and operates with its own set of resources, including CPU power, RAM, and storage. This segregation allows you to enjoy the benefits of a dedicated server at a fraction of the cost.
Understanding the difference between a dedicated server and VPS
In the realm of web hosting, two popular options often come up for discussion: dedicated hosting and virtual private servers. Both have their merits and differences and cater to different needs.

Dedicated servers
A dedicated server is an entire physical server devoted solely to your website or application. It provides you with complete control and exclusive access to all of its resources, such as the processor, memory, storage, and bandwidth. This level of autonomy grants you the freedom to customize and configure the server according to your specific requirements.
Advantages of dedicated hosting:
- Since you have all the resources to yourself, you can expect faster load times, enhanced security, and improved overall performance.
- Ideal for websites or applications that experience high traffic or require substantial computing resources.
- With no sharing involved, you won’t have to worry about other users impacting your server’s performance.
VPS hosting
A VPS provides a middle ground between shared hosting and a dedicated server. A VPS employs virtualization technology to partition a physical server into multiple virtual servers, similar to the cloud, each operating independently. While they share the same physical hardware, the partitions ensure that resources are allocated exclusively to each virtual server, mimicking the experience of a dedicated server.
Advantages of VPS hosting:
- Generally more affordable since the resources of one physical server are shared among multiple users.
- Excellent option for small to medium-sized businesses or websites with moderate traffic.
- Offers scalability that will allow you to easily adjust your resources as your needs evolve, upgrading or downgrading your plan without the need for physical hardware changes.
- Provides the flexibility and freedom to install software, choose your operating system, and configure the server settings to meet your specific needs.
- Isolates your virtual cloud VPS instance from other instances on the same physical server, minimizing the risk of unauthorized access and data breaches.
VPS vs dedicated server: summary table
| Feature | Dedicated | VPS |
|---|---|---|
| Server isolation | One physical server dedicated to a single user | One physical server shared among several isolated and private virtualized servers, each serving a different user |
| Resource allocation | All the physical resources of the server (CPU, RAM, storage, bandwidth, GPU) of the server are dedicated to the website/application hosted. | The virtual servers share the resources of the physical server. Each virtual server has an isolated and dedicated portion of the physical resources of the server. |
| Performance | Higher performance due to dedicated resources and no sharing | Good performance — better than that of shared hosting |
| Scalability | Limited scalability; requires hardware upgrades for expansion | Easily scalable with flexible resource allocation |
| Cost | Expensive, higher upfront and ongoing costs | Cost-effective, affordable, and flexible pricing options |
| Management and control | Full control over the server and its resources | Administrative access with control over the virtual environment |
| Security | Enhanced security with physical isolation | Good security but can be impacted by neighboring VPS instances |
| Customization | Complete customization options for VPS hardware and software | Customizable but limited by the virtual environment |
| Technical expertise | Requires advanced technical knowledge for setup and management | Moderate technical knowledge required |
| Traffic handling | Can handle high traffic loads without performance degradation | Can handle moderate to high traffic, but performance may suffer |
| Use cases | Large resource-intensive ecommerce sites, enterprise applications | Small, medium, or large websites, web applications, and development/testing environments that do not have resource-heavy requirements |
Choosing between a dedicated server and a VPS ultimately boils down to your specific requirements and budget. If you are going to host resource-intensive applications and high-traffic websites, dedicated hosting could be the way to go. However, if you’re seeking a balance between performance and affordability, a VPS will be an ideal solution that’ll provide scalability and isolation to ensure high performance and security.
How to use a VPS: setup and management (step-by-step)
If you’re new to virtual private servers and want to set up and manage one for your needs, this step-by-step tutorial will walk you through how to use a VPS.
Step 1: Choose a VPS provider
The first step in setting up your VPS is to select a reliable VPS hosting provider. Look for a company that offers a good reputation, excellent customer support, and a range of plans to suit your requirements.
Oftentimes, Liquid Web and Microsoft Azure come up among the most popular VPS hosting providers. Let’s compare their key features:
| Liquid Web | Azure | |
|---|---|---|
| Fully managed VPS and self-managed options | ✅ | ❌ |
| Linux & Windows OS | ✅ | ✅ |
| Includes cPanel / WHM / Plesk | ✅ | ✅ |
| Full server stack support | ✅ | ✅ |
| Performance optimization | ✅ | ❌ |
| 24/7/365 support included | ✅ | ❌ |
| Service monitoring | ✅ | ✅ |
| Proactive monitoring | ✅ | ❌ |
| Power & Network Uptime Guarantee | 100% | 99.999% |
| SLA remedy | 1000% | Service credits |
| Migrations included | ✅ (most at no cost) | ❌ |
| Backups included | ✅ | Extra cost |
| Predictable billing | ✅ | Per second billing |
As you can see, Liquid Web dominates over Microsoft Azure, offering exceptional uptime, performance, security, and customizability, making it the top choice. Additionally, Liquid Web offers a secure infrastructure and compliant hosting options to help protect sensitive data and meet regulatory requirements so you can stay on top of your online business needs.
Besides, getting started with Liquid Web is extremely straightforward. All you have to do is check Liquid Web’s flexible pricing plans, pick the one that suits you best, and sign up for an account.
Step 2: Create a new virtual machine instance with the desired operating system and specifications
The two most popular operating system (OS) choices for VPS hosting are Linux and Windows. Linux or Linux-based operating systems (Ubuntu, AlmaLinux, Debian, etc.) are often preferred due to their open-source nature, lower cost, and versatility.
However, if you don’t want to go through the hassle of learning Linux commands, Windows can be a better option since it’s much more intuitive and easier to use.
Liquid Web supports both Linux and Windows, so you can choose the OS that best aligns with your needs.
Once you have settled on an OS, it’s time to create a virtual machine instance on your server. Here is an overview of the process:
1. Access your VPS using your host’s control panel.
2. Determine the virtualization technology you want to use for creating the VM instance. The most common options are hypervisor-based virtualization (ex: VMware, Xen, or KVM) and container-based virtualization (Docker and LXC/LXD). This will depend on your specific requirements and the options provided by your VPS provider.
3. Install the necessary virtualization software of your choice on your VPS. In this tutorial, we are going to be using VMware.
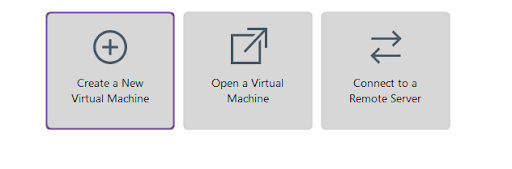
4. Launch the VMware workstation app on your desktop and click the Create a New Virtual Machine button.
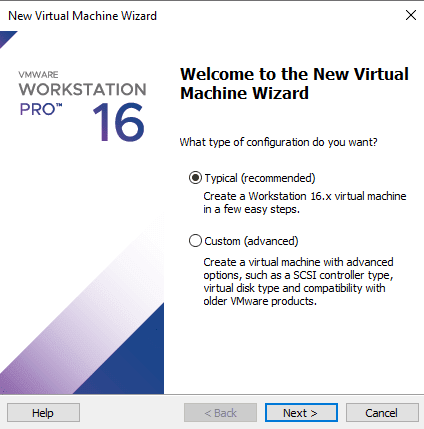
5. Select the Typical (recommended) configuration option and click on the Next button.
6. Select the Installer disc image file (iso), then click the Browse button.

7. Choose the disc image of the OS you want from your computer, whether it’s Linux or Windows.

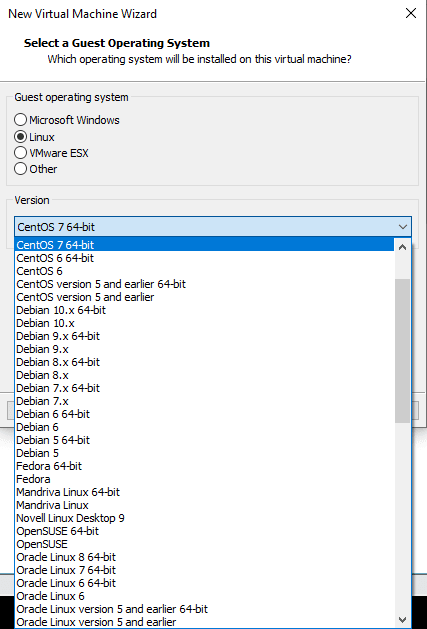
8. Choose the name of the operating system, then click Next. For this tutorial, we selected Linux as the Guest operating system and CentOS 7 64-bit as the version.
9. Name your VM and choose its location, then click Next. You can name your VM whatever you want.

10. Specify the disk space capacity for your virtual machine, then select whether you want to store your virtual disk as a single file or split into multiple files.

11. Review your VM’s information and click Finish if everything looks correct.

12. Once the VM instance is created, you have to deploy it by powering it on and setting up or installing your OS as you normally would on your own desktop computer.

Step 3: Connect to the VPS using SSH
Secure Shell (SSH) is a robust cryptographic network protocol that will allow you to securely connect to a remote machine or server over an unsecured network, like the internet, and perform various operations, including remote command execution, file transfers, and even tunneling other protocols. All data transmitted between the client and the server will be encrypted so that even if someone intercepts the communication, they won’t be able to decipher the content.
Before granting access to a remote system, SSH verifies the identity of the user or client connecting to it. This is typically done using public-key cryptography, where the client presents a public key, and the server verifies it against a stored private key. This public key authentication process adds an extra layer of security, ensuring that only authorized users can access the remote resources.
Let’s look at how you can generate an SSH key pair and connect to your VPS.
VPS setup for Windows users
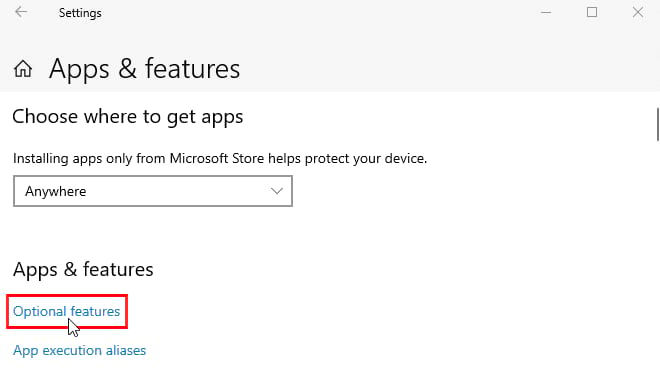
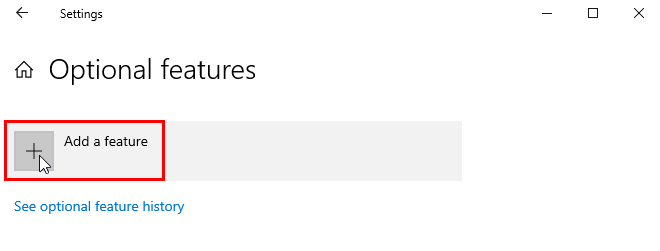
1. Launch the OpenSSH client. If you haven’t installed it already, you can do so by going to Settings > Apps > Optional features > Add a feature, then look for OpenSSH Client and install it.


2. Make sure you have Git installed, then open the Command Prompt or PowerShell.
3. Type the following command to generate a new SSH key pair:
ssh-keygen -t rsa -b 4096You can choose a different type and bit size if desired.
4. Press Enter and provide a location to save the key pair when prompted or leave it blank to use the default location.
5. Enter a passphrase. It is recommended to use a strong passphrase for added security. Note that the characters won’t be visible as you type.

Then, the SSH key pair will be generated and saved to the specified location. The public key will have a .pub extension.

6. Make sure you have the IP address of your VPS, which is typically provided by your hosting provider, then type the following command, replacing username with your VPS username and your_vps_ip with the IP address of your VPS:
ssh username@your_vps_ipVPS setup for Windows users: GUI
Alternatively, if you want to connect to your VPS using an application with a graphical user interface (GUI) instead of the Command Prompt, you can follow these instructions after generating your SSH key authentication using the above steps:
1. Download and install PuTTY
2. Launch PuTTY, go to the Session category, enter your VPS IP address in the Host Name (or IP address) field, and select the SSH option in the Connection type field.

3. Go to the Connection category, expand the SSH menu, and select Auth. In the Private key file for authentication field, click the Browse button to locate and load your SSH private key file, then click Open to initiate the SSH connection.

You will now be connected to your server.
VPS setup for Linus or macOS users
1. Open the terminal application. You don’t need to install SSH since it’s readily available.
2. Execute the following command to generate a new SSH key pair and change 4096 to the bit size you prefer:
ssh-keygen -t rsa -b 40963. Press Enter and provide a location to save the key pair when prompted. You can leave it blank to use the default location.
4. You’ll be asked to enter a passphrase. Similar to Windows, it is recommended to use a strong passphrase for enhanced security.

5. Make sure you have the IP address of your VPS, which is typically provided by your hosting provider, then type the following command, replacing username with your VPS username and your_vps_ip with the IP address of your VPS:
ssh username@your_vps_ipYou might need to specify your private key using the -i flag:
ssh -i /path/to/private_key username@your_vps_ipYou’ll now be successfully connected to your server.
Step 4: Update the package manager and install any necessary software packages
Once you have connected successfully to your VPS, it’s essential to update your package manager to ensure access to the latest software packages and security updates.
For a Windows VPS setup:
The package manager plays a pivotal role in managing software installations and updates on your Windows VPS. Before installing any new packages, it is essential to ensure that the package manager is up to date by executing the following command from the Command Prompt:
choco upgrade chocolateyDetermine the software packages you need for your specific requirements, then execute this command, changing package-name with the name of the software you want to install:
choco install package-nameThe package manager will then automatically download and install the requested software package along with any required dependencies. This may take some time, depending on the size of the packages and your internet connection speed.
For a Linux VPS setup:
Depending on the Linux distribution you are using, the commands may differ slightly. Here are the commands for some popular distributions:
For Ubuntu and Debian, use the following commands:
sudo apt update
sudo apt upgrade
These commands will fetch the latest package lists and upgrade any outdated packages on your system.
Now, you can proceed to install any required software packages for your specific needs. Use this command, replacing package_name with the name of the software you want to install:
sudo apt install package_nameWe’ll do the same for CentOS, but executing slightly different commands:
sudo yum updatesudo yum upgradesudo yum install package_nameStep 5: Secure your VPS by configuring a firewall
An effective way to bolster the security of your VPS is by configuring a firewall, which acts as a virtual barrier, filtering and regulating network traffic based on predetermined rules. By selectively allowing or denying incoming and outgoing connections, a firewall can effectively shield your VPS from malicious activities.
For a Windows VPS setup
Navigate to the Start menu and search for Windows Firewall with Advanced Security or open it from the control panel. Then, click on the Inbound Rules and Outbound Rules options from the left-hand panel. This will display the existing rules governing incoming and outgoing traffic. Review these rules meticulously to identify any potential vulnerabilities or misconfigurations. It is crucial to have a clear understanding of the existing rules before proceeding further.

Windows Firewall with Advanced Security offers a wide range of rule types that cater to different scenarios. For instance, you can create rules based on specific ports, programs, or even predefined services.
Let’s say you wish to allow inbound traffic on a specific port while blocking all others. To achieve this, click on Inbound Rules and select New Rule.

In the subsequent wizard, choose the Port option and specify the desired port number. You can opt for TCP or UDP protocols based on your needs. Select Block the connection to restrict access to other ports. Then, customize the rule by assigning a name and description that accurately reflect its purpose.
Similarly, you can create outbound rules to regulate the traffic leaving your VPS to exercise granular control over the network traffic originating from your VPS.
For a Linux VPS setup (using UFW)
Uncomplicated Firewall is a user-friendly command-line tool that simplifies firewall management on Linux systems. It provides an uncomplicated interface to create and manage firewall rules effortlessly.
To install UFW, enter the following command:
sudo apt update
sudo apt install ufw
By default, UFW denies all incoming connections and allows all outgoing connections. You can check the current settings by running this command:
sudo ufw status verboseSince SSH is typically the primary means of accessing a remote Linux server, it is crucial to enable SSH connections explicitly:
sudo ufw allow sshConsider the services your VPS requires, such as web hosting or database management, then allow access to these services through specific ports using this command:
sudo ufw allow <port>/<protocol>Replace <port> with the relevant port number, and <protocol> with either tcp or udp, depending on the service requirements.
Once you have defined the necessary rules, enable UFW by typing:
sudo ufw enableYour new firewall permissions will automatically be enabled once you reboot your server.
For a Linux VPS (using FirewallD)
Firewall Daemon (FirewallD) is a dynamic firewall management tool designed specifically for Linux operating systems. It provides a user-friendly interface to manage network traffic and offers a convenient way to configure and administer firewall rules.
Before diving into the configuration process, ensure that your VPS is running a Linux distribution that supports FirewallD. Common distributions such as CentOS, Fedora, and Red Hat Enterprise Linux often come pre-installed with FirewallD. However, if you are using a different distribution, you may need to install it manually.
FirewallD operates with the concept of zones, which define the level of trust assigned to a network connection. By default, FirewallD provides a set of predefined zones, such as public, trusted, home, work, and internal. Each zone has a specific set of rules that govern the traffic flow.
Before making any modifications, verify the default zone assigned to your VPS. The default zone dictates the rules applied to network connections that do not match any specific zone.
sudo firewall-cmd --get-default-zoneIf the default zone is not set to your desired level of security, you can change it using the following command:
sudo firewall-cmd --set-default-zone=<zone>Replace <zone> with the name of the desired zone, such as public, trusted, or internal. In some cases, you may need to modify the rules within a specific zone to suit your requirements.
FirewallD offers an array of options for managing zones, including adding or removing services, ports, and IP addresses. For example, to set up basic rules to allow incoming SSH connections and deny all other incoming traffic, use the following command:
sudo firewall-cmd --set-default-zone=drop
sudo firewall-cmd --zone=public --add-service=ssh --permanent
sudo firewall-cmd --reload
Once you have configured your zones and rules, activate FirewallD to enable it on your VPS by running the following:
sudo systemctl enable --now firewalldBy following these steps, you can effectively secure your Linux VPS using FirewallD. However, it is important to note that firewall configuration requires careful consideration of your specific needs and potential vulnerabilities.
Step 6: Test the VPS and configure any additional services or applications
By meticulously testing your VPS, you can identify any underlying issues, evaluate its overall performance, and ensure optimal functionality. This proactive approach enables you to address potential obstacles upfront, guaranteeing a stable and secure environment for your applications and services.
Here is an overview of how you can test your VPS:
1. Start by verifying that you can establish a secure connection through SSH to evaluate your network connectivity and general accessibility (check step 3).
2. Employ commands such as top, htop, or free on Linux
sudo top
sudo htop
sudo free
By running these commands, you will be able to gather real-time information about your system’s resources and gain valuable insights into its performance.
If you’re running a Windows VPS, you can use Task Manager or Resource Monitor, which have user interfaces and don’t require you to execute commands from your Command Prompt.
3. Test network connectivity by using commands like ping and traceroute, which work on both Windows and Linux, to verify that your VPS has a stable internet connection.
After you’ve tested your VPS and made sure that everything is operating smoothly, you can now configure additional services or applications to enhance your system’s functionality and cater to your specific needs. Of course, this step boils down to what you are specifically looking to get out of your VPS; nevertheless, here are a few examples so you can grasp the concept:
- Set up a web server
- Install a web server software such as Apache or Nginx. These tools will allow you to host websites and deliver content over the internet.
- Configure the server to listen on the desired port, typically port 80 for HTTP or port 443 for HTTPS, to ensure encrypted traffic (check step 5).
- Set up your website files in the appropriate directory on the server.
- Open the necessary ports in the firewall to allow incoming web traffic.
- Test the web server’s functionality by visiting your VPS IP address in a web browser.
- Set up a database server
- Install a database server like MySQL or PostgreSQL.
- Configure the server to listen on the desired port, usually port 3306 for MySQL or port 5432 for PostgreSQL.
- Set up your user accounts and create the necessary databases for your applications.
- Open the relevant ports in the firewall (check step 5).
- Test the database server’s connectivity using a client application like MySQL Workbench or pgAdmin.
- Set up a VPN server
- Install a VPN such as OpenVPN or WireGuard.
- Configure your server according to your desired settings, including network configuration, encryption protocols, and authentication methods.
- Generate client configuration files that will allow users to connect to the VPN server.
- Open the necessary ports in the firewall to allow VPN traffic (check step 5).
- Test your VPN’s functionality by connecting with a client application, such as OpenVPN Connect or a WireGuard client.
Don’t get overwhelmed, though! You don’t need all of the above tools. Configuring extra services on your VPS entirely depends on your specific use cases or security needs.
You might also want to keep in mind that managing a VPS involves several ongoing tasks to ensure optimal performance, security, and reliability. These tasks include monitoring resource usage and performance, updating software and applying security patches, regular data backups, and troubleshooting and resolving any issues that may arise.
VPS management requires considerable knowledge and expertise. If you’re new to VPS management or prefer to focus on other core tasks, it’s highly recommended to find a reliable VPS provider that meets your needs.
A reputable provider, such as Liquid Web, can offer the technical expertise, infrastructure, and support necessary to ensure the smooth operation of your VPS. By implementing best practices and considering expert knowledge, you can optimize your VPS experience and ensure a reliable and secure environment for your applications or websites.
Comparing VPS hosting plans
There are several crucial factors to consider when selecting your VPS hosting plan. Let’s take a look at these factors to enable you to make an informed decision that aligns with your needs and budget:
- Pricing – Don’t only take into account the initial costs but also the long-term expenses. Some providers may offer attractive introductory rates, but they could significantly increase upon renewal. Therefore, carefully examine the pricing structure and ascertain its sustainability in the long run.
- Resource allocation – This includes CPU, RAM, storage, and bandwidth. It’s vital to ensure that the resources provided in the hosting plan are sufficient to meet your requirements. Consider the potential need for scaling up in the future as your digital project grows. Opting for a plan that allows easy resource upgrades without significant disruptions can save you from hassles down the line.
- Operating system options – VPS hosting plans commonly offer Windows and Linux options. Windows tends to come with a higher cost due to licensing fees, while Linux is generally more cost-effective and offers extensive compatibility with various software packages. Assess your specific needs and consider the cost and compatibility aspects when deciding on an operating system.
- Virtualization software – Virtualization tools play a vital role in the performance and stability of your VPS. Common virtualization platforms include KVM, OpenVZ, and VMware, each having its own merits and may offer varying levels of performance, stability, and compatibility. Research and gather insights into the virtualization software used by different providers to ensure it aligns with your requirements.
- Scalability and server upgrade options – Ideally, your chosen hosting plan should allow you to add or remove resources without major disruptions to your service. Flexibility in scaling up or down as your needs evolve ensures a smoother transition and minimizes potential downtime.
- Customer support and Service Level Agreements (SLAs) – Prompt and reliable customer support can save you from hours of frustration and potential revenue loss. You should also evaluate response times, uptime guarantees, and compensation policies for any potential downtime. Hosting providers with strong SLAs and proactive support tend to offer a more dependable service.
The goal here is to find the right balance between cost, performance, and scalability. Don’t just go for the cheapest choice and sacrifice the performance or scalability of your VPS, which may lead to setbacks in the long run.
Carefully evaluate the factors listed here and consider your unique requirements so you can make a well-informed decision that ensures the optimal performance and growth of your online presence.
Why choose Liquid Web for your VPS needs?
Offering an unwavering commitment to customer satisfaction and cutting-edge infrastructure, Liquid Web stands out as a trusted provider for businesses of all sizes, delivering reliability, performance, security, and support.
Whether you’re launching a website, running a demanding application, or managing an eCommerce store, Liquid Web’s VPS solutions offer the stability and performance you need to thrive in the digital realm by providing:
- Exceptional uptime and performance – Liquid Web guarantees 100% power and network uptime, providing a solid foundation for businesses that cannot afford downtime or sluggish performance. By addressing these pain points head-on, Liquid Web’s powerful infrastructure and cutting-edge technologies outshine other industry giants, enabling businesses to provide an outstanding user experience.
- Secure infrastructure and compliant hosting options – Liquid Web understands that businesses cannot afford to compromise on security, offering a secure infrastructure that prioritizes the protection of valuable data. Liquid Web’s compliant hosting options adhere to industry standards, ensuring that sensitive information remains safeguarded so you can gain peace of mind, knowing that your online assets are shielded from potential risks.
- Customizable and scalable hosting solutions – Liquid Web recognizes that every business has unique requirements, so it offers customizable and scalable hosting solutions that you can tailor precisely to your needs. Whether it’s adjusting server resources or installing specific software, Liquid Web provides the flexibility necessary to optimize performance, which will empower you to scale effortlessly as your online presence expands, without worrying about outgrowing your hosting infrastructure.
- Personalized approach for SMBs – If you’re a small or medium-sized business (SMB) that often faces distinct challenges in managing your online presence due to limited technical resources, Liquid Web can effectively leverage VPS hosting to drive your growth and success.
- Exceptional customer support – When you choose Liquid Web, you gain access to a dedicated team of experts available 24/7/365, ready to assist with any technical or hosting-related inquiries. Whether it’s troubleshooting, performance optimization, or guidance on scaling, Liquid Web’s stellar support ensures customer satisfaction.
- Hassle-free migration – For businesses seeking new hosting providers, Liquid Web takes care of the server migration, ensuring a seamless transition with minimal disruption. This attention to detail allows businesses to focus on their core operations while entrusting their hosting needs to Liquid Web’s expertise.
As far as migrations go, this was the best I’ve ever been a part of. The success of our work towards ending hunger and improving the environment requires a hosting service that is up to the task, and we found it with Liquid Web.”
– Gary Oppenheimer, founder of AmpleHarvest
By addressing pain points and meeting the needs of SMBs, Liquid Web empowers businesses to thrive in the digital landscape.
Get started with Liquid Web’s VPS solutions today
A VPS offers a range of benefits such as increased performance, enhanced security, and greater control over your hosting environment. However, it’s essential to emphasize the importance of getting your VPS setup and management right to ensure smooth and successful operation. Opting for a reputable and reliable hosting provider, such as Liquid Web, can greatly assist in this process.
Liquid Web is a trusted and highly recommended VPS hosting provider, offering industry-leading infrastructure, expert support, and cutting-edge technologies. Liquid Web’s VPS hosting and managed VPS strike the perfect balance between cost and functionality, providing the stability, security, and performance necessary for you to thrive online.
Related Resources
Managed VPS vs Unmanaged VPS: What’s the Difference?
Caching Options for Optimizing Your VPS
5 Simple VPS Management Tools You Need
Why VMware performance monitoring is a must for your enterprise
Top 10 bare metal cloud hosting providers in 2024
Comparing hosts and servers: Key differences explained