All about DNS_PROBE_FINISHED_NXDOMAIN: Fixes and insights
Stumbling upon a DNS_PROBE_FINISHED_NXDOMAIN error while accessing a website can be a frustrating experience, right? It's a common issue that many internet users encounter, and it can seriously hinder your ability to visit websites or conduct online business.
The DNS_PROBE_FINISHED_NXDOMAIN error creates a barrier between your visitors and your website. It's not just a minor inconvenience. For businesses, this could mean a significant loss in traffic, potential customers, and revenue.
This guide is here to help you navigate this technical obstacle. By the end of this article, you’ll have explored the causes of the DNS_PROBE_FINISHED_NXDOMAIN error, a step-by-step tutorial to resolve it, and insights on preventing it from recurring.
Prepare to equip yourself with the knowledge you need to navigate the complexities of the DNS_PROBE_FINISHED_NXDOMAIN error, understand its implications, and explore effective fixes to regain uninterrupted browsing!
Understanding the DNS_PROBE_FINISHED_NXDOMAIN error
DNS_PROBE_FINISHED_NXDOMAIN is an error that appears on web browsers, indicating a problem with the domain name system (DNS). DNS serves as a bridge between human-readable domain names (for example, www.example.com) and their corresponding IP addresses.
When you enter a URL into your browser, the DNS system translates it into an IP address, allowing your device to locate the website's server and retrieve the content.
So, when the DNS cannot find the IP address associated with the given domain name, it returns the NXDOMAIN response, indicating that the domain does not exist. As a result, your browser displays the DNS_PROBE_FINISHED_NXDOMAIN error, preventing access to the website.
This error can be a source of frustration for users, especially when trying to access essential services or information. For online businesses, this error can lead to lost sales, missed opportunities, and damage to their reputation.
Understanding this issue and how it affects your browsing experience is the first step in resolving it.
Root causes and common triggers
DNS_PROBE_FINISHED_NXDOMAIN can occur due to a variety of factors, including:
- Incorrect URL — Typing the wrong URL or a misspelled domain name can lead to this error. Double-check the URL to ensure accuracy.
- DNS server issues —The DNS server configured on the network might be experiencing problems or undergoing maintenance, leading to the DNS_PROBE_FINISHED_NXDOMAIN error.
- Browser cache or cookies —Outdated or corrupted DNS cache and data on your device can cause conflicts, resulting in this error message.
- Router configuration problems —Incorrect settings on your router can interfere with DNS resolution.
- VPN or antivirus software —In some cases, overprotective firewall, antivirus, or VPN settings can mistakenly identify a legitimate website as malicious, blocking access and displaying the error.
By addressing the underlying issue, you can restore access to the website, ensure smoother browsing in the future, and fix DNS_PROBE_FINISHED_NXDOMAIN errors.
How to identify DNS_PROBE_FINISHED_NXDOMAIN errors
Recognizing the DNS_PROBE_FINISHED_NXDOMAIN error is relatively straightforward. Here are some signs that you may be dealing with this issue:
- Website accessibility —If you cannot access a specific website, but other websites load without issue, this error could be the culprit. This suggests that the problem lies with the DNS resolution for that particular domain.
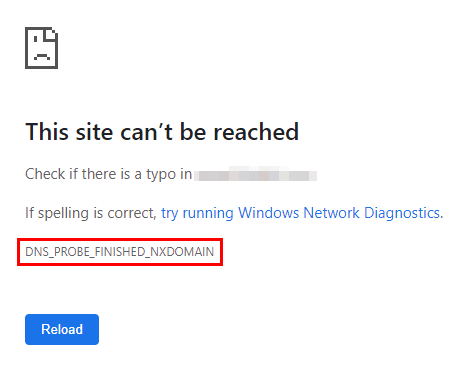
- Error message — The browser will typically display an error message, but it can vary slightly depending on your browser. For instance, Chrome users will see "This site can’t be reached" followed by "dns_probe_finished_nxdomain."
| Alt text: DNS_PROBE_FINISHED_NXDOMAIN error in Chrome. |
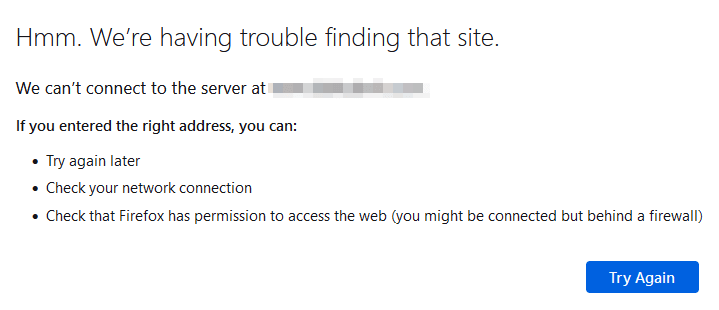
Firefox users will see "Hmm. We’re having trouble finding that site." followed by "We can’t connect to the server at [website]."
- DNS settings review —If you've checked your DNS settings and found no apparent issues, yet you're still unable to access certain websites, this error might be the cause.
- Network diagnostic tools —Using network diagnostic tools, like the network troubleshooter available on your operating system, can help confirm if you're dealing with this error. If there's a problem with the DNS, the tool will highlight it.
Step-by-step solutions to fix the error
Don't worry – there are several steps you can take to resolve the DNS_PROBE_FINISHED_NXDOMAIN problem. The following solutions are listed from easiest to most complex, so it's best to follow them in order:
1. Restart your computer and router
A simple restart of the computer and router can often resolve the error. This process resets your network hardware and can often clear up any temporary issues affecting your DNS resolution.
2. Clear browser cache and cookies
Browser cache and cookies can sometimes cause conflicts with DNS resolution. Clearing them can help resolve the DNS_PROBE_FINISHED_NXDOMAIN error.
Here's how to do it from a Chrome browser:
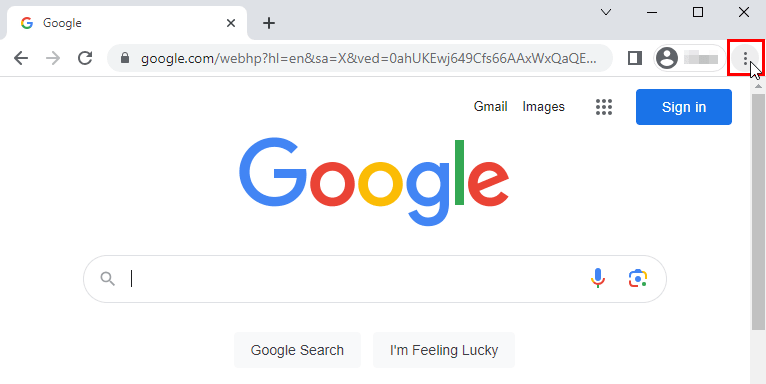
- Click on the three dots in the top right corner of your browser.
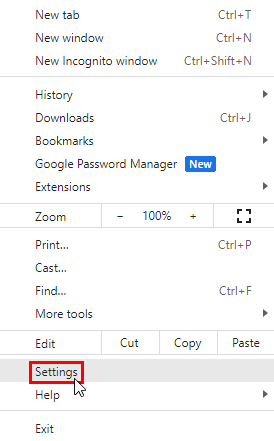
- Click on Settings.
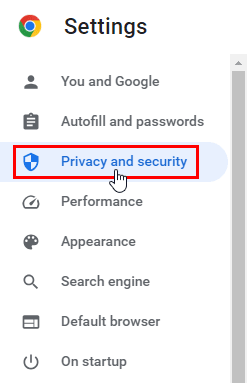
- On the left, click on Privacy and security.
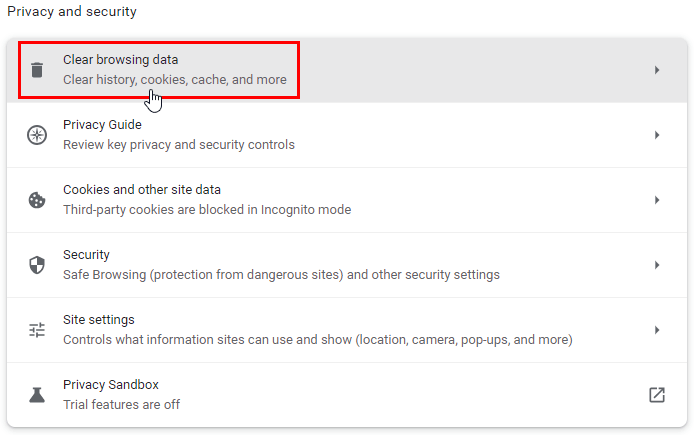
- Click on Clear browsing data.
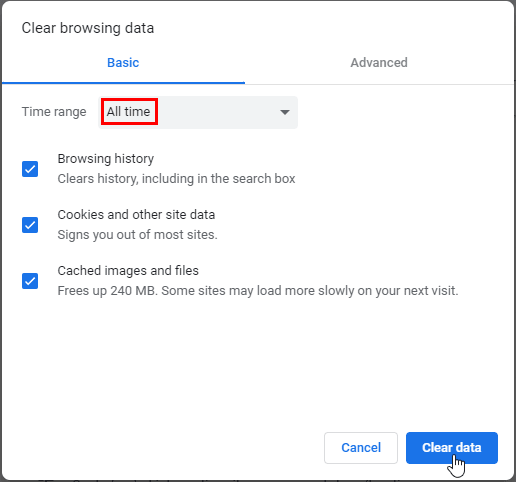
- Check all three boxes to clear the browsing history, cookies and other site data, and cached images and files, then click the Clear data button. Make sure to change the time range to All time.
The steps to clear cache and cookies on other browsers, like Firefox and Safari, are very similar.
3. Check and change your DNS settings
Correct DNS settings are essential for proper domain name resolution. Here's how to check and update your DNS settings on Windows, macOS, and Linux:
Windows
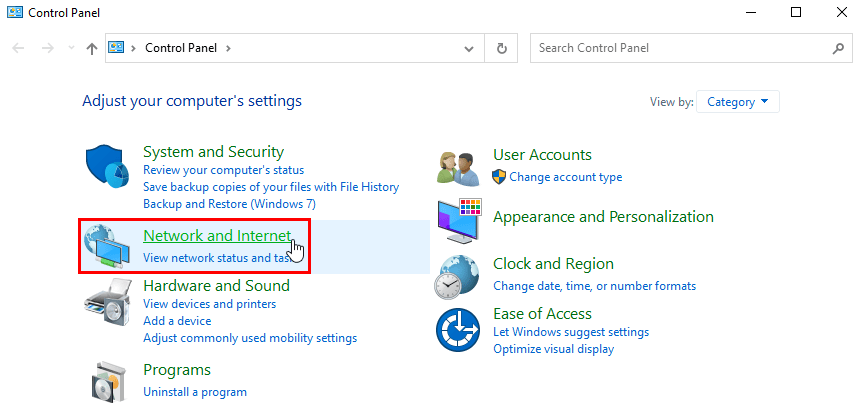
- Open the Control Panel.
- Click on Network and Internet.
- Click on Network and Sharing Center.
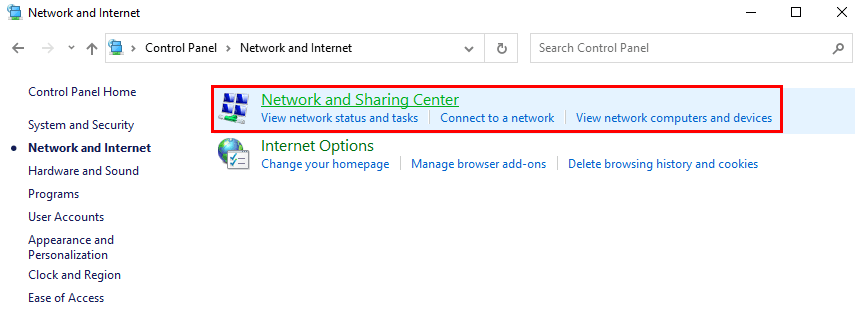
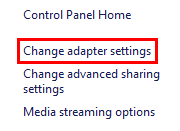
- On the left pane, click on Change adapter settings.
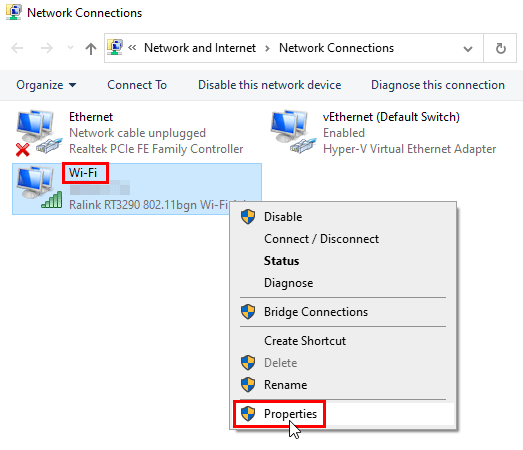
- Right-click the network interface connected to the Internet (Wi-Fi or Ethernet), and select Properties.
- Select Internet Protocol Version 4 (TCP/IPv4) and Internet Protocol Version 6 (TCP/IPv6) and then click on Properties. Check that both Obtain an IP address automatically and Obtain DNS server address automatically options are selected.
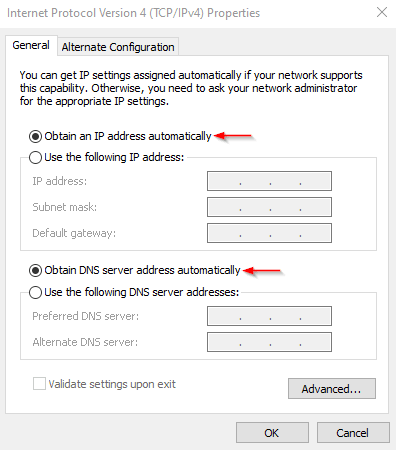
- Alternatively, you can select the Use the following DNS server addresses option and enter the address of the DNS server you'd like to use, then click "OK.”
macOS
- Open System Preferences.
- Click on Network.
- Select your network connection from the left panel (Wi-Fi or Ethernet).
- Click on the Advanced button.
- Go to the DNS tab, where the DNS servers will be listed in the DNS servers box.
- To add a new DNS server, click on the + button and add the IP address of the DNS server you want to use.
- To remove a DNS server, select the IP address you want to remove and then click -.
Linux
- Open the terminal.
- Display the contents of the resolv.conf file, which is a configuration file used by the DNS resolver in Linux-based systems, by running the following command:
cat /etc/path_to_resolv.conf_file- Edit the resolv.conf file with a text editor to add the DNS server addresses you want to use. For example, you can execute the following to open the resolv.conf file with the nano text editor:
sudo nano /etc/path_to_resolv.conf_file- Look for the line that starts with #DNS= and remove the # symbol at the beginning if it's there.
- Add your DNS server addresses separated by a space. There are three approaches to this step (change 8.8.8.8 and 8.8.4.4 to the DNS server addresses you want to use:
- For newer versions (using systemd-resolved):
DNS=8.8.8.8 8.8.4.4- If you're running an older Linux version, add a line for each DNS server you want to use using the nameserver directive. For example:
nameserver 8.8.8.8 - For recent versions of CentOS and Fedora, NetworkManager might be managing the DNS configuration. In that case, you should use NetworkManager's configuration instead of directly modifying /etc/resolv.conf. You can use the nmcli command-line tool to manage NetworkManager settings:
sudo nmcli connection modify <connection-name> ipv4.dns "8.8.8.8 8.8.4.4"
sudo nmcli connection up <connection-name>
Replace <connection-name> with the name of your active network connection (either Ethernet or Wi-Fi).
4. Disable VPN or antivirus temporarily
If you're using a VPN or have active antivirus software, you may want to temporarily disable them to see if they're causing the DNS_PROBE_FINISHED_NXDOMAIN error. The process may vary depending on your operating system (OS), but the general steps are:
To disable your VPN:
- Click or right-click the VPN service icon in your system tray (bottom-right or top-right).
- Most VPN services have a disconnect or stop option in the right-click context menu. If this isn't the case, you may need to access the settings within the VPN application itself.
- Click on the option to disconnect or stop the VPN service.
To disable your antivirus software:
- Find the antivirus icon in your system tray.
- Right-click the antivirus icon.
- In the context menu, look for options like disable, quit, stop, or something similar. If these options aren't available, you may need to open the antivirus software dashboard to disable it.
5. Check your hosts file
The hosts file plays a key role in DNS resolution. If this file is misconfigured, it can cause the DNS_PROBE_FINISHED_NXDOMAIN error. To check the local hosts file and rule out any issues related to it, follow these steps:
- Open the "hosts" file on your computer:
- For Windows, the file is located at C:\Windows\System32\drivers\etc\hosts. You'll need administrative privileges to modify this file.
- For macOS and Linux, the file is located at /etc/hosts. You'll need root privileges to modify it.
- Look for any entries related to the domain you are trying to access. If you find an entry that maps the domain name to an IP address, it could be causing the issue. You can remove or comment out (by adding a # before the entry) the line to revert to a DNS-based resolution for that domain.
- Save the changes (if any) to the hosts file.
6. Reset your network configuration
Resetting the network configuration can often help resolve the DNS_PROBE_FINISHED_NXDOMAIN error by clearing any incorrect settings. Here's how to reset your network configuration on Windows, macOS, and Linux:
Windows
- Run the Command Prompt as an administrator.
- Type the following commands one after the other and press Enter after each one:
netsh winsock resetnetsh int ip resetipconfig /releaseipconfig /renewipconfig /flushdns- Close the Command Prompt and restart your computer.
macOS
- Click on the Apple menu and go to System Preferences.
- Click on Network.
- Choose your active network connection (like Wi-Fi or Ethernet) from the list and click the Advanced button.
- Click on the TCP/IP tab.
- Select the Renew DHCP Lease button.
- Click on the DNS tab.
- Select the + sign to add a DNS and type in 8.8.8.8 and 8.8.4.4 (Google's DNS).
- Click on OK and then Apply to save your changes.
Linux (Ubuntu)
- Open the terminal.
- Type the following commands one after the other and press Enter after each one:
sudo systemctl stop NetworkManagersudo systemctl stop systemd-networkdsudo systemctl stop systemd-resolved
sudo systemctl disable NetworkManagersudo systemctl disable systemd-networkdsudo systemctl disable systemd-resolved
sudo apt-get install --reinstall network-manager network-manager-gnomesudo apt-get purge nplan netplan.io
sudo rm -f /etc/netplan/*.yamlsudo rm -f /etc/netplan/*.ymlsudo ln -s /run/systemd/resolve/resolv.conf /etc/resolv.conf
sudo systemctl enable NetworkManagersudo systemctl start NetworkManager
sudo dhclient- Flush DNS (like on Windows) by installing nscd (Name Service Cache Daemon):
sudo apt-get install nscd
sudo /etc/init.d/nscd restart
Incorrect network settings can lead to a loss of internet connectivity. If you're unsure about any of these steps, it's recommended to consult with someone experienced with network settings, like Liquid Web’s team of experts. Otherwise, proceed with caution and at your own risk.
Choosing the right hosting provider
Selecting a reliable and high-performance VPS hosting provider is crucial in preventing issues like DNS_PROBE_FINISHED_NXDOMAIN. A good hosting provider ensures your website is available and performs well and handles complex server-side configurations, including DNS management.
When choosing a VPS hosting provider, consider the following key features:
- High uptime and performance —The hosting provider should guarantee high uptime, ensuring your website is always accessible.
- Security and compliance — Your hosting provider should adhere to the highest security standards and comply with relevant regulations to protect your data.
- Customizable hosting plans — The ability to customize your hosting plan allows you to choose the resources that best fit your needs.
- Expert support — A good hosting provider offers expert support to quickly resolve any issues, including DNS-related errors.
That’s where Liquid Web comes into play!
Key features and benefits of Liquid Web
Liquid Web is a top-tier hosting provider that stands out for offering high-performance hosting solutions. Liquid Web's VPS hosting services come with several features that are particularly beneficial for preventing and resolving DNS errors:
- Managed hosting services —Liquid Web’s managed hosting services remove the hassle of managing your own server. Liquid Web will take care of everything and handle server-side complexities, including DNS management, to reduce the risk of DNS errors.
- Wide range of hosting options — With a variety of hosting options like VPS, dedicated servers, and cloud dedicated servers, Liquid Web ensures solid DNS handling.
- Excellent support —Liquid Web's expert support team can quickly resolve any DNS-related issues that might lead to a DNS_PROBE_FINISHED_NXDOMAIN error.
- Variety of operating systems — Liquid Web offers a variety of operating systems for VPS hosting, dedicated servers, and cloud dedicated products, catering to your DNS management preferences and expertise level.
- 99.999% uptime — Liquid Web's promise of near-perfect uptime speaks to the reliability of the infrastructure. Reliable servers reduce the chances of DNS errors due to server downtime.
- Custom solutions —For more complex needs, Liquid Web works with you to build the ideal solution. This could involve advanced DNS configurations, minimizing the chance of errors.
- Server management —Liquid Web can manage all aspects of your server, including DNS settings, reducing the likelihood of human error leading to a DNS_PROBE_FINISHED_NXDOMAIN issue.
- 1-click scaling — Several of Liquid Web's products offer 1-click scaling, which can be helpful in maintaining site availability as traffic increases. A sudden increase in traffic could potentially lead to DNS-related issues if not managed properly.
By choosing Liquid Web, you can guarantee a smooth, high-performing online presence and avoid frustrating DNS errors.
Get started with Liquid Web's VPS hosting solutions
The DNS_PROBE_FINISHED_NXDOMAIN error can be a vexing problem for your website visitors, hindering their ability to access your online business. It occurs when a DNS lookup fails to find a valid IP address for the domain being accessed.
The role of a dependable hosting provider cannot be understated in addressing and preventing DNS-related issues. A reliable hosting provider will be equipped with a robust DNS infrastructure that comprises multiple redundant servers strategically distributed across various geographical locations.
This setup will minimize the chances of DNS failures and ensure that users can seamlessly access websites without encountering DNS_PROBE_FINISHED_NXDOMAIN or similar errors.
That’s where Liquid Web, a leading player in the web hosting industry, stands out!
Liquid Web is a dependable ally for website owners or developers grappling with the DNS_PROBE_FINISHED_NXDOMAIN error. With a robust DNS infrastructure, user-friendly DNS management interface, and round-the-clock expert support, Liquid Web empowers users to overcome DNS-related challenges effortlessly.
Even better, through its commitment to managed hosting, diverse hosting options, additional specialized services, and exceptional customer support, Liquid Web has garnered a loyal customer base and continues to be a top choice for businesses seeking reliable and high-performance web hosting solutions.
So, whether you're a growing startup or an established enterprise, Liquid Web has the expertise and resources to power your online presence effectively. Don't miss out on this opportunity to enhance your online presence and ensure your website's success. Explore Liquid Web’s VPS hosting plans and sign up now!
Related Resources
Keep up to date with the latest Hosting news.


