◦ Comprehensive security
◦ 24/7 support
VPS → Security Tips
20 VPS security tips to protect your data
Every second, new cyber threats emerge, targeting vulnerabilities in servers, websites, and online data infrastructures. It’s a serious risk to data privacy, customer trust, and operational continuity.
Cyberattacks happen every 39 seconds, and over 50% of small businesses have experienced a breach. That’s why securing your Virtual Private Server (VPS) has never been more crucial.
VPS security involves setting up protective layers around your server, making it harder for attackers to infiltrate or cause harm. From preventing unauthorized access to defending against malicious attacks, ensuring your VPS is secure is a proactive way to keep sensitive information safe, maintain website availability, and boost customer trust.
This guide breaks down 20 essential tips to secure your VPS, giving you practical, expert insights to build a resilient, secure server environment!
Get premium VPS hosting
High-performance VPS hosting that delivers unrivaled power, the fastest speeds available, and 24/7 expert support
Common VPS security vulnerabilities
Cyber attackers often exploit predictable patterns and weaknesses, so knowing where your VPS might be at risk can help you stay one step ahead.
Weak authentication and passwords
One of the most common entry points to your VPS is through weak or reused passwords. Brute force attacks, where hackers systematically guess login credentials, are surprisingly effective when authentication methods aren’t secure.
Outdated software and systems
Cybercriminals are quick to exploit unpatched vulnerabilities in outdated software or operating systems, especially if they’re no longer supported by the vendor.
Misconfigured firewalls and open ports
Firewalls serve as the first line of defense, blocking unwanted access to your server. However, poorly configured firewalls and open ports can create direct pathways into your system, leaving it susceptible to a variety of cyber threats, such as Distributed Denial of Service (DDoS) attacks.
Unrestricted root access
Root access grants unrestricted control over the server, which is beneficial for management but risky if compromised. Allowing unrestricted root access makes it easier for attackers to escalate privileges and gain complete control of the system.
Insufficient user permissions
Managing who has access to what on your VPS is critical. Users often have more permissions than necessary, giving attackers an easier path if they manage to compromise one account.
Inadequate logging and monitoring
Without proper server logs and monitoring, it’s challenging to detect suspicious activity early. Attackers often start small, probing for weaknesses before launching a full-blown attack.
Lack of encryption for data in transit and at rest
Unencrypted data is low-hanging fruit for cybercriminals. Whether it’s data in transit (like login credentials) or stored data, unencrypted information can be intercepted or stolen.
Malicious software and malware
Vulnerable servers are prone to malware infections, which can steal data, alter server functions, or even completely disable services. Without antivirus or malware scanning tools, a VPS can quickly become compromised and used as a launching point for further attacks.

20 essential tips for VPS security
Think of VPS security as your server’s guard, constantly working to prevent and detect threats before they can compromise your data. For any organization using a VPS, security is a critical component to maintaining trust, compliance, and operational stability.
1. Configure an internal firewall
Setting up an internal firewall is one of the first steps to controlling what traffic can reach your server. Using tools like iptables, you can create custom rules to block or allow specific IP addresses, ports, and protocols.

Basic rules to implement include blocking access to unused ports and restricting SSH access to trusted IP addresses only. An internal firewall provides that additional layer of security by filtering out unwanted traffic before it even reaches your server applications.
2. Configure a UFW firewall
If iptables sounds a bit complex, Uncomplicated Firewall (UFW) is a more user-friendly alternative, especially for those new to Linux environments. UFW allows you to set firewall rules with simpler commands and is particularly beneficial for managing basic server security settings.
The first step is to enable UFW using the following command:
$ sudo ufw enable
The process includes defining rules for SSH, HTTP, and HTTPS traffic, limiting the open ports that are accessible. Choosing UFW for its simplicity or iptables for granular control will depend on your comfort level, but both will strengthen your VPS security.
3. Update your systems and applications
Outdated software is a major vulnerability, as it can leave your VPS exposed to known exploits. Regularly updating your operating system, applications, and installed services is crucial for maintaining security.
Warning!
Enabling automatic core updates in WordPress requires editing the wp-config.php file. Before making any changes to the wp-config.php file, be sure to take a full backup of your site and database.
Learn more: Enabling Automatic Updates in WordPress →
Set up automated updates where possible or develop a patch management strategy to ensure everything stays current. Timely updates not only close security gaps but also enhance your VPS’s performance and reliability, making it a win-win for both security and functionality.
4. Switch to SSH keys
SSH keys offer a stronger authentication method than traditional passwords. They’re based on a cryptographic key pair, making it nearly impossible for hackers to gain access without the correct key.
Setting up SSH key authentication requires generating a public and private key pair on your local machine, then placing the public key on your server. It’s essential to protect your private key and consider adding a passphrase for an additional layer of security.
Note:
If you ever need to change your passphrase, you can do it at any time with the following command:
ssh-keygen -p -f ~/.ssh/host.example.com
5. Use SFTP instead of FTP
Traditional FTP (File Transfer Protocol) transmits data in plain text, making it susceptible to interception. SFTP (Secure File Transfer Protocol), on the other hand, encrypts all data transfers, ensuring sensitive information remains private during transmission.
Switching to SFTP is straightforward and can be configured easily if you already use SSH, as it uses the same secure connection.
6. Install and setup Fail2ban
Fail2ban is a powerful tool that automatically detects and bans IP addresses with suspicious activity, such as repeated login attempts. Start by checking the Firewalld service status using the following command:
sudo systemctl status firewalld
Configuring Fail2ban lets you set rules to monitor log files and automatically block IPs showing malicious behavior. This tool can be tailored to monitor SSH, FTP, and other services, providing an essential layer of automated security for your VPS.
7. Review user rights and permissions
Only give users the permissions they need to perform their tasks—no more, no less. Regularly reviewing user rights ensures that old or unneeded accounts don’t have access to sensitive parts of your server.
Implement access control best practices, such as the principle of least privilege, to limit the potential damage from any compromised account. Routine permission audits make your server more secure and help you stay aware of any unusual activity.
8. Use strong passwords or passkeys
Passwords are often the first line of defense, so it’s essential to use complex and unique ones. Avoid common words or predictable patterns, and consider using a mix of uppercase letters, lowercase letters, numbers, and special characters.
Even better, using passkeys—a long sequence of random characters—or a password manager can offer even greater security. With passkeys, you minimize the chance of brute force or guessing attacks, especially for critical services like SSH access.
9. Migrate to a secure VPS hosting provider
The right hosting provider makes a significant difference in VPS security. When choosing a provider, look for key security features such as:
DDoS protection: DDoS protection is vital for defending against high-volume attacks by monitoring traffic and filtering out malicious requests before they reach your server. This protection ensures your site stays up and running even during high-volume attack attempts, maintaining uptime and minimizing potential disruptions for your users.
Expert support: Expert support ensures quick responses to potential issues. In the world of VPS hosting, having access to knowledgeable support when you need it is invaluable.
Reliable uptime: Downtime can be detrimental to businesses, impacting both reputation and revenue. Look for uptime guarantees of 99.9% or better, to reinforce your business continuity and operational stability.
A secure VPS host serves as your partner in protecting your data, so choose wisely and look for providers with proven security measures.

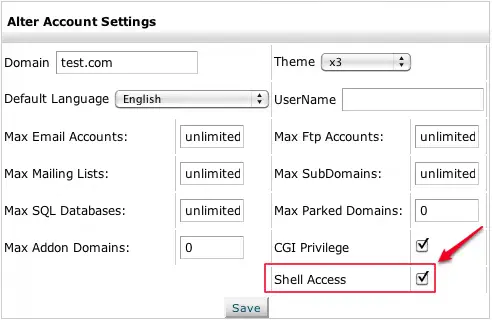
10. Disable root logins
Root logins offer unrestricted access to your VPS, which makes them high-value targets for attackers. Disabling root access and creating a new user account with sudo privileges instead, reduces the risk of unauthorized control.
Requiring users to switch to sudo for elevated commands, lets you better track actions and prevent accidental misconfigurations. This minor change makes it much harder for attackers to achieve full access if they breach your system.
11. Monitor server logs
Server logs are like a window into your VPS’s activity, helping you detect potential security issues before they escalate. Regularly monitoring logs lets you catch unusual patterns, such as repeated failed login attempts or unexpected access requests.
Important logs to track include SSH, authentication, and application logs, as these often contain clues about unauthorized activity. Setting up alerts for critical events can help you respond quickly if a potential breach is detected, ensuring you’re always in the loop about what’s happening on your server.
12. Change the default SSH port
By default, SSH (Secure Shell) runs on port 22, a well-known target for automated attacks. Changing your SSH port to a less common number is a simple but effective way to avoid these brute force attempts.
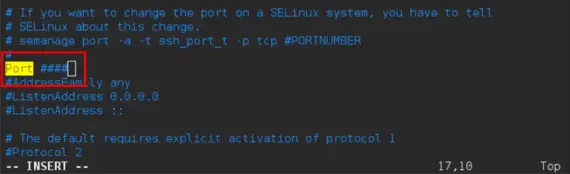
For instance, setting your SSH port to something non-standard, like 2200 or 2222, significantly reduces the risk of automated scanning attacks. Just remember to update your firewall rules to allow traffic on this new port!
Note:
Make sure you don’t pick a port number that another service uses! Check Wikipedia’s list of port numbers, and use a port number that isn’t listed.
13. Install an antivirus
While many people assume antivirus protection is only necessary for personal computers, it’s equally vital for VPS environments. An antivirus program scans for malicious files and identifies potential threats, helping prevent infections that could compromise data or allow attackers to gain control.
There are several antivirus solutions available for VPS, including ClamAV, which is open-source. Once installed, schedule regular scans and keep the software updated for maximum protection.
Warning!
Note that an antivirus program will have its own system requirements, so you need to make sure that your VPS can accommodate it. ClamAV, for example, requires a minimum of 3 GB of RAM and 1 CPU at 2.0+ Ghz.
Learn more: How to Install ClamAV →
14. Use a malware scanner
Beyond antivirus software, a malware scanner offers specialized detection for more subtle threats, such as hidden scripts and backdoors that can evade traditional antivirus programs. Popular tools include Maldet, Rkhunter, and Imunify360 for Linux servers.
Regular scanning helps ensure that no unwanted software is running on your server and alerts you to potential risks that might go unnoticed otherwise. Schedule scans on a weekly or monthly basis to maintain ongoing vigilance against malware threats.

15. Set up a VPN
A Virtual Private Network (VPN) creates a secure, encrypted tunnel between your device and your VPS, protecting your data as it travels over potentially insecure networks. It is particularly useful if you’re accessing your VPS from public or untrusted networks, as it ensures that data cannot be intercepted.
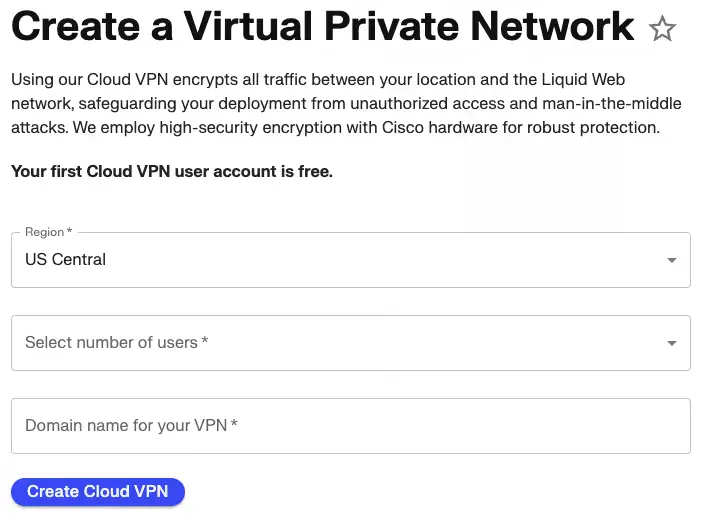
Setting up a VPN connection on your VPS adds an extra layer of security, shielding data from prying eyes and keeping your information safe during transit.
16. Backup regularly
No security plan is complete without a reliable backup strategy. Regular backups protect your data against loss from hardware failures, cyberattacks, or accidental deletions.
Consider implementing automated backups that run on a daily or weekly schedule, depending on the frequency of changes to your data. Make sure your backups are stored securely, either on a separate server or with a secure cloud backup service, and test your recovery process periodically to ensure everything works as expected in case of an emergency.
17. Install SSL certificates
SSL (Secure Socket Layer) certificates encrypt the data transmitted between your server and the client’s browser, adding a critical layer of security. SSL protects sensitive information, such as login credentials and payment details, from being intercepted by malicious actors.

Most VPS hosting providers offer SSL certificates, and services like Let’s Encrypt provide them for free. After installation, ensure that all connections to your server redirect to HTTPS, providing secure browsing for your users.
18. Disable IPv6
IPv6, the newer version of the Internet Protocol, is not always necessary for VPS configurations and can open additional doors for cyberattacks if not configured correctly. Disabling IPv6 reduces the potential attack surface of your server, especially if your network doesn’t rely on IPv6.
Many VPS hosting platforms allow you to easily disable IPv6 within their control panel, adding a layer of simplification and security to your server environment.
19. Require two-factor authentication (2FA)
Adding 2FA to your VPS login process strengthens security by requiring an extra verification step beyond the standard password. With 2FA, even if an attacker obtains a password, they won’t be able to access the server without the second form of authentication, typically provided via a mobile app or hardware token.
Note:
Before 2FA can be enabled, users need to download a two-factor authentication app like Duo Mobile or Google Authenticator. You will enter the key or scan the QR Code given during the Two-Factor Authorization process into the 2FA app.
Enabling 2FA for all user accounts accessing your VPS creates a significant barrier against unauthorized access, boosting overall security.
20. Disable unused ports
Unused ports are like unlocked doors, waiting for attackers to find and exploit. Regularly review the ports that are open on your VPS and disable any that aren’t needed for your specific applications.
Tools like nmap can help you identify which ports are open, and from there, you can configure your firewall to block any unnecessary ones.
VPS security FAQs
Next steps
Liquid Web stands out as a VPS hosting provider that integrates powerful security measures as part of our core services, providing peace of mind and protection for businesses of all sizes.
Built-in DDoS protection: Distributed Denial of Service (DDoS) attacks are among the most common threats to VPS environments. Liquid Web’s built-in DDoS protection shields your server.
Expert support: Liquid Web’s team of experienced technicians is available to assist with any issues or concerns, providing guidance on security settings, troubleshooting, and emergency response.
Reliable uptime and redundant backup systems: Liquid Web’s VPS hosting packages include a 99.999% uptime guarantee and employs redundant backup systems to keep your data safe and accessible.
Automated updates and patches: Automated updates and patch management ensure that your server software, including operating systems and critical applications, is always current and secure.
Advanced server monitoring tools: Liquid Web’s advanced monitoring tools provide real-time insights into your server’s performance and potential security issues.
Strong SSL encryption and secure network infrastructure: Liquid Web provides support for SSL certificates, ensuring that your connections are encrypted and secure. Additionally, our secure network infrastructure includes firewalls, intrusion detection systems, and other defenses to keep your VPS safe from both external and internal threats.
Enhanced access control options: Enhanced access control options allow you to implement SSH key-based authentication, two-factor authentication (2FA), and strict permission settings for users. These options give you the flexibility to customize access based on your needs.
When it comes to VPS hosting, security is a top priority, and finding a provider that prioritizes strong security features can make all the difference.
Additional resources
VPS: A Beginner’s Guide →
A complete beginner’s guide to virtual private servers
Plesk VPS benefits →
9 key benefits that a Plesk control panel can bring to your VPS server
What is managed VPS hosting? →
Benefits, use cases, and how to decide if it’s right for you

Luke Cavanagh, Strategic Support & Accelerant at Liquid Web, is one of the company’s most seasoned subject matter experts, focusing on web hosting, digital marketing, and ecommerce. He is dedicated to educating readers on the latest trends and advancements in technology and digital infrastructure.