
 Brian Corson
 Introduction
PuTTY is the de facto standard used to connect to Linux devices from Windows. The best way to use PuTTY is with secure shell (SSH) keys. People prefer to use PuTTY with SSH keys so that they don’t have to remember their SSH password. Using PuTTY enables users to use stronger passwords that prevent password compromises resulting from brute force attacks.
For added security, you can also use PuTTY with SSH keys and a passphrase. This way, if a hacker gets your SSH key, they still can’t SSH in because they would also need your passphrase. This is a form of two-factor authentication. This tutorial outlines how to use PuTTY with and without the passphrase using SSH keys.
Initial Setup of PuTTY
In this example, we use host.example.com for the Linux server. Use your domain name in place of example.
It’s a good idea to give your server a nickname (otherwise known as a hostname). When you do this, you have to set it up in DNS, otherwise, it won’t work. If you haven’t done this, you can use your server’s IP address instead of your domain name.
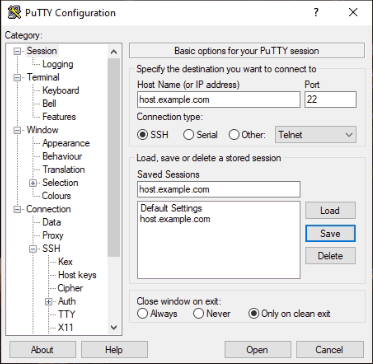
1. Download on your Windows system.
2. Create a profile/saved session for our host.example.com server.
The default port for SSH is 22. Many people use a different port to reduce brute force attacks. You may want to double-check and see what port your server is set up to use. If you’re not sure, try using 22 as shown in the below example.

3. Go to Connection, then Data, and enter the username that you want to use in the Auto-login username text box. In this example, we are using root.

4. Then, go back to Session. Under Saved Sessions, enter your server’s nickname. Usually, you’ll have the same thing in the Host Name and Saved Session boxes. If you don’t have your DNS setup, you can use the server’s IP in the Host Name box and the nickname in the Save Sessions box.

5. Now, click the Save button. This will save your profile/saved session, so you don’t have to configure PuTTY every time you open it. The next time you open PuTTY, simply click the Load button and then Open.
Connect to the SSH Server
If you’re connecting to your server for the first time, you will get the following security warning regarding the SSH key fingerprint. It is to prevent man-in-the-middle attacks. These attacks occur when a hacker gathers login credentials transferred between a user and an unprotected (no SSL certificate) website. Click Accept to continue and save the cached key in the registry.
[su_box title=”Note:” style=”glass” box_color=”#3ac6eb” radius=”20″]If you get this message in the future, do not connect! Have a security expert help you find out why the key doesn’t match or is missing. If you’re a customer of Liquid Web, contact support for assistance.
[/su_box]

You saved the username previously, so you only need to enter the password.

Now, you’re able to log in the easy way with the username and password.
Generate SSH Keys with PuTTY
Passwords are sometimes easily compromised, such as in brute-force attacks. Also, security best practices dictate using different passwords for each separate login. By using SSH keys, not only do you have one less password to remember, it’s done in a secure way.
1. Generate a public/private SSH key pair.
Use PuTTYgen to create/generate a public/private SSH key pair. Simply double-click on the executable that you downloaded earlier (puttygen.exe). Under Type of key to generate, the default of RSA (the first option, which is the option for SSH-2 RSA) and 2048 are fine. Using SSH-1 RSA is not recommended, because it is less secure. Click the Generate button.

2. Move the cursor around in the blank area to generate a random SSH key.
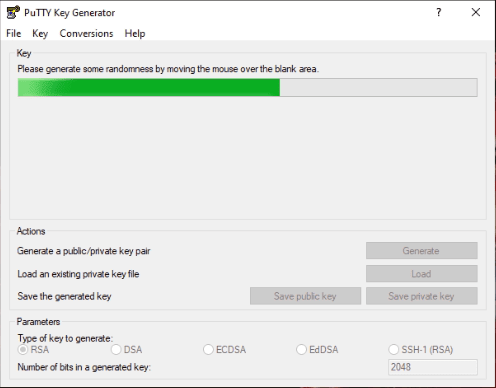
3. Now that the public/private SSH key pair has been generated, you have a choice to make:
- Option A: An SSH key without passphrase.
- Option B: An SSH key with a passphrase.
While passwords and passphrases are almost the same things, a password is typically a single word whereas a passphrase is a sentence. Furthermore, PuTTY/Linux treats them as two different things. If you’re using SSH keys, you won’t be prompted for a password unless something is wrong.
If you want to use a passphrase, enter it now, otherwise leave it blank. Adding a passphrase adds an additional layer of security to SSH keys, but you have to remember it. You’ll need to enter the passphrase twice if you decide to use one (under Key passphrase and Confirm passphrase).
4. Under key comment, you can enter anything. People typically use their e-mail address.
Then, click Save public key and save it to a safe location on your computer. You can use any extension you want but people generally use .pub or .pub.key. So for example, host.example.com.pub.key.


5. Click Save private key. This time, the name has to end with .ppk. So, for example, host.example.com.ppk.

Copying Your SSH Key to the Server
1. Copy the public key from the PuTTYgen window.

2. Save the public key on the server
Now, you should login to your server (if you’re not still logged in from before). You’ll still be using the username and password for now. You need to paste the public key into the file ~/.ssh/authorized_keys (in a single line).
[su_box title=”Note:” style=”glass” box_color=”#3ac6eb” radius=”20″]Old Linux servers use the file authorized_keys2 instead of the file authorized_keys. So if it’s not working, try using ~/.ssh/authorized_keys2 instead of ~/.ssh/authorized_keys.
[/su_box]


Set the permissions of that file, so it’s only readable/writable by that user.

3. Attach the private key to your Save Session in PuTTY.
If you’re still connected to your server, disconnect/close PuTTY and open a fresh instance.
Click host.example.com, and then click Load.

4. Make the selections for SSH authentication, then Authentication methods, and finally click Browse.
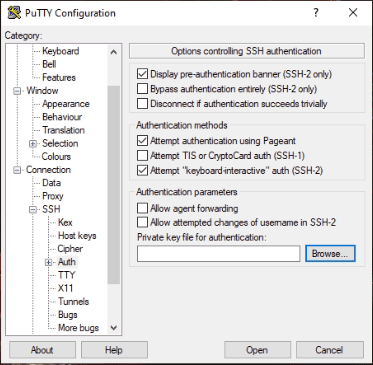
5. Find the private key that you previously saved.


6. Go back to Session and click the Save button.

You’ve attached your private key to your host.example.com profile/saved session.
Your First PuTTY SSH Key Login
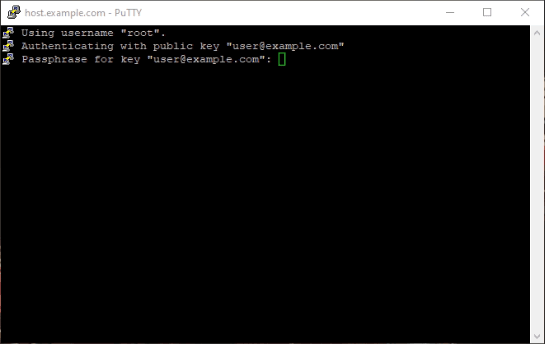
Everything is ready for you to log in. Make sure host.example.com is selected in the Saved Sessions and click the Open button.

If you set up a passphrase, you’ll be prompted for it. Otherwise, it will log you in without prompting for the password.

Here, you can see what it looks like if you set up a passphrase. Notice that it says passphrase and not password.
[su_box title=”Note:” style=”glass” box_color=”#3ac6eb” radius=”20″]If it still prompts you for a password, either something is wrong with the key or the permissions, you didn’t follow the steps correctly, or something else is wrong. If you’re a customer of Liquid Web, please contact support for help.
[/su_box]
Conclusion
Now, you are able to use PuTTY SSH keys to connect to your server. While not having a password to log in is convenient, you’ll have heightened security with a PuTTY key and a passphrase. You are on your way to a more secure server.
Looking for secure hosting to test out these concepts? Liquid Web has VPS and dedicated server hosting from which to choose. Contact our sales team today to determine the right fit for your next project.
