How To: Create a Cloud Load Balancer
In the past, load balanced setups have required dedicated networking equipment, which takes time and expertise to set up correctly. Liquid Web’s Cloud Load Balancer makes setup and configuration of a load balancer as easy as filling out a web form.
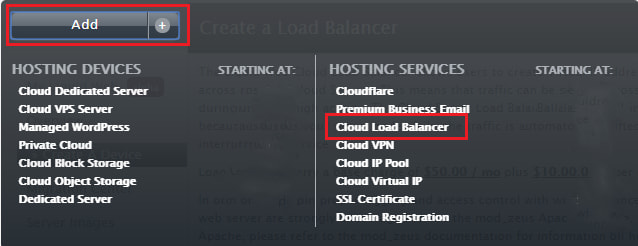
First, log into your manage interface and click on the Add button, in the upper left-hand corner. Under “Hosting Services”, click Cloud Load Balancer.

Next, configure and create the load balancer. Make sure that you select the same region that holds the servers you wish to load balance[1]. After entering a name for your load balancer[2], choose the service you plan on balancing[3]. For most cases this will be web traffic, but you have the option of selecting other ports.
Once the service is selected, you will need to indicate which nodes you want to balance[4]. You should be balancing traffic between a minimum of two nodes.
Next, select the load balancing method that works best for your traffic[5]. There are three options: Round Robin, Least Connect, and Historical Intelligence. Each has trade-offs:
- Round Robin simply goes down the list of nodes, sending each request to the next node on the list. While it is a straightforward method, it does not take into account how busy each node is.
- Least Connect sends each request to the node that has the fewest connections. This helps keep requests from piling up on a node.
- Historical Intelligence has some benefits of Least Connect, while also taking into account how busy nodes have been in the past. Busier nodes are avoided when possible.
Enabling session persistence[6] will enable your applications to persist a visitor’s session using cookies. An SSL certificate[7] can also be applied to the load balancer.
After everything is set up to your liking, click Create Load Balancer. A popup will ask you to verify your configuration, and you will need to click Create Load Balancer a second time. Just like that, your load balancer is up and running. If you find out that you’ve configured it incorrectly, don’t worry; it will be easy to change later.
Setting up the rest of your application code is beyond the scope of this article, but do note that our managed servers are already pre-configured to use the mod_zeus Apache module for proper logging and access control.
Related Articles:

About the Author: Patrick Hawkins
Patrick Hawkins is a former Test Engineer and Managed WordPress admin with Liquid Web
Our Sales and Support teams are available 24 hours by phone or e-mail to assist.
Latest Articles
How to use kill commands in Linux
Read ArticleChange cPanel password from WebHost Manager (WHM)
Read ArticleChange cPanel password from WebHost Manager (WHM)
Read ArticleChange cPanel password from WebHost Manager (WHM)
Read ArticleChange the root password in WebHost Manager (WHM)
Read Article


