

Depending on your business model, you might need to add custom fields to your WooCommerce products.
Those could be text fields, select boxes, radio buttons, or any other type of input you can think of. You can add them so that they only show in the backend when managing your orders, or you can display them on your website and in emails. Our custom fields will not be added in a custom meta box as usual. They’ll show in the “Product Data” area, just beside the regular product fields.
In this article, I’ll walk you through adding a custom field to a WooCommerce product — for a custom SKU. I will explain how you can add that field to your admin email notifications for new orders. In this example, you’re running a dropshipping business.
Why You’d Want to Add Custom Fields to WooCommerce Products
Having WooCommerce custom fields will allow you to enter the SKUs of your vendor while showing your own SKUs to your customers. This way, you can process new orders faster and can also search the WooCommerce backend for your custom SKUs.
WooCommerce is one of the easiest plugins to extend and since it was acquired by Automattic in 2015, it’s not going anywhere. So it’s a safe bet to say that the hooks and functions we’ll use in this article will be around in the future.
Sell your products online, worry-free
Officially recommended by WooCommerce, our hosting is made for online businesses like yours
What is a Hook?
WordPress provides hooks as a way to add custom functionality or custom designs to your site on predefined places (e.g. in the header or footer) or on predefined actions (e.g. adding a product to the cart). They allow developers to easily implement new features without having to rewrite the entire theme or plugin code.
Hooks can be used as Actions (these hooks do something) or Filters (these hooks manipulate data). We’ll use some Action hooks today.
How to Add WooCommerce Custom Product Meta
Here’s how to add a custom meta box in a WooCommerce product. We’ll dive into the code first. The WooCommerce API allows us to leverage built-in functions that add all sorts of input fields into the product area. Specifically, you can add six different types of inputs:
- Text fields
- Select boxes
- Checkboxes
- Radio buttons
- Textareas
- Hidden fields
Each of those fields can be added to the regular product tabs of WooCommerce multiple times or in any combination you choose. Those tabs are:
- General
- Inventory
- Shipping
- Linked Products
- Attributes
- Variations
- Advanced
Any of these tabs come with specific hooks we can use to add our custom fields to that tab. I’ll outline those hooks in more detail soon, but first I want to point out that not all tabs show for each type of product. For example, the “Variations” tab is not showing for “Simple” product types, and the “Shipping” tab is missing if your product is “External”.
You can use a number of hooks to add your fields to any of these tabs:
General Tab
woocommerce_product_options_pricing
woocommerce_product_options_downloads
woocommerce_product_options_tax
woocommerce_product_options_general_product_page
Inventory Tab
woocommerce_product_options_sku
woocommerce_product_options_stock
woocommerce_product_options_stock_fields
woocommerce_product_options_stock_status
woocommerce_product_options_sold_individually
woocommerce_product_options_inventory_product_data
Shipping Tab
woocommerce_product_options_dimensions
woocommerce_product_options_shipping
Linked Products Tab
woocommerce_product_options_related
Attributes Tab
woocommerce_product_options_attributes
Variations Tab
woocommerce_variable_product_bulk_edit_actions
Advanced Tab
woocommerce_product_options_reviews
woocommerce_product_options_advanced
You can find the appropriate hook to use by browsing through the HTML files inside the woocommerce/includes/admin/views folder. Those files make up the meta boxes you’re seeing in the admin interface when editing your products.
In our example, we’ll use the woocommerce_product_options_sku hook to add a field for a second SKU right below the existing SKU field. To do that, we’ll implement functions provided by the WooCommerce API.
Each function takes an array of arguments, which I outlined in the following gists. You can copy and paste each of these directly to your theme’s functions.php file (be sure to use a child theme).
Adding a text field:
https://gist.github.com/jan-koch/cfa2731ff5755fe297990269dd816e2b
Adding a textarea:
https://gist.github.com/jan-koch/7fbec8d1a0b89fd6761343a9245e77e0
Adding a select box:
https://gist.github.com/jan-koch/5dd8897b974969ed66204e92f6a05ef4
Adding radio buttons:
https://gist.github.com/jan-koch/c0efab4f2ec7222eab50e4646be01971
Adding a checkbox:
https://gist.github.com/jan-koch/312cfc891e7118f29a2fc99f13af7612
Adding a hidden field:
https://gist.github.com/jan-koch/d28d02ed4885eb096642501ddcc20235
You can probably guess by now that we’ll use the text field to store our custom SKU. To do that, we’ll implement the following function into the child theme’s functions.php:
function jk_add_custom_sku() {
$args = array(
'label' => __( 'Custom SKU', 'woocommerce' ),
'placeholder' => __( 'Enter custom SKU here', 'woocommerce' ),
'id' => 'jk_sku',
'desc_tip' => true,
'description' => __( 'This SKU is for internal use only.', 'woocommerce' ),
);
woocommerce_wp_text_input( $args );
}
add_action( 'woocommerce_product_options_sku', 'jk_add_custom_sku' );
By using this code snippet, you’ll see the custom SKU field in the “Inventory” tab right below the original SKU field. Feel free to adapt the label and description as needed.
Be careful when editing the ‘jk_sku‘ ID though, as the saving and display functions depend on that ID and would also need to be adjusted.
Saving the WooCommerce Custom Product Meta
After we add the field for the custom SKU, we need to tell WooCommerce what to do with it when the product is saved. By itself, the above code will do nothing and won’t save the value. That’s obviously not what we want, so let us extend that code and add the saving function.
To do that, we’ll leverage the woocommerce_process_product_meta hook. With the following function, your WooCommerce store will save the new custom SKU field when you save the product:
function jk_save_custom_sku( $post_id ) {
// grab the custom SKU from $_POST
$custom_sku = isset( $_POST[ 'jk_sku' ] ) ? sanitize_text_field( $_POST[ 'jk_sku' ] ) : '';
// grab the product
$product = wc_get_product( $post_id );
// save the custom SKU using WooCommerce built-in functions
$product->update_meta_data( 'jk_sku', $custom_sku );
$product->save();
}
add_action( 'woocommerce_process_product_meta', 'jk_save_custom_sku' );
Here’s a gist containing both code snippets. You can add the code to your functions.php file directly.
Let me explain the function starting with its trigger point, the hook woocommerce_process_product_meta. It hooks into the WC_Meta_Box_Product_Data::save function, which lets us update product meta fields without calling the regular “add_post_meta” or “update_post_meta” functions.
I prefer this approach over using the regular functions to manipulate WooCommerce meta fields, as we ensure that all product data gets processed properly when saving our WooCommerce custom fields.”
Secure Data Processing and Data Sanitization
Since we, as the developers, cannot expect to know how the user will use this new field, or how good the website will be managed in the future (e.g. keeping a site updated or enforcing strong passwords), we need to be careful about what we store in this field.
To ensure that our function only stores valid data, we’re running the field’s value through sanitize_text_field before adding it to the database.”
Accessing Custom WooCommerce Product Meta Fields in the Frontend or in Mails
Now that we’ve successfully implemented the backend functionality of the custom SKU field, let’s make use of it in the daily business of running the eCommerce shop.
In our example, we’ll use the custom SKU and display it in the “new order” notification emails that are sent to the admin of the shop. This will help the shop owner forward orders to the dropshipping vendor and will save a massive amount of time, compared to managing some sort of spreadsheet, mapping product names to the SKU of the vendor.
To add the custom SKU in the frontend, we’ll leverage WooCommerce’s powerful templating system. First, we copy the file email-order-items.php from wp-content/plugins/woocommerce/emails/ to wp-content/themes/your-child-theme/woocommerce/emails. If that folder does not exist in your child theme, you have to create it through FTP/SFTP.
The ability to override email templates (as well as other templates like the product detail page) is one of the big benefits of using WooCommerce.
By simply copying the file containing the template for the order item list in emails to the themes folder, you can use your own styling and contents. Just be aware that future WooCommerce updates might require you to update your custom templates, too.
After copying the template file, open it in an editor of your choice (I’m just making the move from PHPStorm to VS Code). You’ll see the template showing a table structure with the body elements representing each order position. It’s in that context we need to load the custom SKU for each product in order to display it.
Luckily for us, WooCommerce shows the SKU only in admin emails by default, so we don’t need to handle that ourselves.
To display the custom field, we’ll use the regular get_post_meta function:
// load the custom SKU
$custom_sku = get_post_meta( $product->get_id(), 'jk_sku', true );
if ( is_string( $custom_sku ) ) { // only show the custom SKU
// if it's set
// change this line if needed
echo "
" . wp_kses_post( "Custom SKU: $custom_sku" );
}
Here is a Github gist containing the full email template, which you can directly download and add to your theme’s folder.
Once the file has been added, you’ll see this format in admin emails:

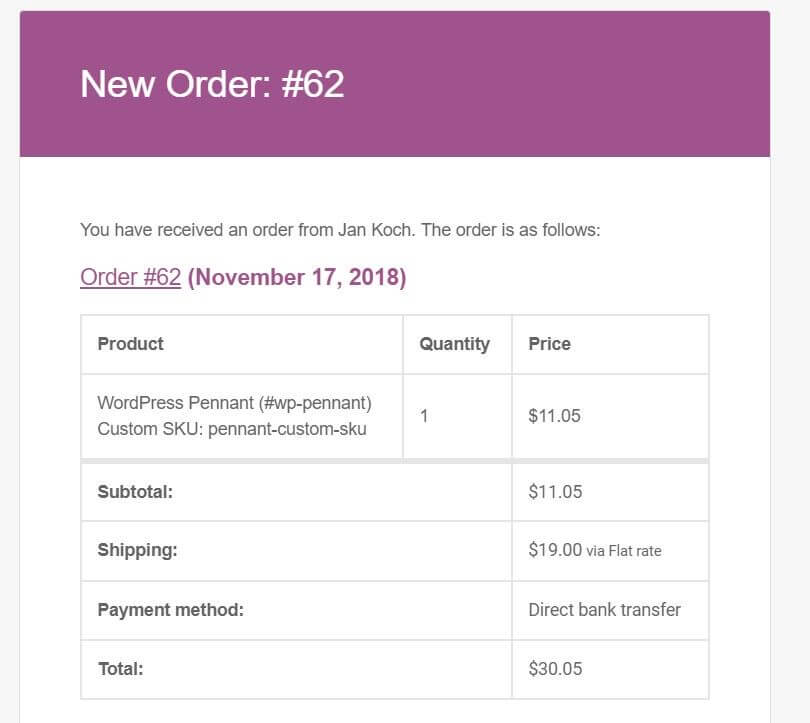
The custom SKU is now added right below the product name. You can, of course, change the position and also the label by tweaking the email template above to your preferred layout.
Get Started Adding Custom Fields
In this article, we explored just a little bit of the flexibility WooCommerce brings to the table. Being able to add custom fields this easily is one reason why you might consider WooCommerce over Shopify.
The acquisition through Automattic will only increase the importance WooCommerce has in the WordPress space. And the efforts of companies like Nexcess to support WooCommerce users with custom hosting plans just confirms this trend.
If you want to learn more about extending WooCommerce, check out the WP Mastery Code Snippets page and start experimenting with the examples I provide on that page.
Get Fully Managed WooCommerce From Nexcess
With Nexcess, better is built in.
With a dedicated solution for WooCommerce hosting, you get:
- Automated scaling to keep your site fast during traffic surges.
- Automatically optimized images for fast loading times.
- Lightning fast load times thanks for our built-in CDN.
- And more!
See why users gave us a 4.6 out of 5 star rating on Trustpilot. Experience optimized WooCommerce hosting for your store today.

