


How to install a local Gogs Git repository on AlmaLinux
Gogs (short for Go Git Service) and the Gitea fork of Gogs are lightweight, open source-based Git servers written in the Go programming language. They provide a self-hosted Git service with a web interface, allowing users to create and manage Git repositories, collaborate on code, and track changes.
Gogs delivers capabilities similar to primary Git hosting services such as GitHub and GitLab but is intended to be lightweight and straightforward to install on your server. This article will show you how to install Gogs Git Server on the AlmaLinux operating system using a series of steps.
Prerequisites
- Operating system and version: AlmaLinux OS 8.
- Access: Run the as root or sudo command to acquire privileged access to your AlmaLinux system.
- System minimum requirements: 2 GB RAM and 10 GB of disk space.
Step 1. Updating your AlmaLinux system
Ensure your AlmaLinux system's package database and installed packages are up to date:
sudo dnf updateTo enable the EPEL repository on AlmaLinux, you typically need to install the epel-release package, which sets up the repository configuration. Issuing the command below will install the EPEL repository:
sudo dnf install epel-releaseStep 2. Configuring your LAMP setup
First, ensure you have Apache, MariaDB, and PHP installed on your AlmaLinux system. If LAMP is not installed, follow the instructions below to install and configure Apache, MariaDB, and PHP on your AlmaLinux system.
To install Apache Web Server on your AlmaLinux system, run the following command:
sudo dnf install httpdAfter finishing the Apache installation, you must start and enable the httpd service:
sudo systemctl start httpd
sudo systemctl enable httpd
To confirm that your Apache web server is installed and running correctly, check the httpd service status and if it's listening on the default port (80). Run the following command to check the status of your httpd service:
sudo systemctl status httpdTo install the current stable release of the MariaDB server on your AlmaLinux system, run the following commands:
curl -sS https://downloads.mariadb.com/MariaDB/mariadb_repo_setup | sudo bash
sudo dnf install mariadb-server mariadb-devel
After finishing the MariaDB installation, you must start and enable the MariaDB service:
sudo systemctl start mariadb
sudo systemctl enable mariadb
To check the MariaDB service status, run the following command:
sudo systemctl status mariadbIt is suggested that you take the extra steps to protect your MariaDB database from malicious users. Run the following command to protect your MariaDB database server from frequent attacks:
mariadb-secure-installationTo install PHP on your AlmaLinux system, check the AppStream AlmaLinux repository for available versions of PHP modules by running the following command:
dnf module list phpThe output contains the available PHP versions — for example PHP 8.0. To enable the PHP 8.0 module, run the following command;
dnf module enable php:8.0 Then, run the following command to install PHP with some of the recommended extensions on your AlmaLinux system:
dnf install php php-fpm php-zip php-intl php-opcache php-gd php-mbstring php-gd php-xml php-mysqlndUse the following command to check the PHP version:
php -vStep 3. Configuring MariaDB for the Gogs Git repository
Login to MariaDB shell as root user:
mysql -u root -pEnter your MariaDB root password to enter the MariaDB shell.
Then, create a dedicated MariaDB database (using the utf8mb4 character set) and a dedicated MariaDB user for Gogs in the MariaDB shell:
CREATE DATABASE gogs DEFAULT CHARACTER SET utf8mb4 COLLATE utf8mb4_general_ci;

CREATE USER 'gogsuser'@'localhost' IDENTIFIED BY 'yourpassword';

GRANT ALL PRIVILEGES ON gogs.* TO 'gogsuser'@'localhost' IDENTIFIED BY 'yourpassword' WITH GRANT OPTION;

FLUSH PRIVILEGES;

EXIT;
Here is the output:
~]# mysql -u root -p
Enter password:
Welcome to the MariaDB monitor.  Commands end with ; or \g.
Your MariaDB connection id is 15
Server version: 11.1.2-MariaDB MariaDB Server

Copyright (c) 2000, 2018, Oracle, MariaDB Corporation Ab and others.

Type 'help;' or '\h' for help. Type '\c' to clear the current input statement.

MariaDB [(none)]> CREATE DATABASE gogs DEFAULT CHARACTER SET utf8mb4 COLLATE utf8mb4_general_ci;
Query OK, 1 row affected (0.000 sec)

MariaDB [(none)]> CREATE USER 'gogsuser'@'localhost' IDENTIFIED BY 'Your_strong_password';
Query OK, 0 rows affected (0.003 sec)

MariaDB [(none)]> GRANT ALL PRIVILEGES ON gogs.* TO 'gogsuser'@'localhost' IDENTIFIED BY 'yourpassword' WITH GRANT OPTION;
Query OK, 0 rows affected (0.001 sec)

MariaDB [(none)]> FLUSH PRIVILEGES;
Query OK, 0 rows affected (0.001 sec)

MariaDB [(none)]> EXIT;
Bye
Step 4. Installing Gogs Git Server
To install the Gogs Git Server on your AlmaLinux system, follow the below steps.
Step 4.1. Install Git as a prerequisite
You must install Git before installing Gogs. To install Git, run the following command:
sudo dnf install git
To learn more about Git installation, see the article How to install Git on AlmaLinux. For the Ubuntu, see How to install Git on Ubuntu.
Step 4.2. Create the Gogs system user and group
To generate a dedicated user and group for Gogs (both named git), run the following commands:
sudo groupadd git
sudo mkdir /opt/gogs
sudo useradd -s /bin/nologin -g git -d /opt/gogs -M git
Step 4.3. Download and extract the Gogs file
Run the following commands to download the Gog's latest release and extract the file:
cd
wget https://dl.gogs.io/0.13.0/gogs_0.13.0_linux_amd64.tar.gz
sudo tar -zxvf gogs_0.13.0_linux_amd64.tar.gz -C /opt
Here is the output:
~]# wget https://dl.gogs.io/0.13.0/gogs_0.13.0_linux_amd64.tar.gz
--2023-10-09 10:28:17--  https://dl.gogs.io/0.13.0/gogs_0.13.0_linux_amd64.tar.gz
Resolving dl.gogs.io (dl.gogs.io)... 104.21.25.45, 172.67.222.175, 2606:4700:3035::ac43:deaf, ...
Connecting to dl.gogs.io (dl.gogs.io)|104.21.25.45|:443... connected.
HTTP request sent, awaiting response... 200 OK
Length: 30054955 (29M) [application/gzip]
Saving to: 'gogs_0.13.0_linux_amd64.tar.gz'

gogs_0.13.0_linux_amd64.tar.gz                              100%[=========================================================================================================================================>]  28.66M  47.6MB/s    in 0.6s

2023-10-09 10:28:18 (47.6 MB/s) - 'gogs_0.13.0_linux_amd64.tar.gz' saved [30054955/30054955]

[root@ip-172-31-25-198 ~]# sudo tar -zxvf gogs_0.13.0_linux_amd64.tar.gz -C /opt
gogs/
gogs/gogs
gogs/LICENSE
gogs/README.md
gogs/README_ZH.md
gogs/scripts/
gogs/scripts/README
gogs/scripts/init/
gogs/scripts/init/centos/
gogs/scripts/init/centos/gogs
gogs/scripts/init/ddwrt/
gogs/scripts/init/ddwrt/S801gogs
gogs/scripts/init/debian/
gogs/scripts/init/debian/gogs
gogs/scripts/init/freebsd/
gogs/scripts/init/freebsd/gogs
gogs/scripts/init/gentoo/
gogs/scripts/init/gentoo/gogs
gogs/scripts/init/openbsd/
gogs/scripts/init/openbsd/gogs
gogs/scripts/init/suse/
gogs/scripts/init/suse/gogs
gogs/scripts/launchd/
gogs/scripts/launchd/io.gogs.web.plist
gogs/scripts/mysql.sql
gogs/scripts/supervisor/
gogs/scripts/supervisor/gogs
gogs/scripts/systemd/
gogs/scripts/systemd/gogs.service
gogs/scripts/windows/
gogs/scripts/windows/install-as-service.bat
Step 4.4. Change ownership
To change ownership of /opt/gogs, run the following command:
sudo chown -R git:git /opt/gogs Step 4.5. Set up a systemd unit file for the Gogs Git repository
To copy the Gogs systemd unit file, run the following command:
sudo cp /opt/gogs/scripts/systemd/gogs.service /lib/systemd/system/ Step 4.6. Configure the new Gogs systemd unit file
Use any text editor to edit the newly created gogs.service file. For example, you can use nano to open and edit the unit file:
sudo nano /lib/systemd/system/gogs.serviceFind the following lines:
WorkingDirectory=/home/git/gogs
ExecStart=/home/git/gogs/gogs web
Environment=USER=git HOME=/home/git
Then, modify them respectively and save the file:
WorkingDirectory=/opt/gogs
ExecStart=/opt/gogs/gogs web
Environment=USER=git HOME=/opt/gogs
Here is the output:
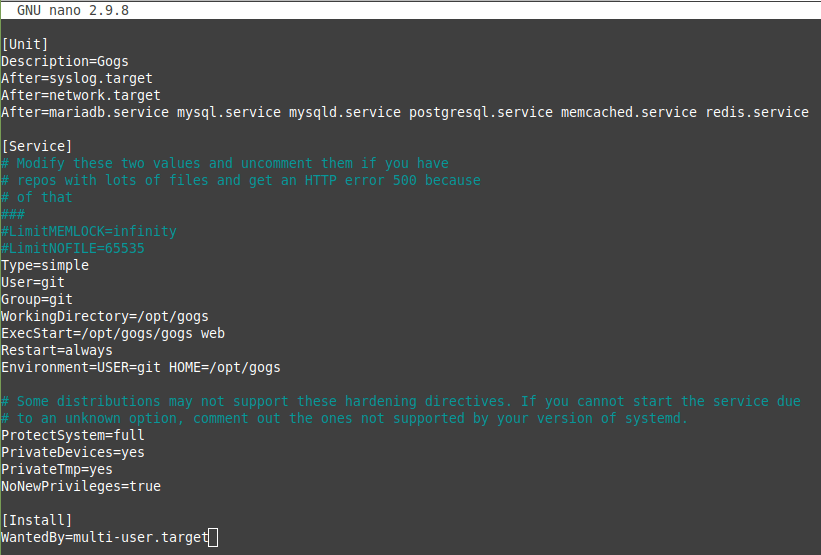
Step 4.7. Reload systemd
To reload systemd to ensure the changes are recognized, run the following command:
sudo systemctl daemon-reload
Step 4.8. Start and enable the Gogs Service
To start and enable the Gogs Service, run the following commands:
sudo systemctl start gogs.service
sudo systemctl enable gogs.service
Step 4.9. Check the Gogs Service status
To check the Gogs Service status, run the following command:
sudo systemctl status gogs Here is the output:
~]# sudo systemctl status gogs
● gogs.service - Gogs
   Loaded: loaded (/usr/lib/systemd/system/gogs.service; enabled; vendor preset: disabled)
   Active: active (running) since Wed 2023-10-09 10:44:32 UTC; 2s ago
 Main PID: 43368 (gogs)
    Tasks: 5 (limit: 09968)
   Memory: 38.6M
   CGroup: /system.slice/gogs.service
           └─43368 /opt/gogs/gogs web

Oct 09 10:44:33 ip-172-31-25-198.us-east-2.compute.internal gogs[43368]: 2023/10/09 10:44:33 [TRACE] Log mode: Console (Trace)
Oct 09 10:44:33 ip-172-31-25-198.us-east-2.compute.internal gogs[43368]: 2023/10/09 10:44:33 [ INFO] Gogs 0.13.0
Oct 09 10:44:33 ip-172-31-25-198.us-east-2.compute.internal gogs[43368]: 2023/10/09 10:44:33 [TRACE] Work directory: /opt/gogs
Oct 09 10:44:33 ip-172-31-25-198.us-east-2.compute.internal gogs[43368]: 2023/10/09 10:44:33 [TRACE] Custom path: /opt/gogs/custom
Oct 09 10:44:33 ip-172-31-25-198.us-east-2.compute.internal gogs[43368]: 2023/10/09 10:44:33 [TRACE] Custom config: /opt/gogs/custom/conf/app.ini
Oct 09 10:44:33 ip-172-31-25-198.us-east-2.compute.internal gogs[43368]: 2023/10/09 10:44:33 [TRACE] Log path: /opt/gogs/log
Oct 09 10:44:33 ip-172-31-25-198.us-east-2.compute.internal gogs[43368]: 2023/10/09 10:44:33 [TRACE] Build time: 2023-02-25 02:30:34 UTC
Oct 09 10:44:33 ip-172-31-25-198.us-east-2.compute.internal gogs[43368]: 2023/10/09 10:44:33 [TRACE] Build commit: 8c21874c00b6100d46b662f65baeb40647442f42
Oct 09 10:44:33 ip-172-31-25-198.us-east-2.compute.internal gogs[43368]: 2023/10/09 10:44:33 [ INFO] Run mode: Development
Oct 09 10:44:33 ip-172-31-25-198.us-east-2.compute.internal gogs[43368]: 2023/10/09 10:44:33 [ INFO] Available on http://localhost:3000/
It is highly advised that you enable HTTPS security. To do so, follow all the instructions provided below, even though they are optional in the next two steps.
Step 5 (optional). Reverse proxy
We can benefit from configuring a reverse proxy for your application. However, it's not required. It can improve security and performance while simplifying auditing and logging. Additionally, accessing the domain without using ports is simpler.
It would help if you used a domain name for the Gogs Service instead of the server's IP address when creating the reverse proxy. If you want to register a domain name with Liquid Web, you can do it from your Liquid Web client portal. After acquiring the domain, you can change the DOMAIN and EXTERNAL_URL entries using your domain name in the file /home/git/gogs/custom/conf/app.ini:
/home/git/gogs/custom/conf/app.ini
[server]
DOMAIN = your_domain_name.com
HTTP_PORT = 3000
EXTERNAL_URL = http://your_domain_name.com:3000/
After everything is completed, we can proceed to the reverse proxy. We must add this block to the domain's configuration file if you're using NGINX The default location is /etc/nginx/sites-available/your_domain_name.com if you replace your_domain_name.com with your domain name:
server {
        listen 80;
        listen [::]:80;

        root /var/www/your_domain_name.com/html;
        index index.html index.php index.nginx-debian.html;

        server_name your_domain_name.com www.your_domain_name.com;

        location / {
               proxy_pass http://127.0.0.1:3000;
        }
}
You can also replace your root /var/www/your_domain_name.com/html, server_name your_domain_name.com, www.your_domain_name.com, and proxy_pass http://127.0.0.1:3000 as per your requirements.
For Apache users, you can add the following details to domain-specific configuration file /etc/httpd/conf.d/your_domain_name.com.conf:
<VirtualHost *:80>
ServerName your_domain_name.com
ProxyPreserveHost On
ProxyPass /  http://your_domain_name.com:3000/
ProxyPassReverse /  http://your_domain_name.com:3000/
</VirtualHost>
Step 6 (optional). Obtain a Let's Encrypt SSL certificate
First, disallow access on port 3000:
sudo firewall-cmd --permanent --remove-port=3000/tcp
sudo systemctl reload firewalld.service
Then, install the Certbot utility:
sudo dnf install dnf-utils
sudo dnf-config-manager --enable rhui-REGION-rhel-server-extras rhui-REGION-rhel-server-optional
sudo dnf install certbot
Next, apply for a Let's Encrypt SSL certificate for the domain your_domain_name.com. Replace your_domain_name.com with your domain name.
sudo certbot certonly --standalone --agree-tos --no-eff-email -m admin@your_domain_name.com -d your_domain_name.comThe certificate and chain will be kept at the following location:
/etc/letsencrypt/live/your_domain_name.com/fullchain.pemThe key file will be saved in the following location:
/etc/letsencrypt/live/your_domain_name.com/privkey.pem The Let's Encrypt SSL certificate is set to expire in three months by default. To auto-renew your Let's Encrypt certificates create the following cron job:
sudo crontab -eInput the following line by pressing I, then save the file:
0 0,12 * * * python -c 'import random; import time; time.sleep(random.random() * 3600)' && certbot renew Every day at noon, this cron job will try to renew the Let's Encrypt certificate. You can change the cron job as per your requirement.
Step 7. Accessing Gogs Git repository
Gogs will launch an HTTP service on port 3000 by default. To modify firewall rules to enable visitors access to port 3000 and reload the firewall service to reflect the changes, run the following commands:
sudo firewall-cmd --permanent --add-port=3000/tcp
sudo systemctl reload firewalld.service
The HTTP port (HTTP_PORT) must be changed to an available one in the configuration file before the first run if another service is already using this port. This file is in /home/git/gogs/custom/conf/app.ini unless we provide an alternative installation path:
/home/git/gogs/custom/conf/app.ini
[server] ...
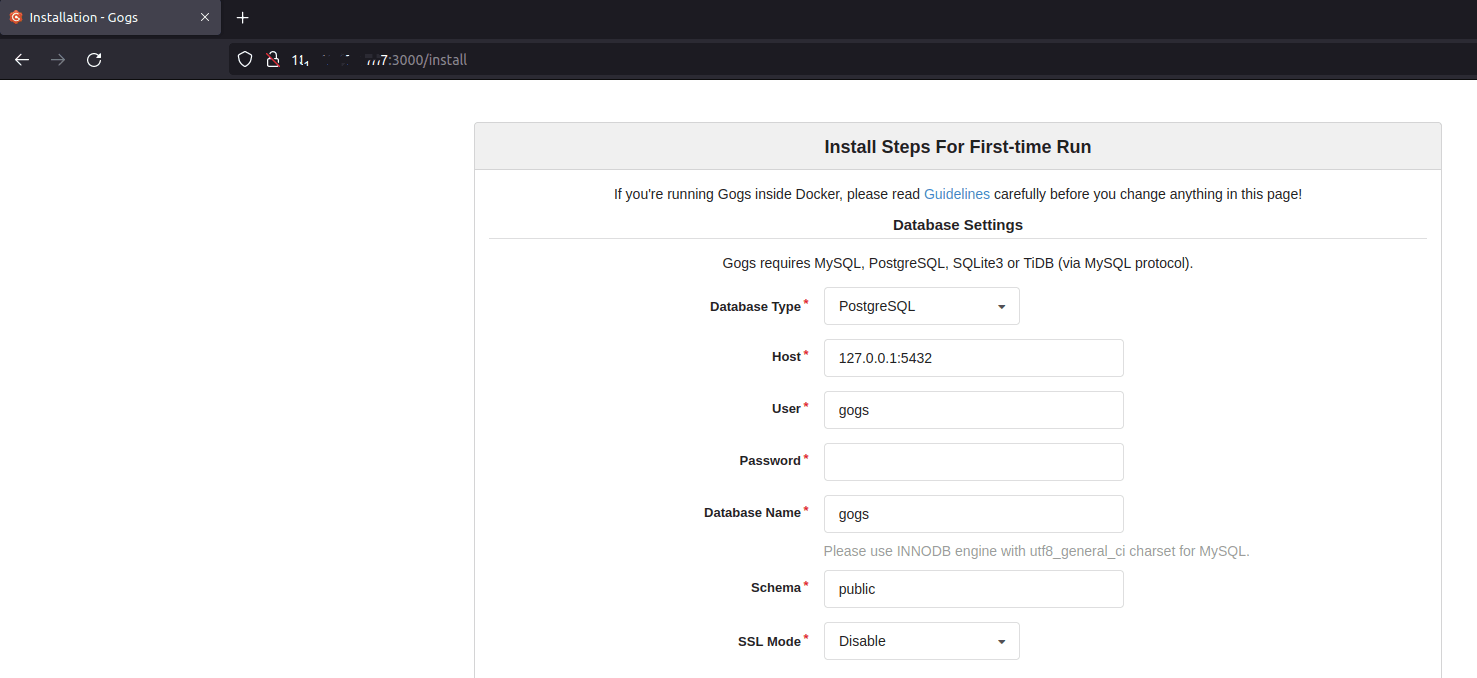
HTTP_PORT = 3000To complete the installation, navigate to http://server_IP_address:3000 in the web browser of your choice. Replace server_IP_address with your server IP address. Fill in the relevant fields as given below, leaving all other fields untouched. In the Database Settings section, change Database Type to MySQL, and enter your User and Password:
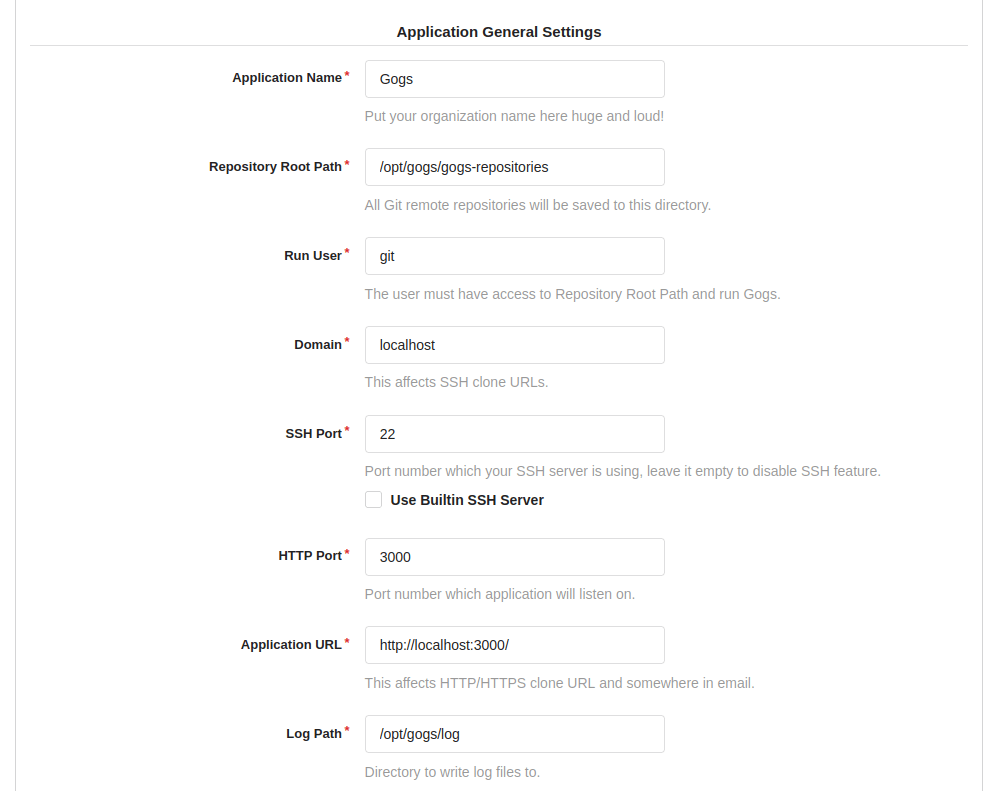
In the Application General Settings section, enter Domain and Application URL values instead of localhost. You can use either the domain name or server IP address here:
In the Admin Account Settings section, enter your Username, Password, and Admin Email values:
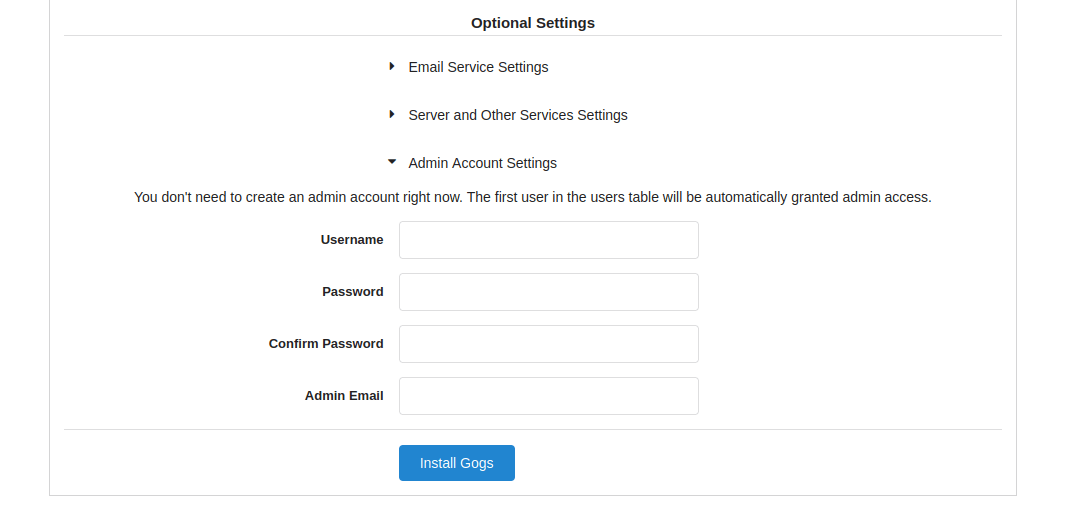
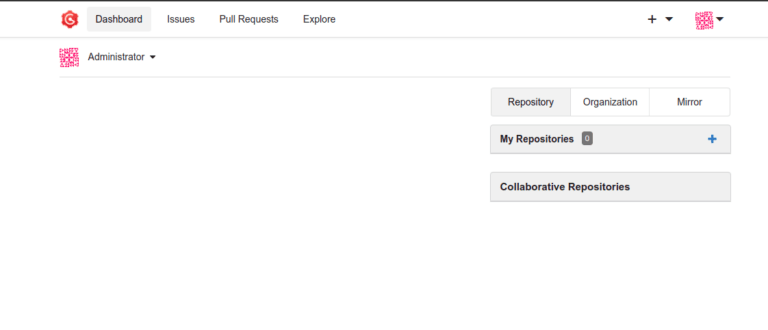
Finally, to complete the installation, click the Install Gogs button. Remember that any custom settings you enter in the Gogs web install interface will be saved in the Gogs custom config file /opt/gogs/custom/conf/app.ini.
After a successful installation, you will see the screen shown below. For now, users can visit the Gogs website at http://your_domain_name.com:3000 or http://server_IP_address:3000. Replace your_domain_name.com with your domain name and server_IP_address with your server IP address:
How to update Gogs Git Server on AlmaLinux
To update Gogs Git Server on AlmaLinux, you can follow the steps below.
Step 1. Download the latest Gogs release
Go to the Gogs official download page and download the latest release corresponding to your system architecture.
Step 2. Stop Gogs Service
To stop the Gogs Service, run the following command:
sudo systemctl stop gogsStep 3. Replace the Gogs binary
Replace the existing Gogs binary with the new one you downloaded. Let's assume you downloaded the new Gogs binary to the /path/to/new/gogs directory:
sudo mv /path/to/new/gogs /usr/local/bin/gogs Step 4. Start the Gogs Service
To start the Gogs Service, run the following command:
sudo systemctl start gogsStep 5. Verify the update
Visit your Gogs web interface and check if the update was successful.
How to uninstall Gogs Git Server on AlmaLinux
To uninstall the Gogs Git Server on AlmaLinux, follow the steps below.
Step 1. Stop the Gogs Service
To stop the Gogs Service, run the following command:
sudo systemctl stop gogs Step 2. Remove Gogs binary and installation directory
To delete the Gogs binary and the Gogs installation directory, run the following commands:
sudo rm /usr/local/bin/gogs
sudo rm /var/lib/gogs
Please note that the rm command always must be employed very carefully because content cannot be restored once a file is deleted on Linux.
Step 3. Remove Gogs system user and group
Run the following commands to remove the system user and group created for Gogs:
sudo userdel git
sudo groupdel git
Step 4. Remove the Gogs systemd service file
To remove the Gogs systemd service file, run the following command:
sudo rm /etc/systemd/system/gogs.service Step 5. Uninstall Git
Git is likely a dependency of Gogs, so removing Gogs might automatically remove Git as well. However, if Git is not removed, you can uninstall it separately using dnf:
sudo dnf remove gitStep 6. Reload systemd
To reload systemd to ensure the changes are recognized, run the following command:
sudo systemctl daemon-reload Step 7. Verify uninstallation
Ensure that the Gogs Git repository has been successfully uninstalled by trying to access the Gogs web interface.
Closing thoughts on your local Gogs Git repository installation
We hope this guide has helped you understand how to install the Gogs Git Server and the associated repository on the AlmaLinux OS easily. If you're seeking Gogs hosting with AlmaLinux, Liquid Web is a great hosting provider to consider.
We went over Gogs installation, setup, and maintenance. It's a professional service that covers all the essentials while remaining simple and requiring little overall maintenance. Our Gogs Git pros can assist you in selecting the best hosting plan from the many available options.
Related Articles:


About the Author: Mohammed Noufal
Mohammed Noufal is a B.Tech graduate with a decade of experience in server administration and web hosting. He is a father to two daughters and finds fulfillment in their growth. In his free time, he enjoys blogging, sharing experiences, and listening to music. With a strong technical background, family commitment, and creative outlets, he represents a well-rounded life journey.


Our Sales and Support teams are available 24 hours by phone or e-mail to assist.
Latest Articles
In-place CentOS 7 upgrades
Read ArticleHow to use kill commands in Linux
Read ArticleChange cPanel password from WebHost Manager (WHM)
Read ArticleChange cPanel password from WebHost Manager (WHM)
Read ArticleChange the root password in WebHost Manager (WHM)
Read Article