
 Sapta Upendran
 AlmaLinux is an open source operating system created by CloudLinux after the announced changes to CentOS. AlmaLinux serves as an alternative to CentOS with a similar structure. The objective remains a free Linux distribution that is binary compatible with the most recent release of Red Hat Enterprise Linux (RHEL).
AlmaLinux is designed for businesses and organizations that seek reliable and well-maintained Linux distributions for commercial use. AlmaLinux is still a very new Linux distribution, so the system’s long-term reliability is yet to be assessed. However, if the short-term is any indication, AlmaLinux is here for the long haul.
This article is a step-by-step illustration of installing Git on AlmaLinux. Git is a versioning control system mainly used by programmers to issue application changes and track revisions.
There are two methods to install Git on AlmaLinux:
- Install using the dnf command.
- Installing Git from source.
Install Git on AlmaLinux Using the dnf Command
1. Here are the commands to install Git using the dnf command.
sudo dnf update -y
sudo dnf install git
Install Git on AlmaLinux From Source
For those who prefer to install from source, use the following steps.
Step 1: Install the Dependencies
First, ensure your system is up to date. Then, install the dependencies required for the installation.
sudo dnf makecache --refresh

sudo dnf groupinstall "Development Tools"
dnf install gettext-devel openssl-devel curl-devel perl-CPAN perl-devel zlib-devel wget -y
Step 2: Clone the Git Repository
Git’s most recent version can be downloaded from the release website with the following command.
wget https://github.com/git/git/archive/refs/tags/v2.33.0.tar.gz -O git.tar.gz
Extract the tar file once the download completes.
tar -zxf git.tar.gzStep 3: Configure the Build
Navigate to the installation directory and begin configuring the build.
cd git-*
The configure script that the make configure command creates allows you to perform all necessary checks. Additionally, this script will construct a Makefile necessary for the next step and declare /usr/local (the default package folder for Linux machines) as the location for the new binary.
 make configure
./configure -- prefix=/usr/local

Step 4: Compile and Install Git
The make utility processes fully programmable configuration files known as makefiles. To ensure the appropriate program compilation, the makefile instructs make on compiling a program and linking it to the OS installation.
make install
Git has been successfully built and installed. You can use the given command to check the version.
git --version
Step 5: Test Your Installation
Before setting up the Git repository, create your user and permissions. Start by creating the user and password. Then, configure your user and email for Git commit messages.
useradd git
passwd git

git config-- global user.name "your git username"
git config -- global user.email "email for git account"
Create a Git repository.
mkdir git-repo
cd git-repo
You can now initialize the git repository and test various git commands. When reviewing our examples provided be sure to replace “yourgitusername” with the actual value.
git init
git add readme.md
git commit -m "first commit"
git branch -M main
git remote add origin https://github.com/yourgitusername/git-repo.git
git push -u origin main
git push -u origin main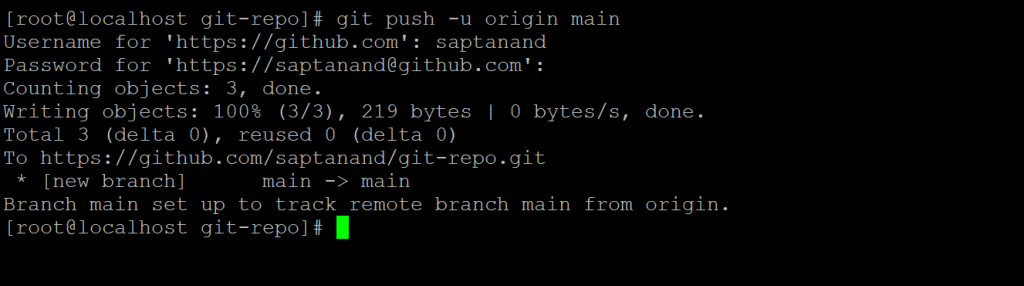
git pull origin main
Conclusion
We have successfully installed and configured Git on AlmaLinux. When comparing CentOS vs AlmaLinux, you see that AlmaLinux functions efficiently as a drop-in replacement for CentOS. Developers use this RHEL replacement with Git installed to control their code versions efficiently. And for systems administrators that need additional functionality, they can create an FTP server and install and configure LsyncD on AlmaLinux.
You can get AlmaLinux with Liquid Web’s VPS hosting, cloud servers, and dedicated servers. Contact our sales team to configure your server today.