


MediaWiki installation guide for Linux (AlmaLinux)
Using this MediaWiki installation guide to install the free wiki platform on Linux (AlmaLinux) lets you create a wiki website within your organization, providing a central location for storing, sharing, and collaboratively editing information.
MediaWiki is an open-source and powerful wiki software developed by the Wikimedia Foundation, which also runs Wikipedia. It's designed to be user-friendly, customizable, and extensible, making it an ideal platform for creating wikis for various purposes, such as team documentation, knowledge bases, and community-driven websites.
AlmaLinux, being a reliable and stable distribution, is an excellent choice of Linux distributions for hosting MediaWiki. In this MediaWiki installation guide, you will learn what MediaWiki is and how to install MediaWiki on AlmaLinux with minimal steps.
Getting started with the MediaWiki installation guide
To install MediaWiki on AlmaLinux, take the steps outlined in this tutorial.
Prerequisites
- Operating System (OS) and Version: AlmaLinux OS 8.
- Access: Ensure you have root or sudo access to install configure software.
Step #1. Update the system
Before installing MediaWiki, ensure your system is up to date. Use the following commands to update your package lists and upgrade existing packages:
sudo dnf updateStep #2. Install the prerequisite OS packages
Installation of the Apache web server and the MariaDB database server are done using the following command:
sudo dnf install httpd mariadb mariadb-serverThe current PHP version available in the AlmaLinux repository at the time of writing this article was PHP 7.2. Due to an upstream issue, MediaWiki is incompatible with PHP 7.4.0 through 7.4.2. Instead, use PHP 7.4.3 or later.
When using PHP 8, please use MediaWiki 1.38.4+. However, in this MediaWiki installation guide, we recommend always installing MediaWiki 1.39 or higher. Wikimedia wikis do not use PHP 8. Hence, that version of PHP receives less testing; however, some groups utilize MediaWiki with PHP 8 without trouble.
You must use the Remi repositories to install PHP 8.1. So, first, use the following command to install Remi repositories:
sudo dnf install epel-releaseTo add and update the Remi repositories, use the following commands:
sudo dnf install https://rpms.remirepo.net/enterprise/remi-release-8.rpm
sudo dnf update
Then, use the following commands to reset the PHP module to its default state and enable the Remi PHP 8.1 module:
sudo dnf module reset php
sudo dnf module enable php:remi-8.1
To install PHP and other supporting packages, run the following command:
sudo dnf install php php-curl php-bcmath php-gd php-soap php-zip php-curl php-mbstring php-mysqlnd php-gd php-xml php-intl php-zip Step #3: Start web server and database service
Enable and start the Apache web server and MariaDB database service to ensure they run at boot:
sudo systemctl start httpd
sudo systemctl enable httpd
sudo systemctl start mariadb
sudo systemctl enable mariadb
Step #4. Secure the MariaDB platform and create a database for MediaWiki.
Run the MySQL secure installation script to enhance the security of your MariaDB installation:
sudo mysql_secure_installationThe script will prompt you to set a root password, remove anonymous users, disallow root login remotely, and remove the test database. Follow the prompts and secure your MariaDB installation.
After you've secured MariaDB, connect to the MySQL server as the root user:
sudo mysql -u root -pCreate a new database for MediaWiki (replace mediawiki_db shown in the example below with your desired database name) and a dedicated user (replace mediawiki_user and your_password with your preferred username and password):
CREATE DATABASE mediawiki_db;
CREATE USER 'mediawiki_user'@'localhost' IDENTIFIED BY 'your_strong_password';
GRANT ALL PRIVILEGES ON mediawiki_db.* TO 'mediawiki_user'@'localhost';
FLUSH PRIVILEGES;
Here is the output:
]# sudo mysql -u root -p
Enter password:
Welcome to the MariaDB monitor.  Commands end with ; or \g.
Your MariaDB connection id is 16
Server version: 10.3.39-MariaDB MariaDB Server

Copyright (c) 2000, 2018, Oracle, MariaDB Corporation Ab and others.

Type 'help;' or '\h' for help. Type '\c' to clear the current input statement.

MariaDB [(none)]> CREATE DATABASE mediawiki_db;
Query OK, 1 row affected (0.000 sec)

MariaDB [(none)]> CREATE USER 'mediawiki_user'@'localhost' IDENTIFIED BY 'your_strong_password';
Query OK, 0 rows affected (0.000 sec)

MariaDB [(none)]> GRANT ALL PRIVILEGES ON mediawiki_db.* TO 'mediawiki_user'@'localhost';
Query OK, 0 rows affected (0.000 sec)

MariaDB [(none)]> FLUSH PRIVILEGES;
Query OK, 0 rows affected (0.000 sec)

MariaDB [(none)]> quit
Bye
You'll need the username, password, and database name during the MediaWiki installation procedure, so keep these handy.
Step #5. Installing and using the MediaWiki web application
Step #5a. Download the latest MediaWiki installation files
The AlmaLinux 8 base repository does not include MediaWiki by default. You can download the most recent version of MediaWiki from the official website using the following command:
wget https://releases.wikimedia.org/mediawiki/1.40/mediawiki-1.40.1.tar.gzHere is the output:
]# wget https://releases.wikimedia.org/mediawiki/1.40/mediawiki-1.40.1.tar.gz
--2023-11-05 04:31:13--  https://releases.wikimedia.org/mediawiki/1.40/mediawiki-1.40.1.tar.gz
Resolving releases.wikimedia.org (releases.wikimedia.org)... 208.80.154.224, 2620:0:861:ed1a::1
Connecting to releases.wikimedia.org (releases.wikimedia.org)|208.80.154.224|:443... connected.
HTTP request sent, awaiting response... 200 OK
Length: 66494248 (63M) [application/x-gzip]
Saving to: 'mediawiki-1.40.1.tar.gz'

mediawiki-1.40.1.tar.gz                                     100%[=========================================================================================================================================>]  63.41M  28.2MB/s    in 2.3s

2023-11-05 04:31:16 (28.2 MB/s) - 'mediawiki-1.40.1.tar.gz' saved [66494248/66494248]
Then, use the following command to extract the downloaded file to the Apache document root (which is /var/www/html/):
tar -xvzf mediawiki-1.40.1.tar.gz -C /var/www/html/Next, create a symbolic link to the MediaWiki directory:
ln -s /var/www/html/mediawiki-1.40.1 /var/www/html/mediawikiStep #5b. Set the required permissions on the mediawiki directory
You can now change the file and group owner of the mediawiki folder using the following command:
sudo chown -R apache:apache /var/www/html/mediawiki Next, use the following command to check SELinux status on your AlmaLinux system:
getenforceHere is the output:
]# getenforce
Enforcing
If SELinux is enabled on your AlmaLinux system, apply the following SELinux rule to the mediawiki folder:
sudo restorecon -FR /var/www/html/mediawikiIf the firewall is already installed on your AlmaLinux system, enable HTTP and HTTPS access and reload it using the following commands:
sudo firewall-cmd --permanent --zone=public --add-service=http
sudo firewall-cmd --permanent --zone=public --add-service=https
sudo firewall-cmd --reload
Step #5c. Start a MediaWiki web-based installation
To begin the MediaWiki installation, enter the following URL into your web browser's URL field:
http://System_IP_Address/mediawiki/Replace the System_IP_Address placeholder value with your IP address in the example URL provided above:

Then, click on the set up the wiki link as shown in the screenshot above. On the subsequent screen that comes up, define your language and the wiki language for your MediaWiki install configuration. Click the Continue button when these values have been set:

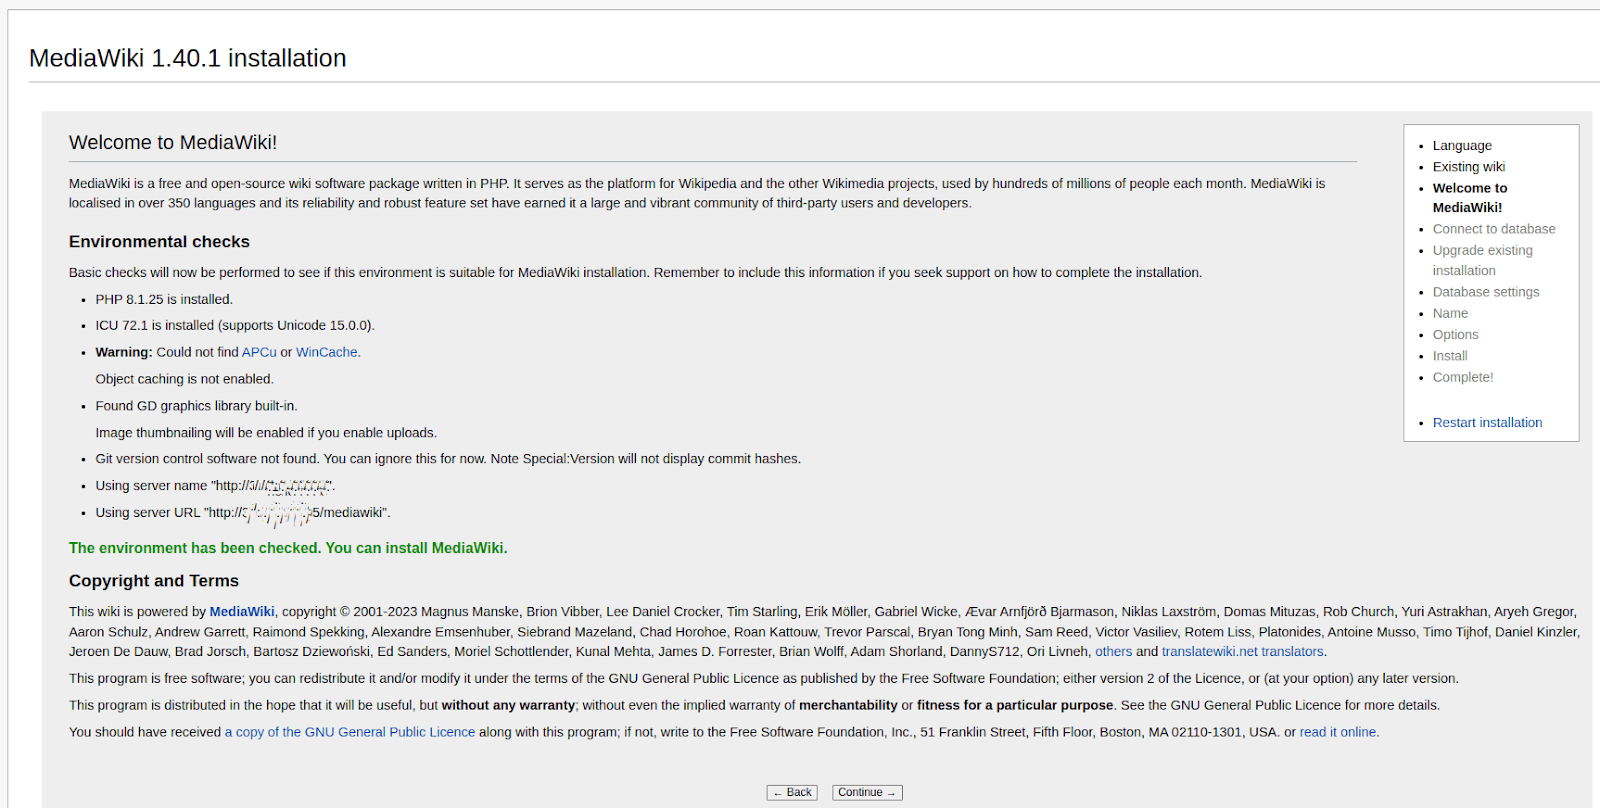
You will see the MediaWiki environmental setup checks listed on the next screen. Click the Continue button to proceed:
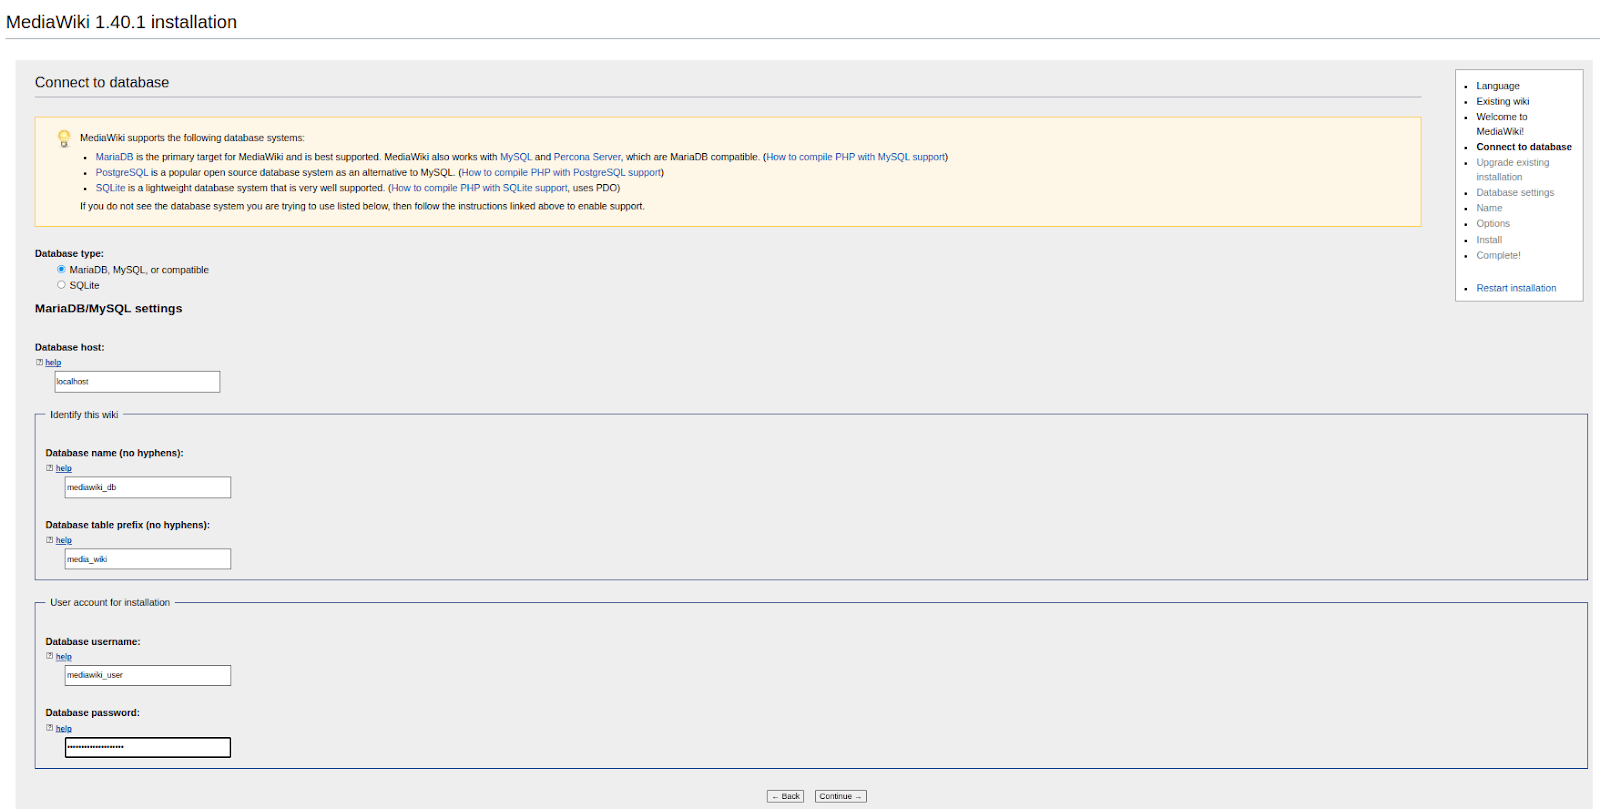
In the Connect to Database section, you enter the Mediawiki database, database username, and password and then click the Continue button:
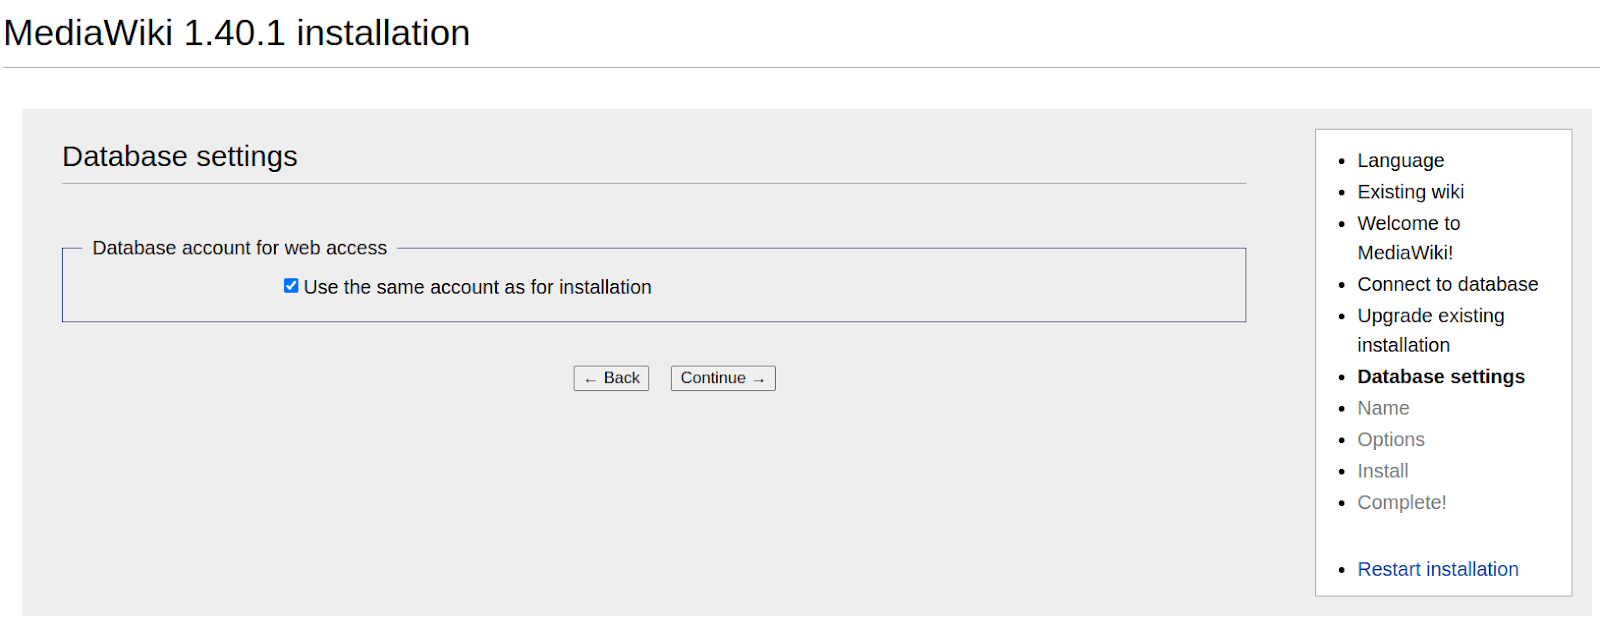
In the Database Settings > Database Account for Web Access area of the user interface, check the Use the Same Account as for Installation checkbox and then click the Continue button:
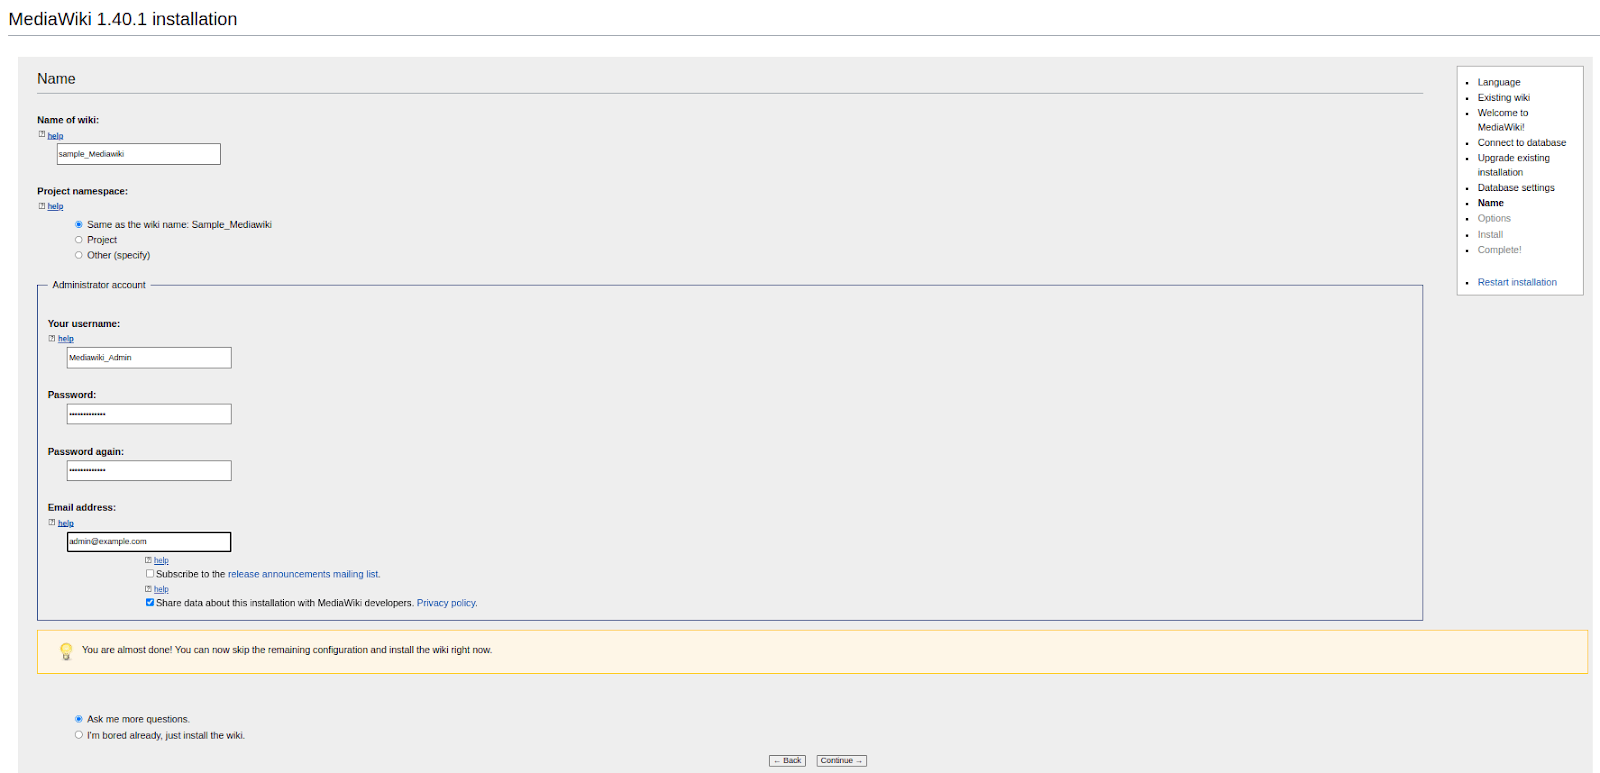
Enter the wiki's name and administrator account details in the Name section. Then, click the Continue button:
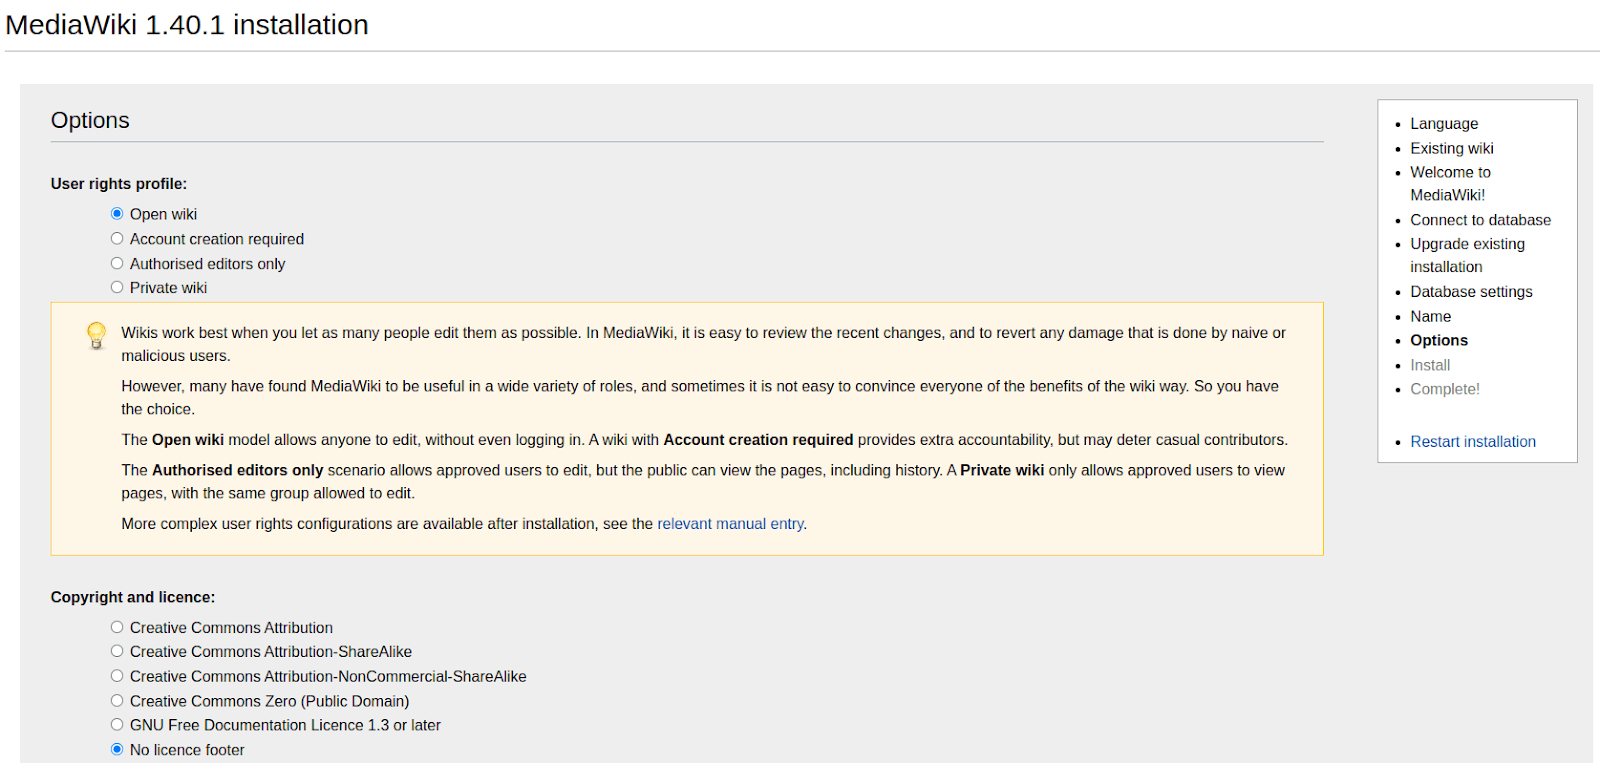
Next, in the Options section, you can select the available options per your requirements and then click the Continue button:
When the Begin the Installation screen appears with its confirmation prompt, choose the Continue button to finish the MediaWiki installation:

After that, click the Continue button again after the database setup portion of the installation has been confirmed as successful on the next screen:

Another screen will appear confirming that the MediaWiki installation has been completed:
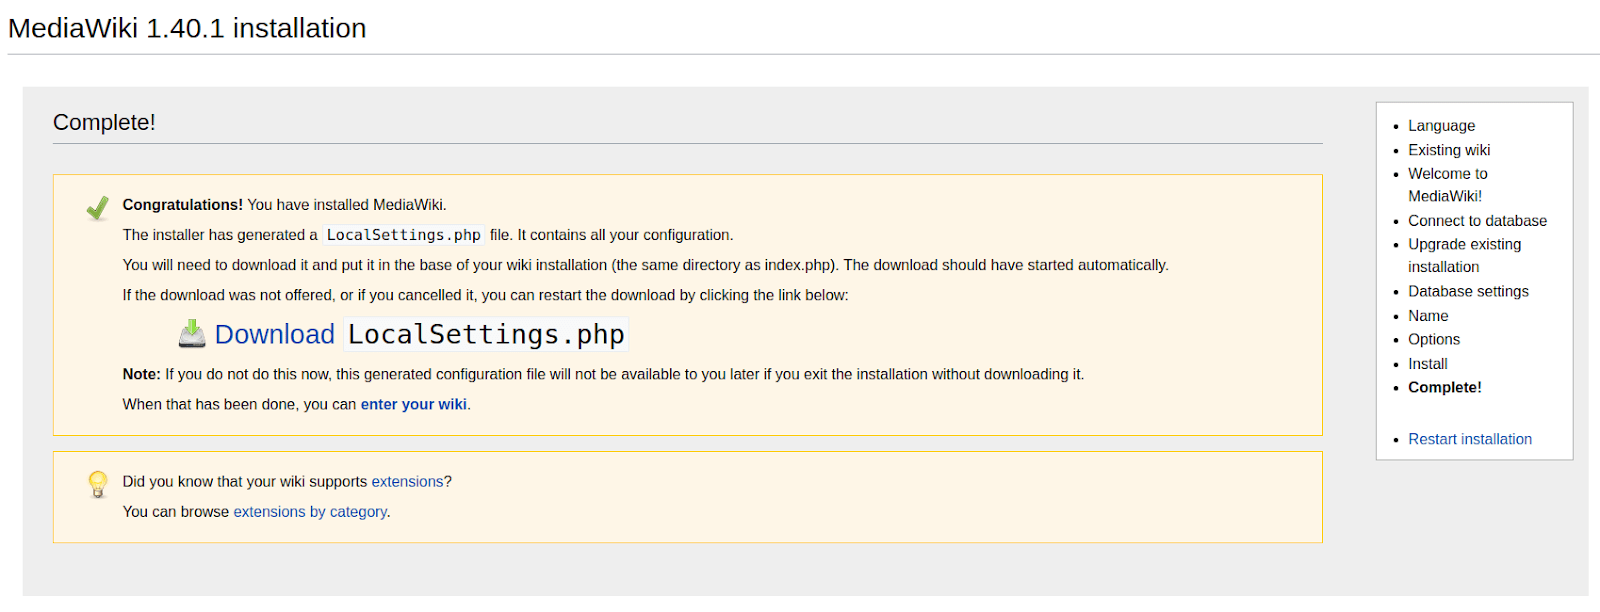
Now, you can download and save the LocalSettings.php file to the MediaWiki directory (/var/www/html/mediawiki/).
Step #5d. Access the MediaWiki web interface
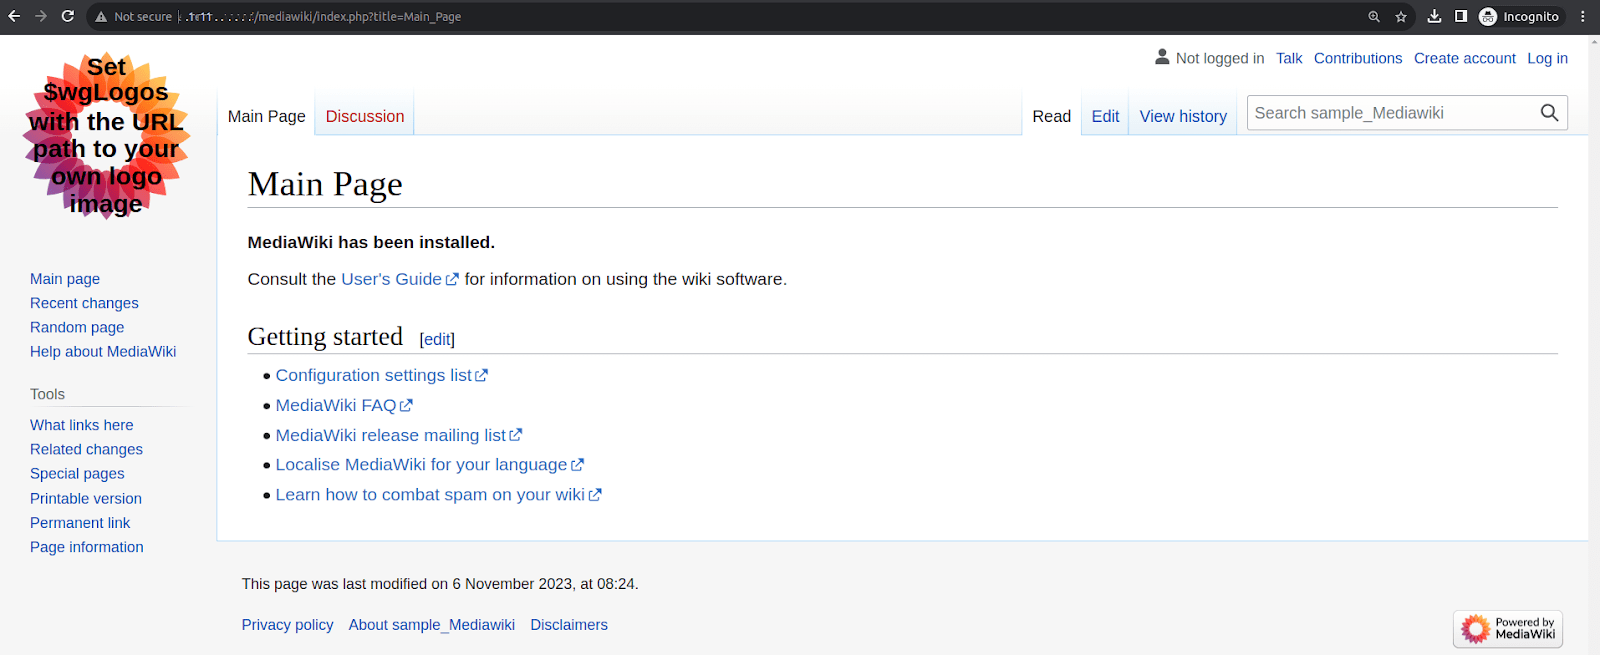
Now, visit the MediaWiki Main Page via the http://System_IP_Address/mediawiki/ URL and click the Log In link in the upper righthand corner of the screen. Of course, when visiting the MediaWiki Main Page, replace the System_IP_Address placeholder value with your actual IP address:
Then, enter the MediaWiki admin credentials you created during the installation process and click the Log In button:

You will taken to the MediaWiki Main Page with the Log Out link shown in the upper, righthand corner of the screen:

Congratulations on establishing your new wiki. It is a powerful tool to help you transfer knowledge among stakeholders in your organization. We hope this MediaWiki installation guide was helpful during the setup and configuration process.
Steps for uninstalling MediaWiki
Uninstalling MediaWiki on AlmaLinux involves removing the MediaWiki application, its associated files, and any related components like the web server and database — depending on your setup. Here are the steps to uninstall MediaWiki.
Step #1. Turn off the web server
If you're using Apache as your web server, turn it off to stop serving the MediaWiki site. You can use the following commands to deactivate it:
sudo systemctl stop httpd
sudo systemctl disable httpd
Step #2. Remove the MediaWiki files
Delete the MediaWiki installation directory from your web server's document root area. This location may vary based on your setup, but it's typically found at /var/www/html/. Use the rm command to remove the MediaWiki files:
sudo rm /var/www/html/mediawikiStep #3. Drop the MediaWiki database
You can drop the database and its associated user if you used a MySQL or MariaDB database for MediaWiki. Remember to replace the mediawiki_db and mediawiki_user values shown with your actual database and usernames:
mysql -u root -p
DROP DATABASE mediawiki_db;
DROP USER mediawiki_user;
Supercharge your MediaWiki installation with Liquid Web hosting
By following this MediaWiki installation guide, you can install MediaWiki on Linux — specifically the AlmaLinux distribution. Hosting your MediaWiki installation with Liquid Web offers a compelling solution for individuals and organizations seeking a robust and reliable platform for collaborative knowledge management. Throughout this MediaWiki installation guide, we've emphasized the importance of a strong hosting environment, and Liquid Web delivers just that along with the necessary infrastructure and 24-hour support.
If you choose Liquid Web for your MediaWiki hosting project, you can enjoy the benefits of a world-class hosting provider with a fantastic reputation for offering performance, security, and unparalleled customer support. Our managed hosting services ensure that your MediaWiki instance on AlmaLinux runs smoothly, is highly available, and can easily handle potential traffic spikes.
Related Articles:


About the Author: Mohammed Noufal
Mohammed Noufal is a B.Tech graduate with a decade of experience in server administration and web hosting. He is a father to two daughters and finds fulfillment in their growth. In his free time, he enjoys blogging, sharing experiences, and listening to music. With a strong technical background, family commitment, and creative outlets, he represents a well-rounded life journey.


Our Sales and Support teams are available 24 hours by phone or e-mail to assist.
Latest Articles
In-place CentOS 7 upgrades
Read ArticleHow to use kill commands in Linux
Read ArticleChange cPanel password from WebHost Manager (WHM)
Read ArticleChange cPanel password from WebHost Manager (WHM)
Read ArticleChange the root password in WebHost Manager (WHM)
Read Article