


How to renew an SSL certificate (a paid SSL cert)
In today's online world, maintaining website security is vital. With new cyber threats popping up all the time, website owners have to be extra careful to protect their data and keep their visitors' trust. That's where Liquid Web comes in. We're all about making sure your website stays secure, no matter what.
SSL certificates are like the bodyguards of your website, making sure all the information shared between your site and its visitors is kept secret. In this guide, we'll show you how to renew your SSL certificate, no matter what kind of hosting you have.
Key points
By reviewing this article, you will learn about the following concepts:
- Overview of how to renew an SSL certificate.
- Renewing an SSL cert for your website hosted with Liquid Web.
- Variations — how to renew an SSL certificate across different hosting scenarios.
- Answers to frequently asked questions about renewing a paid SSL certificate.
Overview of how to renew an SSL cert
Renewing your SSL certificate is a straightforward process that can typically be completed within the general task sequence listed in the next sections. Following the guidelines provided, you can successfully renew your SSL certificate and maintain a secure browsing experience for your website visitors.
Task #1. Assess SSL renewal requirements
Begin by evaluating the expiration date of your current SSL cert. Most SSL providers offer email notifications well in advance of the expiration date to remind you to renew. Alternatively, you can check the expiration date through your SSL provider's dashboard or by examining the certificate details within your web browser.
Task #2. Back up you current SSL certificate
Before initiating the renewal process, it's important to make a backup of your current SSL cert and associated private key. This backup lets you restore the certificate in case of unforeseen issues during the renewal process.
Task #3. Access your SSL provider's dashboard
Log in to your SSL provider's dashboard or account management portal. Navigate to the section dedicated to SSL certificates or renewals.
Task #5. Select the renewal option
Within the SSL provider's dashboard, locate the option to renew your SSL certificate. Depending on the provider, this option may be labeled differently but should be easily identifiable.
Task #6. Verify domain ownership
As part of the renewal process, you may need to verify your domain ownership. This task involves receiving an email that was sent to the domain's registered email address, meta tag verification, or adding a specific DNS record provided by the SSL provider.
Task #7. Generate the Certificate Signing Request (CSR)
If prompted, generate a new CSR for the renewal. The CSR contains essential information about your website and is required to generate the renewed SSL cert.
Task #8. Submit the renewal request
Once all necessary details have been verified and provided, submit the renewal request through the SSL provider's dashboard. Review the information carefully to ensure accuracy.
Task #9. Install renewed SSL certificate
After the renewal request has been reviewed and approved, you will receive the renewed SSL certificate from your SSL provider. Follow the provider's instructions to install the renewed certificate on your web server.
Task #10. Test the renewed certificate
Once the renewed certificate has been installed, perform thorough testing to ensure that the SSL connection is functioning correctly. This action item includes testing both the validity and functionality of the certificate across various web browsers and devices.
Task #11. Update the SSL configuration
Finally, update any relevant SSL configuration settings within your web server or hosting environment to reflect the renewed certificate. This task ensures that the renewed certificate is properly recognized and utilized for all secure connections to your website.
Renewing an SSL Cert for your website hosted with Liquid Web
Let's walk through the process of how to renew your SSL certificate for your website hosted with Liquid Web. Follow the steps outlined in the next sections to ensure a seamless renewal process. Following our guide, you can renew and install your SSL certificate via your Liquid Web account, ensuring continued security for your website.
Step # 1. Check expiration and renewal eligibility
Visit the https://my.liquidweb.com/domain/ssl URL for while logged into your Liquid Web account and search for your domain name. Examine the expiration date of the SSL cert. If it's available for renewal, you'll see a Renew button as shown in the image below:

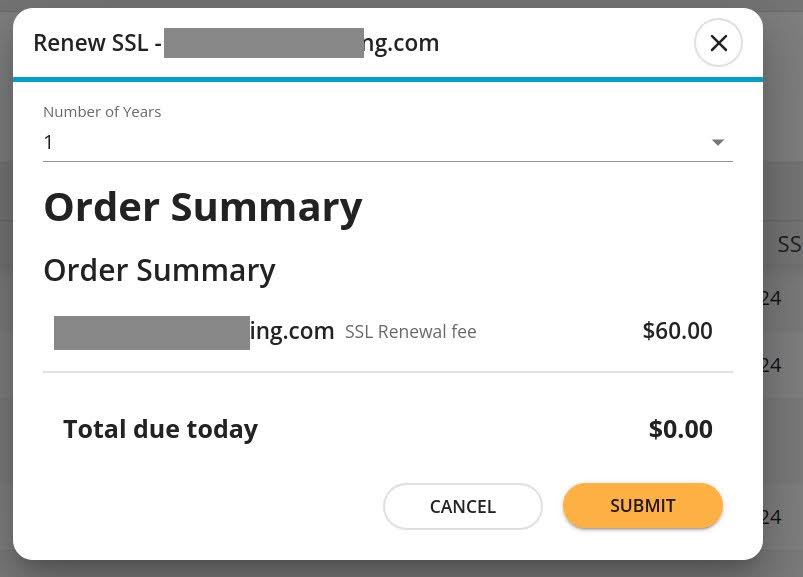
Step #2. Initiate renewal
Click the Renew button corresponding to the SSL cert you want to extend. A pop-up box will appear asking for the number of years you want to renew for and the corresponding price. Select the desired number of years and click the Submit button to proceed with the renewal:
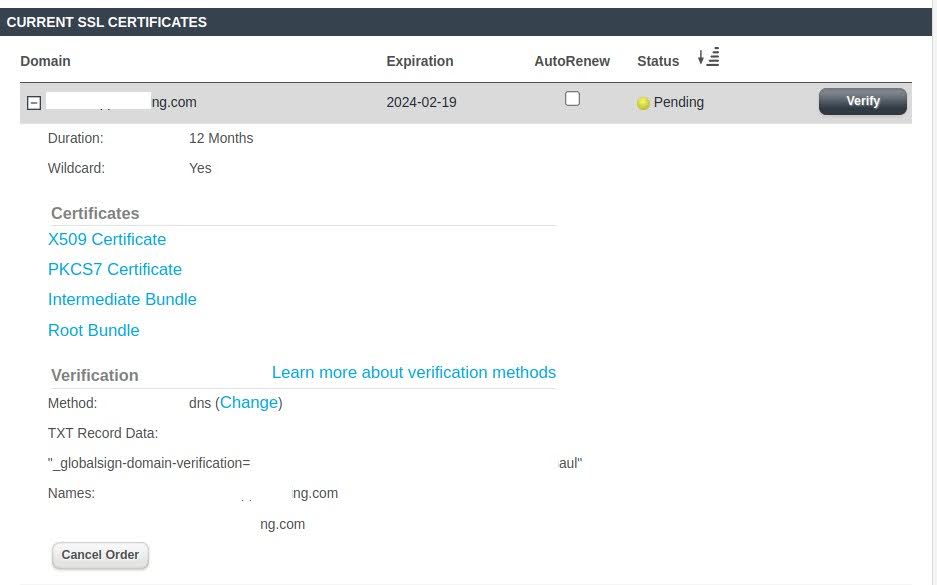
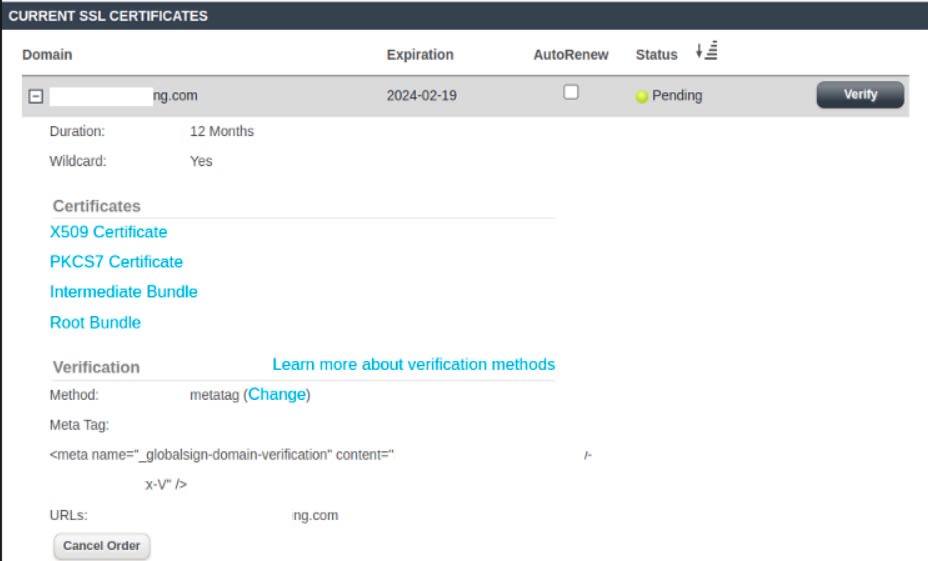
Step #3. Domain verification
After initiating the renewal, go to the https://manage.liquidweb.com/manage/ssl/ URL while logged into your Liquid Web account. Verify your domain using either the Meta Tag or DNS method provided. If using the Meta Tag method, place it in the website directory .well-known/pki-validation/gsdv.txt. If using the DNS method, add it as a TXT record on the nameserver.
3.1. Domain verification via the DNS method and TXT record data
Here is an example domain verification via the DNS method using TXT record data:
3.2. Domain verification via the Meta Tag method and HTML code snippet
Below you will see an example domain verification via the Meta Tag method using an HTML code snippet:
Step #4. DNS method of verification may have processing time (if applicable)
If you choose the DNS method ad your verification option, please note that it may take some time for the verification process to complete.
Step #5. Final verification
Once the domain is verified, return to the https://manage.liquidweb.com/manage/ssl/ URL while logged into your Liquid Web account.. The Verify button can be clicked to confirm the verification process is successful.
Step #6. Certificate installation
Navigate to the Certificates section and select the X509 certificate associated with your domain. Copy the certificate provided.
Step #7. Install certificate
Go back to your website's dashboard or control panel. Paste the copied certificate into the designated field for SSL certificate installation. Generate a Certificate Authority (CA) bundle from the What's My Chain option provided by Liquid Web. Paste the generated CA bundle into the corresponding field. Click the Install button to complete the SSL cert installation process.
Variations — how to renew an SSL certificate across different hosting scenarios
Renewing an SSL cert may vary slightly depending on your hosting provider and SSL certificate type. Regardless of your hosting scenario, the fundamental steps involved in renewing an SSL certificate remain consistent.
By following the outlined procedures and leveraging the resources from your hosting company, you can ensure a seamless SSL certificate renewal process. Here are some additional examples illustrating how to renew an SSL certificate across different hosting scenarios in the next sections.
Scenario #1. cPanel hosting
If you're using cPanel hosting, the SSL renewal process can typically be initiated directly through the cPanel dashboard. Navigate to the SSL/TLS section and select the option to renew your SSL certificate. Follow the on-screen prompts to complete the renewal process seamlessly.
Scenario #2. WordPress hosting
For websites hosted on WordPress platforms, SSL certificate renewal can often be managed through the hosting provider's WordPress management interface. Look for the SSL or Security section within the dashboard to initiate the renewal process.
Scenario #3. Cloud hosting
Cloud hosting platforms may offer built-in tools or integrations for managing SSL certificates. Access the SSL management section within your cloud hosting provider's dashboard to renew your SSL certificate with ease.
Scenario #4. Dedicated server hosting
If your website is hosted on a dedicated server, SSL cert renewal may require direct access to the server's command line interface or control panel. Consult your server documentation or hosting provider for specific instructions on renewing SSL certificates in a dedicated server environment.
Frequently Asked Questions about renewing a paid SSL certificate
Question #1. What is an SSL certificate, and why is it essential to renew it?
An SSL certificate is a digital certificate that encrypts data sent between a site and its visitors, ensuring secure communication. It's crucial to renew your SSL certificate regularly to maintain a secure and trusted connection, as expired certificates can lead to security vulnerabilities and warnings for visitors.
Question #2. How often should I renew my SSL certificate?
The frequency of SSL certificate renewal depends on the certificate's validity period, which typically ranges from one to three years. It's recommended to renew your SSL cert before it expires to ensure uninterrupted security for your website.
Question #3. What if I fail to renew my SSL cert in proper time?
If you do not renew your SSL cert before it expires, visitors may encounter security warnings or errors when accessing your site. Additionally, expired SSL certificates can leave your website vulnerable to cyber threats and compromise data security.
Question #4. Can I renew my SSL certificate before it expires?
Yes, you can renew your SSL cert before it expires. Many SSL certificate providers offer early renewal options, allowing you to extend the validity period of your certificate without losing any remaining validity days.
Question #5. Do I need to generate a new CSR for SSL certificate renewal?
In most cases, you don't need to generate a new Certificate Signing Request (CSR) for SSL certificate renewal. However, if you're changing your SSL certificate type or domain name, you may need to generate a new CSR during renewal.
Question #6. Can I renew my SSL certificate with a different SSL certificate provider?
Yes, you can renew your SSL certificate with a different SSL certificate provider if you choose to switch providers. However, the renewal process may vary depending on the new provider's requirements and procedures.
Question #7. How can I verify the successful renewal of my SSL cert?
After completing the SSL certificate renewal process, you can verify its successful renewal by checking the certificate details in your hosting provider's SSL management dashboard. Additionally, you can use online SSL certificate validation tools to confirm the renewed certificate's validity.
Question #8. What should I do if I encounter issues during the SSL certificate renewal process?
If you encounter any issues or errors during the SSL certificate renewal process, it's essential to contact your SSL certificate provider or hosting provider for help. They will troubleshoot issues and ensure a successful renewal.
Question #9. Is there any downtime during the SSL cert renewal process?
In most cases, there is no downtime during the SSL certificate renewal process. However, it's recommended to schedule the renewal during non-peak hours to avoid potential disruption to website operations.
Question #10. Can I renew multiple SSL certificates at once for multiple domains?
Yes, you can renew multiple SSL certificates at once for multiple domains if you manage multiple websites with separate SSL certificates. Many SSL certificate providers offer bulk renewal options or management tools to streamline the renewal process for a volume of SSL certs.
Unlock secure hosting today with Liquid Web
Maintaining a secure website is a top priority for website owners, and SSL cert renewal is an integral part of this process. By following the step-by-step procedures outlined in this guide for how to renew an SSL certificate, you can effectively renew your SSL certificate and uphold the security of your online presence.
We prioritize the importance of website security and offer a range of SSL certificate solutions to meet your specific needs. Whether you're looking to purchase a new SSL cert or renew an existing one, our expert team is here to assist you every step of the way. When you choose Liquid Web as your hosting provider, you're not just getting a reliable hosting platform — you're unlocking a world of secure hosting solutions tailored to your specific requirements. Our data centers have advanced security measures to ensure the highest level of protection for your website and data.
Our crew at Liquid Web provides round-the-clock support and proactive security measures to keep your website secure and running smoothly. Whether you're a small business owner looking to establish an online presence or a large enterprise needing robust hosting solutions, Liquid Web has you covered.
Don't wait any longer to secure your online presence. Unlock secure hosting today with Liquid Web and experience the peace of mind of knowing your website is protected by industry-leading security measures. Ready to secure your website with a trusted SSL certificate? Explore our SSL certificate offerings and secure your online presence today:
Don't let an expired SSL cert compromise the security of your website. Renew your SSL certificate today with Liquid Web and enjoy peace of mind knowing that your online visitors' data is protected by industry-leading encryption technology.
Related Articles:


About the Author: Haritha Jacob


Our Sales and Support teams are available 24 hours by phone or e-mail to assist.
Latest Articles
In-place CentOS 7 upgrades
Read ArticleHow to use kill commands in Linux
Read ArticleChange cPanel password from WebHost Manager (WHM)
Read ArticleChange cPanel password from WebHost Manager (WHM)
Read ArticleChange the root password in WebHost Manager (WHM)
Read Article