◦ Comprehensive security
◦ Support
WordPress Guide → Errors → Troubleshooting
WordPress troubleshooting: A beginner’s guide

Are you facing issues with your WordPress website? Most of these issues are solved by following easy WordPress troubleshooting steps.
What is WordPress troubleshooting?
WordPress troubleshooting is a process for determining why something does not work as expected. The process does not require code experience and can be accomplished if you have basic WordPress knowledge.
Reasons why you may need to troubleshoot WordPress
There are different reasons why you may need WordPress troubleshooting. These are the most common:
- Website style issue: The website does not follow the style and looks different than it should be (i.e. the font color is red while blue is the right color).
- Speed issues: The website is loading very slowly.
- Connectivity issues: A network-related or instance-specific error occurred while establishing a connection to SQL Server.
- Theme and plugin functionalities don’t work: Sometimes plugins or themes may not work as they should. Maybe your WordPress theme doesn’t look like the demo theme. These conflicts are easily identified with the troubleshooting.
- Increase security: Avoiding hacker attacks to the website is crucial to keeping your site up and running. WordPress troubleshooting can assist you in hardening WordPress and keeping your site safe.
- When you attempt to update a post and encounter the “not a valid JSON response”
3 WordPress troubleshooting techniques
You can troubleshoot your WordPress website using different techniques and plugins. Let’s check the most used below.
Prerequisite: Save a complete backup of your website
Troubleshooting a problem might break something on your website. A backup is essential to easily restore your website to the latest WordPress version before troubleshooting.
You can backup a WordPress website manually, or you can use a plugin. If you are using a WordPress backup plugin, make sure you safely save the backup following the plugin’s documentation.
If you have a managed WordPress hosting plan with Liquid Web, you can easily find the daily backups by going to My Nexcess > Plans > Your Plan > Your Site > Backups on the left sidebar.
Feel free to create a new backup by clicking on the Create Backup button or restore the files on the Daily Backups list by clicking on the three dots on the right and then Restore Files, Restore Databases, or Restore Files + Database.
If you are not using a backup plugin or don’t have managed hosting, we strongly recommend you start using a backup plugin on your site. Or, check with your current hosting provider to see if they offer a backup service. The manual backup process is only recommended for developers and may break your website if something is imported or exported wrong.
1. WordPress website site health checker tool
In WordPress 5.1, the WordPress team added the Website Site Health Checker tool that helps to monitor how your website is doing. You can find it under WordPress Dashboard > Tools > Site Health where you will find the status and info tabs.
In WordPress version 5.4, the Website Site Health Checker was added as a widget to the dashboard. This makes it more visible and easier to find critical errors or improvements from the dashboard view without going to the tools page.
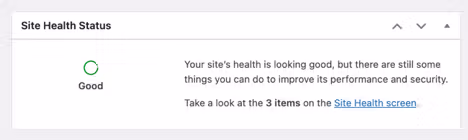
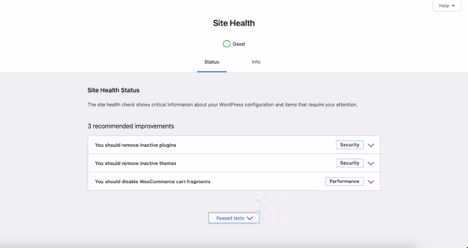
Status page
This page is the first place you should check in the WordPress troubleshooting process to verify and ensure there are no errors reported.On the status page, WordPress runs a performance and security test to make sure everything is going well with your website. It’s also possible to see a colored circle representing your site status. All items are collapsible, giving you more information about each improvement and how to fix it.
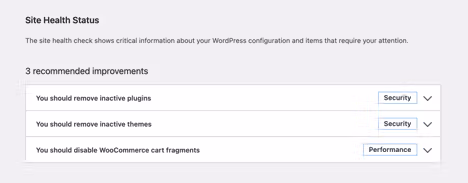
Keep in mind it’s pretty important to keep all those recommendations up to date in order to improve website performance in WordPress.
Info page
The website’s information is stored on the info page, which is pretty useful to share with developers and support if you are getting help.
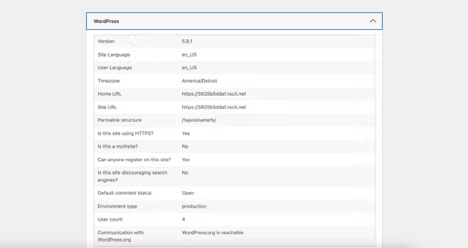
Copy the site information to the clipboard easily by clicking on the available button on this page.
2. WordPress health check and troubleshooting extension
An extension to the Website Health Checker tool is the WordPress Health Check & Troubleshooting plugin developed by the WordPress community. The plugin is very useful for checking for themes or plugin conflicts on your website, as it adds the troubleshooting and tools tabs to the site health page. As a separate plugin, you need to download and install it on your WordPress installation.
Troubleshooting page
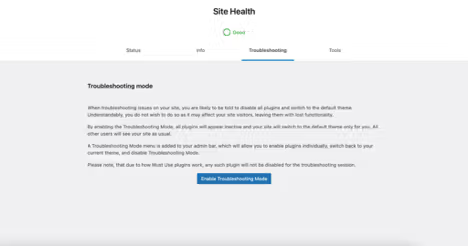
When troubleshooting issues on your site, you are likely to be told to disable all plugins and switch to the default theme. Understandably, you do not wish to do so as it may affect your site visitors, leaving them with lost functionality. By enabling the troubleshooting mode, all plugins will appear inactive and your site will switch to the default theme only for you. All other users will see your site as usual.
A troubleshooting mode menu is added to your admin bar, which will allow you to enable plugins individually, switch back to your current theme, and disable troubleshooting mode. Please note that due to how must used plugins work, any such plugin will not be disabled for the troubleshooting session.
Tools page
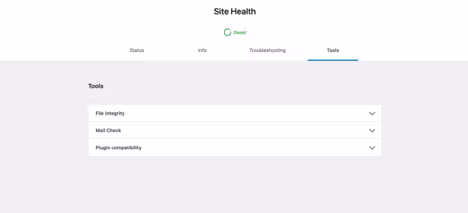
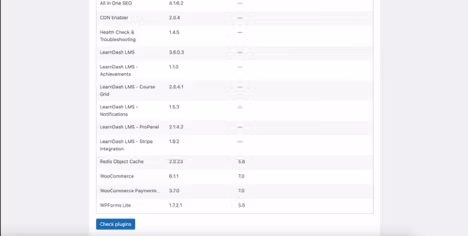
Extra tools offered on this page like the plugin compatibility allow you to see the current installed plugin’s version, as well as minimum and maximum PHP supported versions. It’s essential to know that it must need to be added by the plugin’s author, so don’t worry if you see empty spaces in some plugins.
3. Manual theme and plugin conflict check
This process has the same result and intention as the Health Check & Troubleshooting plugin. The difference here is that it’s manual, does not require a plugin installation, and will not prevent live visitors from seeing the effects of a theme switch and plugin deactivation. For this reason, it is mostly recommended for staging and development environments where the website is still in progress.
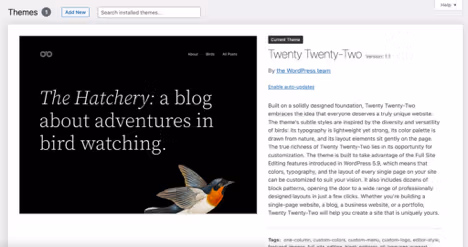
Switch to the default WordPress theme
The best way to check for conflicts related to your theme is to switch to the default WordPress theme, always the most recent one like the Twenty Twenty-Two. If the present issue is solved after this, the problem comes from your theme.
It’s simple to do. Just access the Dashboard > Appearance > Themes > Twenty Twenty-Two and click on the activate button. Note you can search by theme if it is not listed on your themes.
Disable and enable each plugin
Disabling all plugins is the best way to verify if they cause conflict. The process may be tiring, but it is worth it. Just check the following example:
The LearnDash LMS WordPress plugin is not working properly and to get the conflict suspicion solved, you will go to the Dashboard > Plugins > Select All Plugins (except LearnDash) > Deactivate, and then if the issue is solved, go back to the plugin’s page and activate one by one until the issue remains. After that, you just need to reach the plugin support reporting the found conflict.
Upgrade your WordPress.org hosting
If you find yourself struggling with the technical side of your website more than you’d like, it might be time to upgrade your WordPress.org hosting. A good web host will help keep your site fast and secure—and offer expert support. If you need even more help, a managed WordPress hosting arrangement might be a good solution.
Liquid Web has been pushing the industry forward in web hosting for WordPress sites, for decades. Our server speeds are lightning fast, our uptime is unbeatable, and our support team is unrivaled. Click below to learn more, or start a chat right now to get answers and guidance just for you.
Additional resources
Diagnosing WordPress errors on your site →
Even more common errors, how to troubleshoot them, and how to solve them
Comprehensive WordPress security checklist →
18 tasks anyone can implement to make your WordPress site more secure
What is managed WordPress hosting? →
What it means, what it includes, and how to decide if it’s right for you