◦ Comprehensive security
◦ 24/7 support
WordPress Guide → Build → Custom CSS
A beginners guide to WordPress custom CSS
If you’ve ever wanted your WordPress website to look great on every device but your out-of-the-box WordPress theme only gets you about 90% of the way there, don’t worry. Custom CSS will help you perfect how your website looks. It’ll let you override or add to the existing styles so you can tweak things exactly how you want, without needing to dive into theme files or touch PHP.
In this beginner’s guide, we’ll walk you through how to edit CSS in WordPress to help you build a more beautiful, intuitive, and better-performing website!
What does CSS mean in WordPress?
CSS (Cascading Style Sheets) is kind of like the style guide for your site. It doesn’t change what your content says, it just changes how everything is presented.
Now, every WordPress theme already has some CSS baked in. That’s why different themes have different colors, fonts, and layouts right out of the box. But what if you want to tweak something the theme doesn’t let you change in the settings? That’s where custom CSS comes in.
With custom CSS, you can make small (or big!) visual changes to your site, without needing to mess with your theme’s code or hire a developer. And thanks to WordPress tools – and especially if you’re on a solid host like Liquid Web – you’ve got safe ways to test out those changes before you go live. No stress, no “oops I broke the site” moments.
Understanding CSS syntax and selectors
CSS is comprised of style rules that are interpreted by the browser, and then applied to the elements of your document.
The parts of a style rule
- Selector − A selector is an HTML tag at which a style will be applied.
- Property − A property is a particular characteristic of an HTML tag that can be changed. An example of this might be “color” for text elements.
- Value − Values are assigned to properties. For example, color property can have value either red or #F1F1F1. View the complete Mozilla CSS reference to view all properties and possible values for each property.
Here’s how a basic structure of a css rule looks in practice:
selector {
    property: value;
    property: value;
}
Selectors
There are many different selectors you can identify through syntax in order to change the properties of an HTML element. Some of them include:
- Type selectors
- Universal selectors
- Descendant selectors
- Class selectors
- ID selectors
- Child selectors
- Attribute selectors
Syntax
The syntax of CSS is a series of rules consisting of a selector and a declaration block.
The selector block points the code toward an HTML element. The declaration block changes the property of that selector based on a series of values.
selector { property: value }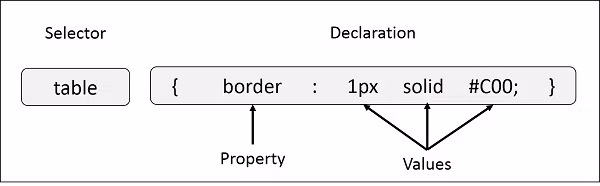
To add more rules (as many as you want), it is standard practice to give each property, value, and declaration its own line. For example:
h1 {
    color: blue; /* Changes the text color to blue */
    font-size: 24px; /* Changes the font size to 24px */
}
Here:
h1is the selector (the element you’re styling).colorandfont-sizeare properties that define how the element should look.blueand24pxare the values assigned to the properties.
How to add custom CSS to WordPress
Now that you know the basics, it’s time to add your custom CSS to your WordPress site – here’s how:
Method 1: Using the site editor (for block themes)
If you’re using a block theme like Twenty Twenty-Five with WordPress’s Full Site Editing (FSE) capabilities, WordPress provides the site editor.
The site editor is a powerful tool that lets you build and customize your entire site using blocks. All you need to do is:
1. Navigate to Appearance > Editor in your WordPress dashboard.

2. Click anywhere on your site’s preview to open the options on the left side.

3. Click on the Styles icon in the top-left corner.

4. Click on the options menu icon and select Additional CSS.

5. Now you can add your custom CSS snippets depending on what exactly you want to change!

💻 Note: You’ll need to find the class or ID of the specific element you want to style. You can do this by using your browser’s Developer Tools. Just open your website in a browser and go to the webpage where you want to change something (like a button, heading, paragraph, etc.). Then, right-click on the element you want to customize and select Inspect. This opens the Developer Tools pane, which will show you the HTML structure of the page, and the element you clicked on will be highlighted in the HTML code.
For example:
<button class="cta-button" id="contact-button">Contact Us</button>Here, the class is cta-button and the ID is contact-button.
You can use either the class or ID to target that element with CSS. Classes are used when you want to target multiple elements (e.g., all buttons with the same style), while IDs are used when you want to target a unique element (e.g., only one specific button).
Method 2: Using the customizer (for classic themes)
For classic themes, the WordPress Customizer offers a user-friendly way to add custom CSS:
1. Go to Appearance > Customize in your dashboard.

2. Click on the Additional CSS section.

3. Just like in Method 1, you’ll need to find the class or ID of what you want to alter and add your custom CSS rules.
4. Use the live preview to see changes and click Publish when satisfied.
Method 3: Using WordPress plugins for CSS editing
There are several plugins available in WordPress that allow you to add custom CSS easily, without needing to interact with theme files directly. These plugins provide a simple interface for adding custom styles and can be helpful for users who want to keep everything within the WordPress dashboard and avoid coding altogether.
Here’s a general overview of how to use a WordPress CSS editing plugin:
- Install and activate the CSS editing plugin of your choice. For this walkthrough, we’ll use the Simple Custom CSS plugin.
- Go to Appearance > Custom CSS (or the specific plugin settings page). You will be presented with a text area where you can input your custom CSS code once you get the class and ID of the element(s) you want to modify.
- After writing your CSS, click Save to apply the changes.
Method 4: Using a child theme and editing directly
If you’re getting serious about customizing your site – or you’re working on a client project – child themes are where it’s at.
A child theme inherits the functionality and styling of a parent theme while allowing you to make modifications without affecting the parent theme’s files. This is particularly useful when you want to make customizations that won’t be lost when the parent theme gets updated.
Here are the steps:
1. Access your WordPress files via an SFTP client (like FileZilla) or your web host’s file manager.
⭐ If you’re hosting with Liquid Web, you’ve got tools like SFTP access, staging environments, and a file manager in your control panel to make this process safer and smoother.
2. Go to the theme directory (wp-content/themes/) and create a folder for your child theme.
3. Inside the folder, create a style.css file and a functions.php file.
4. In style.css, add the following at the top of the file.
/*
Theme Name: Your Child Theme Name
Template: parent-theme-folder-name
*/
Replace parent-theme-folder-name with the folder name of the parent theme.
5. In functions.php, enqueue both the parent and child theme styles:
<?php
function my_theme_enqueue_styles() {
    wp_enqueue_style( 'parent-style', get_template_directory_uri() . '/style.css' );
    wp_enqueue_style( 'child-style', get_stylesheet_directory_uri() . '/style.css', array('parent-style') );
}
add_action( 'wp_enqueue_scripts', 'my_theme_enqueue_styles' );
6. Go to the WordPress dashboard, navigate to Appearance > Themes, and activate your child theme.
7. Now that the child theme is set up, add your custom CSS directly into the style.css file of the child theme.
As you can see, setting up a child theme requires some technical understanding of WordPress theme structure and basic coding. However, it’s the most reliable and long-term solution for custom CSS.
Common CSS customizations for WordPress
Change fonts and text styles
Sometimes a theme’s font just doesn’t match your brand or your taste. With CSS, you can change it in seconds.
body {
  font-family: 'Helvetica Neue', sans-serif;
  font-size: 18px;
  color: #333;
}
Want your headings to stand out more? Try:
h1, h2, h3 {
  font-weight: bold;
  text-transform: uppercase;
}
Change fonts and text styles
Buttons are calls to action. They should stand out. Here’s how to go from bland gray to eye-catching orange:
.button, .wp-block-button__link {
  background-color: #ff6600;
  color: #fff;
  border-radius: 5px;
  padding: 12px 24px;
}
And here’s a nice little hover effect:
.button:hover {
  background-color: #cc5200;
}
Resize or style images
Want your featured images or gallery pics to behave a little better?
img {
  max-width: 100%;
  height: auto;
  border-radius: 8px;
}
This makes sure images are responsive and look great across devices.
Customize links
If you don’t love the default link color or the underlines, you can try this:
a {
  color: #0073aa;
  text-decoration: none;
}

a:hover {
  color: #005177;
  text-decoration: underline;
}
Tweak layout spacing
Let’s say there’s too much padding between blocks, or you want to reduce space under your headings:
h2 {
  margin-bottom: 10px;
}

.wp-block {
  padding: 20px;
}
This kind of spacing control can really clean up the look of your site.
Make it mobile-friendly
Responsive design is huge. You can use media queries to change how things look on smaller screens:
@media (max-width: 768px) {
  .hero-text {
    font-size: 24px;
    text-align: center;
  }
}
This tells the browser: “Hey, on tablets or smaller, make this headline smaller and centered.”
Hide elements you don’t want
Have an element on your page that’s bugging you and your theme won’t let you turn it off? You can just hide it:
.footer-credit {
  display: none;
}
Just use this responsibly – especially if you’re removing theme or plugin credits. Some licenses require attribution.
Animate or add visual flair
If you’re feeling adventurous, CSS can even add subtle animations:
.button {
  transition: background-color 0.3s ease;
}

.button:hover {
  background-color: #ff3300;
}
It’s a tiny detail, but it makes your site feel more interactive and polished.
💡 The best thing about custom CSS? You can start super small – like changing a link color – and grow into more complex stuff over time. Every little tweak you try builds your confidence.
And don’t forget, with Liquid Web, you’ve got staging environments to test everything safely before you go live.
WordPress CSS best practices and troubleshooting
To ensure your site remains efficient, maintainable, and performs well, it’s important to keep the following CSS best practices in mind:
- Avoid Inline CSS: Inline CSS is hard to maintain, doesn’t allow for reusability, and can cause performance issues since styles are not cached. It also disrupts separation of concerns (CSS should be separate from HTML).
- Use specific CSS selectors: Using overly generic selectors (like div or p) can lead to conflicting styles, especially in a large WordPress site with many plugins. This can cause unpredictable behavior and bugs. Instead, target specific elements using class names or IDs, especially those added by WordPress or the theme itself.
- Minimize the use of !important: The !important rule overrides other declarations, which can make your CSS harder to debug and maintain. Overusing !important can result in confusing, unmanageable stylesheets.
- Leverage CSS preprocessors (Sass or Less): CSS preprocessors like Sass or Less offer advanced features like variables, mixins, functions, and nesting, which improve code organization, maintainability, and readability. Set up a local development environment with a preprocessor, compile your Sass or Less into regular CSS, and add it to your theme. This can be automated using build tools like Gulp or Webpack.
- Keep CSS organized: As your site grows, it becomes easy to get lost in long, unorganized CSS files. Keeping your styles organized improves maintainability and readability. Group related styles together, use comments to label sections, and make use of logical file structure (e.g., separating layout, typography, colors, etc., into different files).
- Optimize for performance: Unoptimized CSS can slow down the website, affecting user experience and SEO rankings. Try minifying CSS, combining files, and removing unused CSS rules using tools like PurifyCSS or UnCSS to eliminate unnecessary styles.
- Responsive design and media queries: More people access websites from mobile devices than ever before. If your site isn’t optimized for mobile, it could lead to poor user experience and increased bounce rates. Use media queries to ensure your CSS is responsive and adapts to various screen sizes.
Getting started with custom CSS in WordPress
Custom CSS opens up a world of possibilities for customizing your WordPress website, allowing you to fine-tune the look and feel of your site beyond the limitations of your theme. Whether you’re adjusting fonts, buttons, layout, or responsiveness, CSS empowers you to create a site that reflects your brand and style perfectly.
With tools like staging environments available through Liquid Web, you can test your changes safely before going live, avoiding any “oops” moments.
Speaking of Liquid Web, when you’re ready to take your WordPress site to the next level, there’s no better hosting option. With robust features, excellent customer support, and optimized server performance, Liquid Web ensures your website runs smoothly while you focus on design.
Choose Liquid Web today and unleash the full potential of your WordPress site!
Additional resources
How to use your WordPress admin login page →
How to find, use, and troubleshoot your admin page
What is managed WordPress hosting? →
Discover what it covers and decide if it’s right for you
WordPress source control →
What does it mean and what are your options? Get all the details and get started