Leveraging caching with PWA for your Magento store setup
Progressive Web Apps (PWAs) are web applications that use modern web technologies and design patterns to deliver a user experience that is similar to native web applications. They’re quick, dependable, secure, responsive, and browser independent. They can function offline and on mobile devices as if they were native apps.
Get fast, reliable hosting for WordPress
Power your site with the industry’s fastest, most optimized WordPress hosting
Explain further please — if Magento is PWA-ready, what does that get you?
Progressive Web Applications (PWAs) provide tremendous value to companies and users alike by increasing site speed, delivering a customized user interface, and offering stronger security and greater flexibility for ongoing website management. Developers can use static site generators to launch highly engaging PWA storefronts that can then be connected to ecommerce platforms on the backend. PWAs offer a number of benefits: – Offline purchases – Push notifications – Standalone app experience – No marketplace submission/bureaucracy – Single code base for multiple platforms
Optimizing Magento performance to win over your ecommerce shoppers
In this article, you will learn about PWAs in the context of the Magento 2 platform for ecommerce. You will be able to better understand how the Magento PWA can help you optimize Magento performance when you take advantage of all the caching features available and recommended by industry experts among other enhancements:
- Magento performance optimization
- Everything you need to know about Magento PWA studio
- Creating a Magento PWA
About using Elasticsearch for your Magento platform
Although the focus of this article is the Magento PWA, a review of Magento optimization strategies would not be complete without mentioning Elasticsearch. Let’s summarize why it is important to include in your Magento ecommerce solution. Elasticsearch is so essential for the success of your store that for Magento 2.4 and above, Liquid Web now automatically bundles an Elasticsearch cloud container (size extra small — xs), which is billed separately at $10 per month ($70+ value). Of course, if your web traffic volume and performance needs grow larger, you can always upsize your Elasticsearch cloud container size with Liquid Web easily.
Why it’s a no-brainer to use Elasticsearch for speedy search results and catalog product pages
Do you want to serve up incredibly fast search results and catalog product pages to you web shopping audience? In addition to super-fast full-text searches, Elasticsearch provides quickly generated dynamic web content functionality because its indexing service runs on the server instead of searching the full database. Ensure that visitors to your Magento store will enjoy their shopping experience by leveraging Elasticsearch as the containerized search engine. Furthermore, Elasticsearch can be linked to Kibana for in-depth website analytics.
Introduction to Magento PWA
The Magento PWA Studio project is a collection of developer tools for creating, deploying, and maintaining a PWA storefront on top of Magento 2.3 and higher. In order to create a build system and framework that follow the Magento extensibility principle, it makes use of contemporary tools and libraries.
Pros of Magento PWA
Industry experts agree that the benefits of Magento PWA are significant: Exploring the features of Magento PWA — a deep dive
Fast speed
The loading time for PWA on a 4G network is less than 5 seconds. Additionally, PWA has a cache to prevent problematic and unsatisfactory website performance. In order to give your customers a better browsing experience, use Magento PWA.
Improved security
Payment security is one of the most important aspects of online shopping. Customers, in particular, are constantly concerned that their personal information will be compromised. As a result, they may be hesitant to use their credit or debit card in your online store. This issue can then be resolved using Magento PWA. You can improve payment security by integrating the Payment Request API into the browser.
Suitable for search engine optimization (SEO)
PWA can reduce the amount of time it takes for your page to load because it is so quick, and they have URLs that Google can index. These elements will surely assist to improve your SEO.
Extremely responsive
Users of mobile devices are multiplying dramatically, and most likely, they travel everywhere with their phones. So, more people are using their mobile devices to make purchases. PWAs have layouts that are responsive to all devices. As a result, you can rest assured that your website will look great on any device.
Offline functionality
People nowadays carry their phones with them everywhere. They might therefore want to buy something everywhere. On the bus, the train, etc. are a few examples. However, there are some locations with poor Internet connectivity. So in those circumstances, PWA is required. It will repeat the elements of the layouts stored in the browser cache using the cache API and unique scripts.
Cons of Magento PWA
Although the pros are quite extensive, there are a few drawbacks to using Magento PWA:
- Battery-consuming. It will be more challenging for the phones to process PWA because it is written in complex codes. As a result, PWA can use more battery power on your phone than native apps.
- Limited support for browsers and native API.
- It may also be unable to access certain features on your devices. Bluetooth, advanced camera control, and so on are examples.
When is Magento PWA necessary?
Consider your current circumstances carefully before deciding whether or not to use Magento PWA because it has both advantages and disadvantages. The following are some scenarios in which you should use Magento PWA:
- Using Magento PWA might be a better option if you don’t have much time for marketing.
- The conversion rate of your website has decreased.
- Your target audience prefers Android over iOS.
- Budget and resources are insufficient to create a native mobile app.
- Consider redesigning your eCommerce site.
- If you want to give your customers a better experience.
How can you implement Magento PWA?
By using Magento PWA Studio
If you’re looking for a practical way to implement Magento PWA, Magento PWA Studio will be the best option. Magento PWA Studio is actually a collection of Java-based development tools. It guarantees to give customers a PWA experience through a Magento solution. Your existing Magento 2 storefront will be replaced with Magento PWA Storefront. Then, using GraphicQL-based Magento APIs will communicate with your current Magento back end.
By using Magento extensions
Numerous extensions are available on the Magento Marketplace, all of which promise to give your website the capabilities of a Progressive Web App. However, it is critical to understand that extensions cannot magically enable smooth offline availability or improve page load times. For example, since the core front-end code that defines this functionality is fixed, extensions cannot change it.
By using a Magento PWA Storefront showroom
You can choose from a variety of Magento PWA Storefront demos, including those created by Magento and third-party developers. You can view those demos to see how the front ends for PWAs that have already been developed look and feel. They are “PWA Lumas” for your Magento in general, complete with attributes and a scalable layout.
About caching with PWA for your Magento store setup
In today’s highly competitive ecommerce space, PWAs can give you an edge by offering customers fast and responsive shopping experiences regardless of their device or network speeds. With Magento, one way you can maintain this advantage is by implementing caching for your PWAs. In this guide, we’ll cover how you can implement this feature during your Magento store setup.
What is caching?
In computing, caching describes the process of using a temporary data store to reduce network requests and improve performance. This storage area is called a cache — it holds frequently accessed data. So when a data request is made, it’s directed to that cache instead of the request going straight to the source. For websites and web applications, caching helps reduce the network traffic between client devices and host servers by storing web resources in a more accessible location. When setting up your Magento store, caching will help your PWAs load faster and be more responsive to customers shopping. However, there are two different ways you can implement caching in your Magento store configuration: server-side caching and client-side caching. We explain each type of caching the next sections in a general manner. Then, after we learn how to set up our new store, we will dive into the specifics of optimizing each type of caching for you Magento 2 store setup.
Server-side caching
Serve-side caching temporarily stores data and web files on a remote server that’s different from the one which these files originated from. Usually, a webpage request from a user is sent by their browser to the host server for that website. The host server pulls together the components needed to generate the right webpage and then sends it back to the user’s browser. When server-side caching is implemented, a copy of the assembled webpage is created and stored on the server. When the subsequent request for that page is made, the server responds by immediately loading the cached copy of the page rather than spending time reassembling the page again from its components.
Client-side caching
Client-side caching is also referred to as browser caching. In this scenario, the cache of web files and resources is stored locally on the client’s device after a request has been made and responded to. So, the next time the client requests a webpage, the browser checks to see if any of the resources for that page are cached locally. If they are, the browser loads those resources from the local storage. This operation is much faster than loading them from a remote server.
Setting up a new Magento store
A single Magento Open Source installation can support multiple stores from the same Magento Admin Dashboard. The checkout process is the same across all stores that are part of the same website, and they all use the same security certificate, IP address, and domain. The fact that the stores share the same Magento Admin Dashboard and use the same code is crucial to comprehend. There are two options: either each store can have its own catalog, or all stores can use the same catalog. It is possible to create a unique main menu for each store by allowing each to have its own root category. Before you can leverage caching, you need to set up your Magento store. Follow these steps to get started.
1. Choose a domain name and Magento plan
You can purchase a domain name for your Magento store setup from Liquid Web. Next, choose from our fully managed Magento hosting plans. You also can enable Auto Install Magento option while purchasing a plan to automatically install Magento.
2. Create a website
If you wish to create a website that doesn’t share cart data, shipping options, payment methods, etc., with the default website, you must create a new website. To create a new website, you can follow these steps: 2a. First, from your Magento Admin Panel, go to Stores > Settings > All Stores. 2b, Click the button to create a website, then enter the requested details for the new website:
- Name: Enter a name for the website.
- Code: Enter a unique code. For example, if you run a French store, you could type in french.
- Sort Order: Enter a numerical sort order, if desired.
2c. Remember to save your progress.
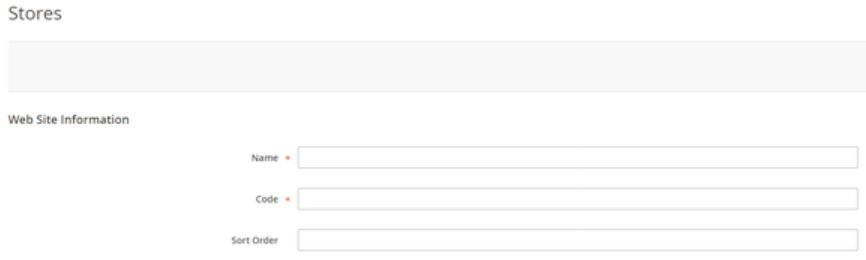
3. Create a new store
To create a new store, you can follow these steps: 3a. From your Magento Admin Panel, go to the All Stores page. 3b. Click the button to create a store and enter the requested details for the new store:
- Website: Choose the website with which you want to associate this store.
- Name: Enter a name for the store. Code: To locate the store, enter a code in lowercase characters.
- Root Category: Set to the root category that establishes the structure of categories for the new store’s main menu. Select the store’s root category if you’ve already created one. Alternatively, select Default Category. You can update the setting when you return later. Click Save Store.
3c. Save your progress before you move on.
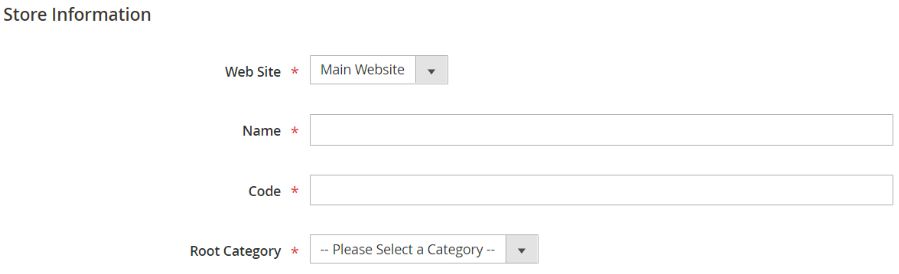
4. Create a default store view
To create a default store view, you can follow these steps: 4a. As in the previous steps, navigate to the All Stores page in your Magento Admin Panel. 4b. Click the button to create a store view, then enter the requested information the new store view:
- Store: Choose the store with which you want to associate this store view.
- Name: Enter a name for this store view.
- Code: To identify this store view, type a unique name.
- Status: Select Enabled.
- Sort Order: Enter a numerical sort order if desired.
4c. Remember that for the Status dropdown picklist, you must have selected Enabled. 4d. Save before you move on to the next step.
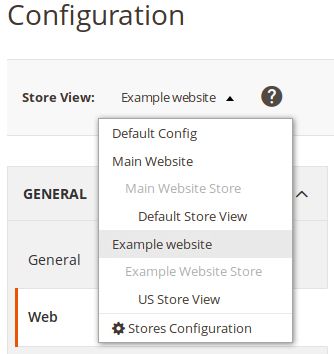
5. Configure the Store Base URL
To configure the Store Base URL, you can follow these steps: 5a. From your Magento Admin Panel, go to Stores > Settings > Configuration. 5b. Under the General section, click Web. 5c. Select the correct store the Store View list:
5d. Expand the Base URLs section and enter the base URL for the store. For example, the URL may look like https://subdomain.example.com:
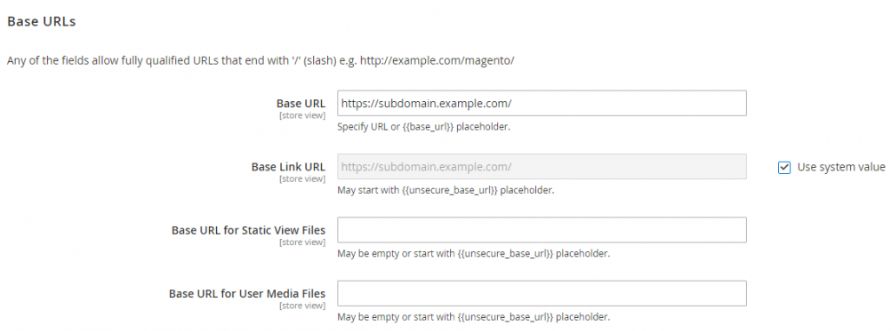
5e. Save your progress before moving on.
6. Add the store code to the Store Base URL
It’s easier to set up multiple stores when using Magento because you can add the store code to the Store Base URL. With this method, you can store index.php and .htaccess without creating directories on the Magento file system. In addition, by doing this, future upgrades to Magento will not cause index.php and .htaccess to become out of sync. Here’s what you need to do: 6a. In your Magento Admin Panel, go back to the Configuration page. 6b. Under the General section, click Web. 6c. Select the store from the Store View list. 6d. Next, expand the URL Options section:
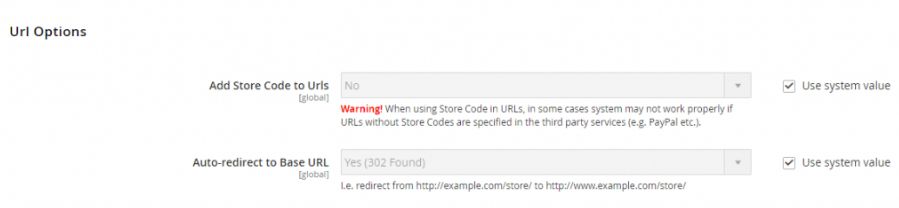
6e. Set the Add Store Code to URLs field to Yes after unchecking the Use System Value checkbox to the right of the field. 6f. Save to apply the changes.
Optimal Magento 2 PWA store setup, including Venia Storefront, Varnish Cache, and caching from a CDN
Now that you have finished the basic Magento store setup, you can implement a number of options to ensure that your store’s PWAs employ caching correctly.
Client-side caching with the leverage browser caching settings for Apache and NGINX web servers
How to enable leverage browser caching for Apache?
Leverage Browser Caching can be added to your Magento 2 website using the .htaccess file in two ways:
- via mod_expires
- or via mod_headers
To update the cache, you must specify a date. Simply add this code to the .htaccess file in the document root directory of your Magento 2 installation:
# Leverage browser caching using mod_expires # ExpiresActive On ExpiresByType image/jpg "access plus 1 year" ExpiresByType image/jpeg "access plus 1 year" ExpiresByType image/gif "access plus 1 year" ExpiresByType image/png "access plus 1 year" ExpiresByType text/css "access plus 1 month" ExpiresByType application/pdf "access plus 1 month" ExpiresByType text/x-javascript "access plus 1 month" ExpiresByType application/x-shockwave-flash "access plus 1 month" ExpiresByType image/x-icon "access plus 1 year" ExpiresDefault "access plus 2 days" # End of Leverage browser caching using mod_expires #
However, if you have a shared server and do not have access to mod_expires, you can use mod_headers to take advantage of browser caching. Please use the following code:
# Leverage browser caching using mod_headers # <FilesMatch ".(ico|pdf|flv|jpg|jpeg|png|gif|js|css|swf)$"> Header set Expires "Wed, 15 Apr 2020 20:00:00 GMT" Header set Cache-Control "public" # End of Leverage browser caching using mod_headers #
How to enable leverage browser caching for NGINX?
You can add this code to the server block of your NGINX server configuration file to enable Leverage caching:
#browser caching of static assets location ~* .(jpg|jpeg|png|gif|ico|css|js)$ { expires 7d; }Client-side caching with Venia Storefront
Venia Storefront is an official storefront that Magento built in collaboration with the community. It was developed as a part of Magento’s switch to PWAs. It uses client-side caching to enable some advanced features, like offline mode for your store. Venia caches data using service workers. These are JavaScript (JS) files that intercept network requests and use preconfigured strategies to either fetch cached data or store new data based on user requests. Some page requests sent from the Venia storefront can also be cached using GraphQL queries with full-page rendering. Our excellent guide covers how to install the Venia Storefront on your existing Magento store setup.
Server-side caching with Varnish cache (“Varnish”)
Varnish is a web application accelerator that can speed up the delivery of webpages via caching. Typically, it’s installed in front of your web server to intercept traffic between the server and clients. This Magento store setup allows Varnish to cache HTTP content from your web server and deliver it speedily to client requests that require a response identical to the cached content. Varnish can be used with Magento to cache content-heavy ecommerce sites, improving their performance for the customer. If you’re running a self-hosted instance of Magento, you can configure Varnish on your web servers directly. However, if you’re running a managed instance of Magento with Liquid Web, you can enable Varnish right from your account dashboard before activating it in your Magento store configuration.
Caching with a content delivery network (CDN)
Content Delivery Networks (CDNs) are a well-known way of optimizing the web content delivery process for your website visitors. They use a network of geographically distributed servers to cache web files and ensure that requests for those files get a response from the closest server on the network. A CDN will lessen the load on your Magento server while improving the performance of users’ PWAs worldwide. Liquid Web includes CDN access with all Managed Magento hosting plans. This infrastructure grants you access to remote servers in 285+ global locations that can cache your ecommerce website.
Optimal Magento 2 PWA store configuration settings, including key components and options
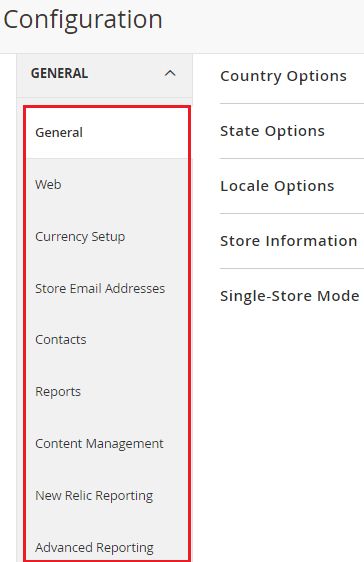
The Magento store configuration settings offer several options that change the store’s used components. In the following sections, we will focus on those configuration settings that should be reviewed and modified to allow the best performance for Liquid Web customers:
- General
- Catalog
- Customer
- Sales
- Advanced
1. General
The General section contains subsections of Country Options, State Options, Locale Options, Store Options, and Single-Store Mode:
1a. General
Country Options Expand the Country Options and uncheck the Use System Value checkbox on the right side. Enter your country both in the Default Country field and the field labeled Allow Countries from which we’re willing to accept orders. Using the CTRL key with mouse clicks, you can select multiple countries. The other fields should remain unchanged:

- Default Country: Select your default country.
- Allow Country: By default, all countries are allowed. We can remove the country as per our requirements.
- Zip Postal Code: Do not need to change.
State Options Because the country has changed, the State Options are no longer necessary (depends on if the country selected has states):

- State is Required for: No need to change.
- Allow to Choose state if it is Optional to Country: Choose Yes or No.
If the State Options are enabled for your country, please fill in the corresponding fields. Locale Options The Magento store setup screen allows you to change the timezone. As a result, there is no need to make any changes to State Options or Locale Options:

- Timezone: Timezone of your Magento store.
- Locale: Default Language
- Weight Unit: The weight unit will be applied during both the shipping process and in your Magento store.
- First Day of Week: Choose the first day of the week as per your requirements.
- Weekend Days: Choose weekend days as per your requirements.
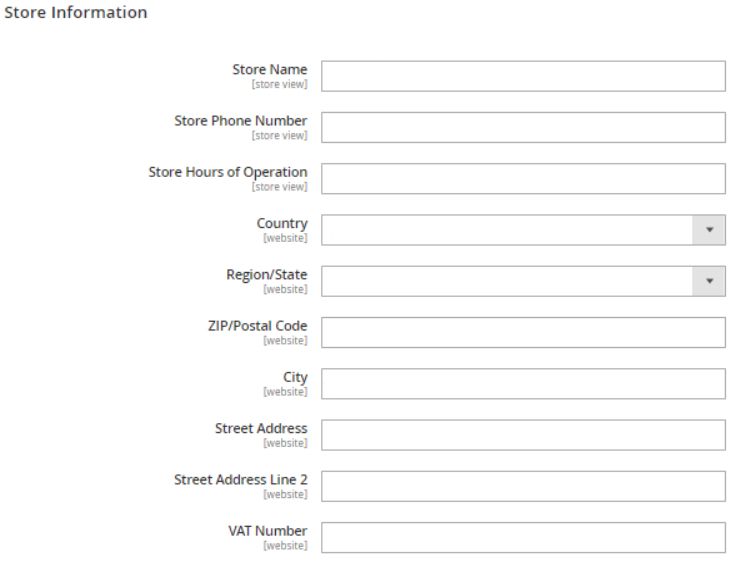
Store Information You can add the current information of your Magento store setup in the Store Information section:
Single-Store Mode If there aren’t many languages or store views for customers to choose from, you can set the Enable Single-Store mode value to Yes:
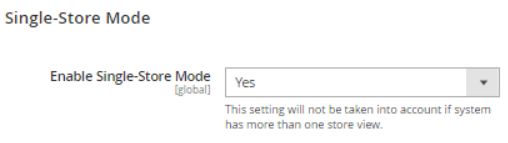
It will provide adequate performance optimization. You can disable it if your Magento store setup supports multiple languages.
1b. Web
URL Option Nothing needs to be changed here. Search Engine Optimization (SEO) If you want Search Engines to crawl and index your website, you can set the Use Web Server Rewrites value to Yes:

Base URLs (Secure) The Base URL (Secure) area will be used to qualify the URLs. It has two important field options:

- Use Secure URLs on Storefront: Set the value to Yes, if you only want to access your storefront via HTTPS.
- Use Secure URLs in Admin: It’s the same as it is in the frontend. In order to secure the store’s admin with SSL, set this value to Yes as well.
Default Pages In most cases, this option will be left as the default. However, you should be aware of these provided options in order to avoid potential issues:
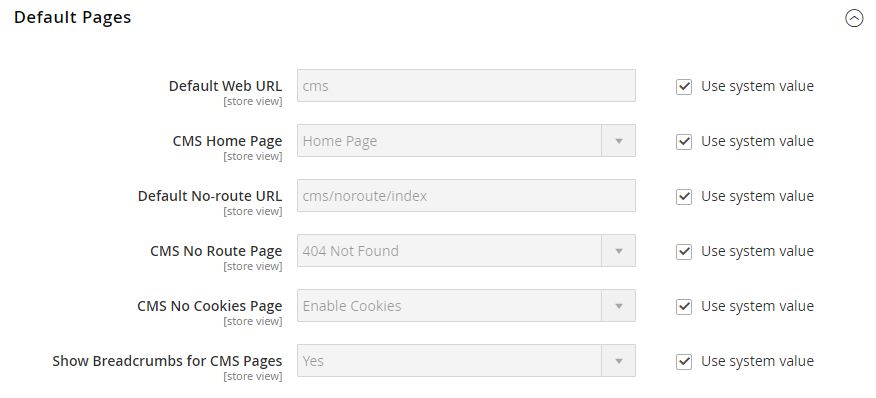
- Default Web URL: The default Web URL of your Magento store setup. CMS Home Page: The default is the Home page.
- Default No-route URL: The default No-route URL (cms/route/index).
- CMS No Route Page: 404 Not Found by default.
- CMS No Cookie Page: The Default is Enable Cookie.
- Show Breadcrumbs for CMS Pages: By default, it is Yes.
Default Cookie Settings We need to think about checking this Default Cookie Setting option. Certain countries, such as the United Kingdom or European countries, require us to notify them if our website accepts cookies. It is required by law there. As a result, we should enable Cookie Restriction Mode. To enable Cookie Restriction Mode, uncheck the Use System Value checkbox and select Yes in the Cookie Restriction Field. Depending on your needs, you can enable or disable Cookie Restriction Mode because it is not required in some nations:

1c. Currency setup
We will now proceed to the next stage, which is currency setup. We will need to choose your base currency here:
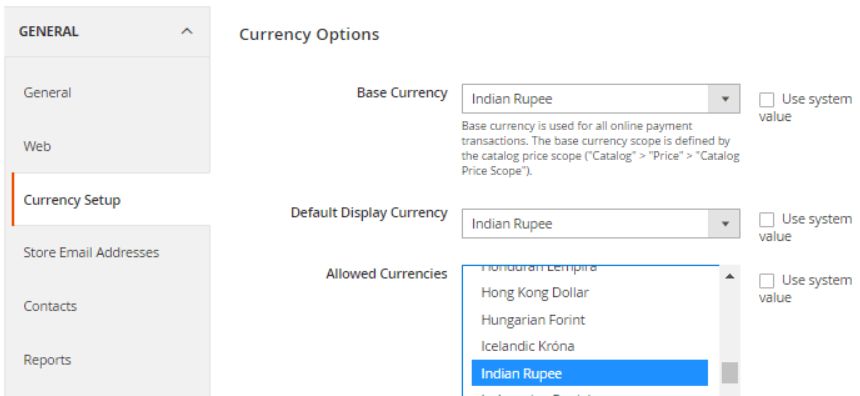
- Base Currency: The base currency is the currency that is used in all online payment transactions. If our website has multiple store views, the catalog price scope determines the base currency scope. While installing Magento 2, we select the currency in the fourth step of the Customization of Magento store se
Additional resources
Magento product recommendations →
Boost sales with product recommendations that guide shoppers to related items.
Magento security guide: 11 best practices →
Strengthen your store with practical security best practices.
Best abandoned cart email solutions for Magento 2 →
Recover lost sales with abandoned cart emails.