
How to configure multiple storefronts in Magento 1
Key takeaways:
- Magento 1 can run multiple storefronts from one installation using websites, stores, and store views.
- Each storefront needs a unique code, base URL, domain setup, and server routing.
- MAGE_RUN_CODE and MAGE_RUN_TYPE help Magento load the correct storefront.
- Test DNS, SSL, cache, categories, products, checkout, and customer login before launch.
This method works only with Magento 1.x. For Magento 2, see How to configure Magento 2 storefronts.
A Magento website may consist of one or multiple storefronts. These storefronts manage showcase products, categories, and search functionality. It is possible to configure multiple Magento storefronts for the same website.
Configuring multiple storefronts in Magento 1 takes two main steps. First, create the website, store, and store view in the Magento Admin Panel. Then, configure the server so each domain loads the correct storefront.
Host Magento at full throttle.
Get secure, reliable Magento hosting so you can scale faster.
What are multiple storefronts in Magento 1?
Multiple storefronts in Magento 1 is a setup that lets one Magento installation support more than one customer-facing store. Businesses may use this setup for different brands, product catalogs, languages, regions, or domains.
A Magento 1 multistore setup can include separate websites with their own domains, stores with different root categories, store views for different languages or display settings, and domains, subdomains, or directories that point to one Magento installation.
Magento 1 hierarchy: website, store, and store view
Before creating a new storefront, it helps to understand Magento’s structure.
| Level | What it controls |
| Website | Top-level container for domains, customers, carts, and base URLs |
| Store | Connects a website to a catalog root category |
| Store view | Controls language, display, and customer-facing view |
Most Magento 1 multi-domain setups start by creating a new website, then a store, then a store view.
Before you configure multiple storefronts in Magento 1
Before you start, confirm the domain, subdomain, or directory structure you want to use. You should also have DNS access, server or hosting control panel access, FTP/SFTP/SSH access, and the SSL certificate details for each storefront.
Also write down the website codes and store view codes you plan to use. These codes matter later because the server uses them to load the correct storefront.
Back up the site files and database before making configuration changes. If you have a staging environment, test the setup there first.
Step 1: create a root category if needed
If your new storefront will use a different catalog, create a new root category first. If all storefronts will share the same catalog and products, you may be able to skip this step.
The first step in setting up multi-store functionality is to create the new store or stores in the Magento Admin Panel.
- Log in to the Magento Admin Panel. If you want your stores to share the same catalog and products, skip to Step G.
- In the top menu, go to Catalog > Manage Categories.
- Click Add Root Category.
- In the Name field, enter your new store name.
- Under Is Active, select Yes.
- Under Display Settings, in Is Anchor, select Yes, and select Save Category.
Step 2: create a new website in Magento 1
- Go to System > Manage Stores.
- Click Create Website.
- In the Name field, enter your new store name. In the Code field, enter a unique string without spaces and write this code down for later use. Click Save Website when ready.
The website code is important; you may use it later as the MAGE_RUN_CODE value when configuring the server.
Step 3: create a new store
- Click Create Store.
- In the Website field, select the website that you just created.
- In the Name field, type a name for your store.
- In the Root Category field, select the root category that you created above, or use the default Root Category if you skipped to Step G earlier.
- Click Save Store when ready.
The store connects the website to the catalog structure.
Step 4: create a new store view
- Click Create Store View.
- In the Store field, select the store you just created.
- In the Name field, give your view a name. This is typically “English.”
- In the Code field, enter a unique string to identify the store view.
- Change the Status to Enabled.
- Click Save Store View when ready.
Store views are often used for different languages or customer-facing versions of the same store.
Step 5: configure the storefront base URLs
- Go to System > Configuration.
- In the Current Configuration Scope drop-down list, select the website that you just created.
- Select the Web menu option, and click to expand the Unsecure and Secure sections, respectively.
- For each section, clear the Use Default check box next to the Base URL and type the URL for your store, including the trailing slash.
- Click Save Config.
Example base URLs:

http://secondstore.com/
Use the correct trailing slash. Also confirm that the secure base URL matches the SSL certificate for that domain.
Step 6: point the domain or subdomain to the server
Magento Admin setup alone doesn’t make the new storefront load. The domain, subdomain, or pointer domain also needs to point to the correct server and webroot.
Check:
- DNS records
- A records or CNAMEs
- Add-on, secondary, or pointer domain settings
- The document root or webroot
- DNS propagation
- SSL coverage for the domain
If the domain points to the wrong server or directory, Magento may load the wrong storefront or fail to load at all.
Step 7: configure the server to load the storefront
After store creation, you must configure the server to load the correct store. There are several methods for doing this. The two most popular methods are presented below.
The method you choose depends on your hosting setup. Some stores use separate directories and secondary domains. Others point multiple domains to the same Magento installation and use server variables to load the correct storefront.
Method 1: use separate directories with secondary domains
The first method is the older of the two and will work for any version of Magento.
Use this method when each storefront has its own document root or secondary domain setup.
- Verify your chosen domain name points to the server.
- Follow the instructions provided in How to create a secondary domain to create a secondary domain for your new store.
- Using either FTP or SSH, copy the .htaccess and index.php files from your Magento installation to the document root of your new domain.
- Open the index.php file that you just copied over and edit the last line of the file as follows:
ATTENTION: Change newstore to the code that you wrote down when you created the new website above.

- Finally, using SSH, create the following symbolic links in the document root of your new domain, and replace the path below with the full path to the document root of your Magento Installation:
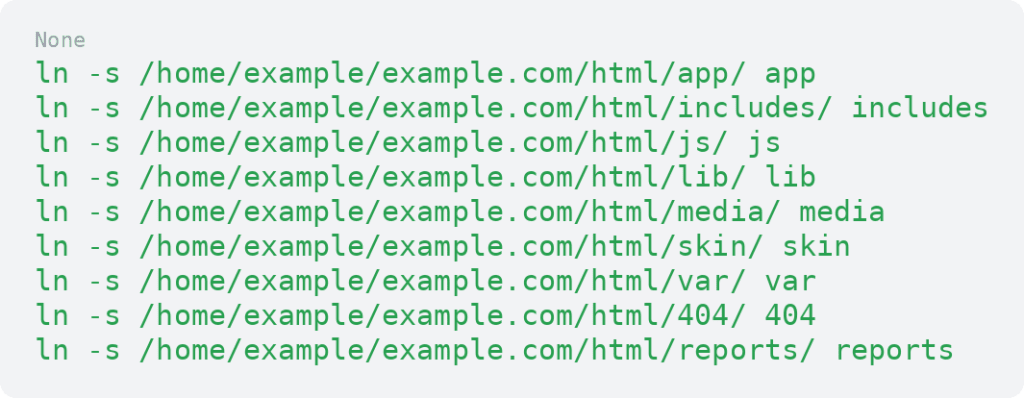
You have successfully configured your secondary domain to work with Magento. You may now load your new domain in your browser and begin developing your new store.
Method 2: use a shared directory with pointer domains
The second method takes advantage of changes made to the index.php file introduced in version 1.4.0.1.
ATTENTION: This method works only for Magento versions 1.4.0.1 and higher.
Use this method when multiple domains point to the same Magento webroot.
If you are configuring a multi-store on a server running the PHP-FPM service and use the pointer domain method outlined below, you will likely require support from our support team.
We will adjust the server’s Apache vhost configuration file to properly redirect your site to the correct storefront. We generally refer to this as the “FPM fix,” and we suggest contacting our support team to request this fix if you are experiencing issues with your Pointer Domain multi-store on a PHP-FPM server.
- Follow the instructions provided in How to create a pointer domain to create a server alias pointer domain for your new store. The pointer domain will be pointing at the primary domain of your Magento installation.
- Edit the .htaccess file in the document root of your Magento installation and enter the following just above the line RewriteEngine On.
- Replace .*newstore.* with the domain name of your new store, keeping the dots and stars.
- Ensure that MAGE_RUN_CODE matches the code you wrote down when you created the new website above. newstore specifies the domain name of your new store, and websitecode specifies the store code created in Magento.

For most multi-domain website setups, MAGE_RUN_TYPE is usually:

Use store only when your setup specifically needs Magento to load a store code instead of a website code.
You have successfully set up your pointer domain to work with Magento. You may now load your new domain in your browser and begin developing your new store.
If SetEnvIf fails
On some servers, particularly those running Litespeed Web Server, the SetEnvIf directive does not get recognized in the .htaccess file. If method 2 fails to configure multiple storefronts, try the following:
- Edit the .htaccess file in the document root of your Magento Installation.
- Type the following text just below the line #RewriteBase /magento/.

Verify that .*newstore.com matches the domain name of your new store. Also verify that MAGE_RUN_CODE matches the code you wrote down when you created the new website.
NGINX routing note
If your Magento 1 store runs on NGINX, routing will depend on your server configuration. Your developer or hosting provider may need to map each domain to the correct Magento website code inside the server configuration.
Example:

Adapt this carefully to your server setup. After changes, test the configuration and reload NGINX.
SSL and HTTPS considerations for multiple storefronts
Each domain or subdomain needs SSL coverage if the storefront uses HTTPS.
Depending on your setup, you may need a single-domain certificate, wildcard certificate, or SAN certificate that covers multiple domains. Also make sure each storefront’s secure base URL matches the correct domain.
After setup, test HTTPS, redirects, checkout, account login, and mixed content warnings for each storefront.
Flush cache and reindex if needed
After configuring multiple storefronts, clear Magento cache so the new settings can take effect.
- Go to System > Cache Management.
- Flush Magento cache.
- Clear server or CDN cache if used.
- Reindex if category or product data does not display correctly.
Base URL changes, scope settings, and storefront routing may not display correctly until cache clears.
Test each Magento 1 storefront
Before launch, test each storefront carefully.
Check:
- Each domain loads the correct storefront
- HTTP and HTTPS load correctly
- Base URLs are correct
- Root category and navigation display correctly
- Product pages work
- Product visibility is correct
- Store switcher works if used
- Customer login works
- Cart and checkout work
- Payment and shipping methods display correctly
- Transactional emails use the right store identity
- Cache does not show the wrong storefront
- Admin configuration scope is correct
SEO considerations for Magento 1 multiple storefronts
Multiple storefronts can create SEO issues if the same content appears across different domains, store views, or catalogs.
Review unique titles, meta descriptions, canonical tags, XML sitemaps, robots.txt settings, and store-view-specific content where needed. If storefronts target different languages or regions, review whether hreflang is appropriate.
Avoid copying the same pages across storefronts without a clear SEO strategy.
Magento 1 support note
Magento 1 is no longer the current Magento release line, but some stores still need to maintain existing Magento 1 environments. If you are configuring multiple storefronts in Magento 1, use backups, staging, careful server routing, and reliable hosting support.
Magento 1 multiple storefronts FAQs
Getting started with Magento 1 multiple storefronts
Magento 1 multiple storefront setup requires both Magento Admin configuration and server routing.
Start by mapping your storefront structure before creating the website, store, and store view.
Magento 1 multistore setups need reliable hosting, correct server routing, DNS, SSL, caching, and support. Liquid Web Magento hosting gives store owners the infrastructure and help they need to manage complex Magento setups with confidence. Explore Liquid Web Magento hosting to find the right fit.
Ready to get started?
Get the fastest, most secure Magento hosting on the market
Additional resources
10 Magento integrations you need to know about →
Easily connect with useful integrations to improve store operations.
How to create a custom Magento 2 maintenance page →
Customize maintenance mode with a branded maintenance page.
8 strategies to optimize Magento 2 speeds →
Discover how to improve speed with proven optimization strategies.