
How to limit access to the Magento Admin Panel
Key takeaways
- Limit Magento Admin access with layered security.
- IP restrictions, user roles, 2FA, and security settings protect sensitive store controls.
- Changing the Admin URL can reduce automated login attempts, but it shouldn’t be the only protection.
- Keep a recovery path available so you don’t lock out your team.
All Magento online store owners desire to improve the security of their Magento store. Preventing access to your Magento Admin Panel is an easy and effective way to decrease security vulnerabilities. But how do you restrict access to the Magento Admin Panel, and why would you want to do this anyway?
This article will explain how to control and limit access to the Magento Admin Panel and secure your Magento store to keep it running smoothly.
Host Magento at full throttle.
Get secure, reliable Magento hosting so you can scale faster.
Why limit access to the Magento Admin Panel?
The Magento Admin Panel controls important parts of your store, including products, orders, customers, users, settings, extensions, and payment-related configuration. If the wrong person gets in, they can make changes that affect store security, customer data, checkout, and revenue.
Before you change Magento Admin access settings
Before you restrict access, make sure you have a recovery path. Admin security changes can lock out legitimate users if an IP address changes, a 2FA device becomes unavailable, or a server rule blocks the wrong path.
Confirm the current Admin URL, identify trusted IP addresses, and make sure you have SSH, hosting control panel, or server access before changing server-level rules. Back up configuration files before editing Apache or Nginx settings, and make sure at least one trusted admin can recover access if something goes wrong.
Why change the default Admin URL?
The default admin URL is https://www.yourdomain.com/admin. However, because the Magento store’s domain name is publicly visible, hackers can easily guess the store admin URL.
The default Magento store admin URL has two parts:
- The store domain name.
- The admin path.
The admin path is a portion of the admin URL that appears after the last slash of the default base URL, such as:

A custom Admin URL helps, but it should not be your only protection. Use it with Admin security settings, IP restrictions, user roles, 2FA, and server-level controls where appropriate.
Method 1: Configure a custom Admin path
You can change the Magento admin default URL by following the steps below.
Open the /app/etc/env.php file and examine its contents.
Default Admin path:

Change the value of the frontName parameter of the backend section.
New Admin path:

Save the file and clear the Magento cache.
Choose an Admin path that is hard to guess, and store it in a secure place for approved admins. Avoid obvious paths such as /admin, /backend, /storeadmin, or your company name.
Method 2: Update Admin security settings
Follow these steps to open the Magento Security tab and modify the details found on it:
- From your Magento Admin Panel, go to Stores > Settings > Configuration.
- Under the Advanced section, select the Admin option.
- Then, navigate to the Security section, found under the Admin area.
Use these settings to reduce risky login behavior:
- Set the Admin Account Sharing field’s value to No to stop anyone from using the same account to log in from many devices.
- Set the Password Reset Protection Type to one of the available options to specify how password reset requests are handled.
- Enter how long a password recovery link will be usable in the Recovery Link Expiration Period field.
- Enter the Max Number of Password Reset Requests to determine how often a password reset request can be submitted per hour.
- Enter the minimum amount of time that must elapse between password reset requests in the Min Time Between Password Reset Requests section.
- Set the Add Secret Key to URLs value to Yes to add a secret key as a security measure to the admin URL. This option is turned on by default.
- Set Login is Case Sensitive to Yes to demand that the uppercase and lowercase characters used in any login credentials entered match those that are saved in the system.
- Enter the session’s duration in seconds in the Admin Session Lifetime field.
- Enter how often a user can attempt to log in to the admin URL before the account gets locked in the Maximum Login Failures to Lockout Account area.
- Enter how many minutes an admin account will be locked after the allotted number of tries in the Lockout Time field.
Next, you’ll set your password options:
- Enter for how many days a password is valid in the Password Lifetime area to restrict how long admin passwords can be used.
- Choose one of the available Password Change settings.
- Once everything is added, click the Save Config button.
These settings help reduce account sharing, password reset abuse, long-lived sessions, repeated login attempts, and weak password practices.
Method 3: Restrict Admin access by IP address
IP restrictions work best when Admin users connect from static IP addresses. If your team has dynamic IPs, consider a VPN that provides a dedicated static IP before you apply strict allow rules.
Restrict IP addresses in Apache
You can restrict IP addresses in Apache by adding the following code in your .htaccess file:

If you are using a custom admin URL, you can use the following code to restrict the IP address:

Restrict IP addresses in Nginx
You can restrict IP addresses in NGINX by adding the following code in your nginx.conf file:

If you’re using a custom admin URL, you can use the following code to restrict the IP address:
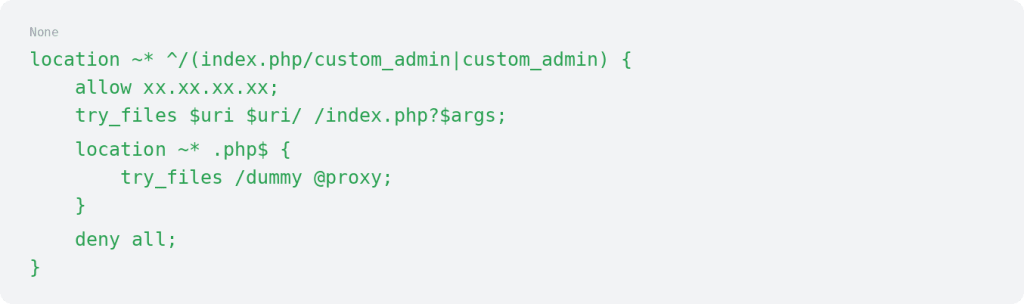
Replace xx.xx.xx.xx with your IP addresses and custom_admin with your custom admin URL.
Test allowed and blocked access after you change server rules. Keep SSH or hosting control panel access available in case a rule blocks a trusted admin by mistake.
Method 4: Set restrictive user roles
Use the principle of least privilege. Give each user the access they need to do their job, not full Admin access by default.
Here’s how to set up a user role in Magento 2:
- From your Magento Admin Panel, go to System > Permissions > User Roles.
- You can find the list of current user roles, which you can edit.
- Click on the Add New Role button to add a new user role.
- Under the Role Information area, enter the name of the user role in the Role Name field.
- Enter the current password of the user you are currently logged in as in the Your Password field.
- Under the Role Resources tab, choose the resources that the admin user will have access to.
- Once everything has been completed, click the Save Role button.
For example, a designer may need access to CMS pages and blocks but not customer or order data. A support user may need order tools but not system configuration. A marketing user may need promotions and content access but not payment settings.
Method 5: Enable two-factor authentication
The second factor is typically a code retrieved via SMS or an authenticator app like Google Authenticator, Authy, or Duo Security.
Store administrators can use the browser extensions of these 2FA apps if they own a smartphone that cannot run them. A store may also set up a 2FA USB device (U2F device), such as a YubiKey, which Magento supports.
To configure your required 2FA provider(s), follow the steps below:
- From your Magento Admin Panel, go to Stores > Settings > Configuration.
- Click on the Security tab and select 2FA.
- Under the General section, click on Provider(s) to use.
- Fill in the settings for each required 2FA method.
- Once everything has been completed, click the Save Config button.
- If required in the future for legitimate reasons, refer to the steps for disabling 2FA temporarily.
2FA doesn’t replace IP restrictions or user roles. It protects the login process, while other controls limit who can reach the login page and what users can do after they sign in.
Method 6: Use CAPTCHA or reCAPTCHA for Admin login
CAPTCHA or reCAPTCHA can help reduce automated login attempts against the Magento Admin Panel. It is most useful when attackers or bots repeatedly try to guess credentials.
Use CAPTCHA as a supporting control. It should work alongside strong passwords, lockout settings, 2FA, IP restrictions, and limited user roles.
Method 7: Review Admin action logging
Admin action logging helps teams understand what happened inside the Admin Panel after a user signs in. This can help with troubleshooting, accountability, and security reviews.
Adobe Commerce includes more native Admin action logging than Magento Open Source. Magento Open Source stores may need an approved extension or another logging process, depending on security requirements.
Method 8: Use Website Restriction Mode carefully
Website Restriction Mode controls customer-facing website access. It can help with private sales, gated storefronts, or pre-launch access, but it does not replace Admin Panel controls such as IP restrictions, 2FA, user roles, or server-level rules.
To enable the Restriction Mode, you can follow the steps below:
- From your Magento Admin Panel, go to Stores > Settings > Configuration.
- Click on General > Click on the Website Restrictions section.
- Set Access Restriction to Yes.
- Set the Restriction Mode to Private Sales: Login Only or Private Sales: Login and Register.
- Set Startup Page to To login form (302 Found) or To landing page (302 Found).
- Select the Landing Page that will present before customers check in to the private sale site.
- Set HTTP Response to 200 OK to notify search engine bots and spiders that the landing page is correct and that there are no additional pages on the website to index.
- Enable Yes on Autocomplete on login/forgot password forms if you want the fields in the customer login and forgot password forms to be populated with information from previous entries automatically.
- Once everything is completed, click the Save Config button.
Magento Admin access control comparison
| Method | What it protects | Best for | Limitation |
| Custom Admin URL | Reduces automated scans against default paths | Basic Admin URL hardening | Does not stop users who know the URL |
| IP restrictions | Limits who can reach the Admin login page | Teams with static IPs or VPN access | Can lock out admins if IPs change |
| Server-level rules | Blocks access before Magento handles the request | Stronger access control at the web server level | Requires Apache or Nginx access |
| 2FA | Adds a second login factor | Protecting against stolen passwords | Does not control what a user can access after login |
| User roles | Limits Admin permissions after login | Teams, vendors, agencies, and support users | Requires regular review |
| CAPTCHA or reCAPTCHA | Reduces automated login attempts | Brute force and bot protection | Should not replace 2FA |
| Admin action logging | Shows what users did after login | Audits and troubleshooting | Features vary by Magento edition |
| Website Restriction Mode | Restricts customer-facing site access | Private sales or gated storefronts | Does not replace Admin access controls |
What to do if you get locked out of the Magento Admin Panel
Admin lockouts can happen after a wrong Admin URL change, IP restriction, 2FA issue, user role change, failed login lockout, or server-level allow/deny rule.
Use your recovery access first. Check SSH, hosting control panel access, backups, or support channels to review the setting that caused the lockout.
Post-change testing checklist
After you apply Admin access restrictions, test access before you consider the work complete.
- Confirm trusted IPs can reach the Admin login
- Confirm untrusted IPs cannot access restricted paths
- Confirm 2FA works for Admin users
- Test a limited user role
- Confirm session timeout and lockout settings work as expected
- Confirm at least one trusted admin can still access the Admin Panel
- Review logs after the changes
When to ask for support
Ask for support before changing server-level restrictions, firewall rules, VPN access, Nginx or Apache configuration, or lockout-sensitive Admin settings.
Support can help review IP restrictions, server rules, backup access, Admin configuration, and recovery options before changes block legitimate users.
Magento Admin Panel FAQs
Magento Admin Panel next steps
Limiting access to the Magento Admin Panel works best when you use layered protection. Restrict who can reach the login page, require stronger authentication, limit user permissions, and keep a recovery path available.
Start by reviewing current Admin users and roles. Confirm who truly needs access before you change IP restrictions, server rules, or other settings that could lock out your team.
If Admin access controls, firewall rules, or server-level restrictions affect a live store, explore Liquid Web Magento hosting.
Related articles
- Magento maintenance — five tasks that will keep your store running smoothly
- Magento 2 go-live checklist — turning on your site!
- Magento 2 help — frequently asked questions
- Liquid Web Cloud plans — how to view your admin URL
- Optimizing Managed WordPress using the W3 Total Cache plugin
- How to configure the Liquid Web CDN using the WordPress CDN Enabler by KeyCDN
Ready to get started?
Get the fastest, most secure Magento hosting on the market
Additional resources
How to reset Magento 2 admin passwords →
Learn to reset your admin password to regain secure store access.
How to change base urls in Magento 2 →
Update base urls to keep store pages loading correctly.
A guide on how to cancel orders in Magento 2 →
Manage orders by canceling orders from the admin panel.